Table of Contents
Advertisement
Quick Links
Advertisement
Table of Contents

Related Manuals for Sony BKDM-3020


Summary of Contents for Sony BKDM-3020
- Page 1 DIGITAL MULTI EFFECTS DME-3000/7000 DME CONTROL PANEL BKDM-3010 BKDM-3020 BKDM-3021 BKDM-3022 BKDM-3023 BKDM-3030 BKDM-3040 BKDM-3050 BKDM-3060 BKDM-7031 BKDM-7041 BKDM-7060 BKDM-7070 BZDM-3010 BZDM-3020 BZDM-7010 BZDM-7020 MAINTENANCE MANUAL Part 1 1st Edition...
- Page 2 Pour toute réparation faire appel à une personne compétente uniquement. DME-3000 Serial No. 10001 and Higher DME-7000 Serial No. 10001 and Higher BKDM-3010 Serial No. 10001 and Higher BKDM-3020 Serial No. 10001 and Higher BKDM-3021 Serial No. 10001 and Higher BKDM-3022 Serial No. 10001 and Higher BKDM-3023 Serial No.
-
Page 3: Table Of Contents
Table of Contents Manual Structure Purpose of this manual ..................5 (E) Contents ....................... 5 (E) Related manuals ....................5 (E) Installation 1-1. Operating Environment .................1-1 (E) 1-2. Power Supply ..................1-1 (E) 1-2-1. Power Specifications ............1-1 (E) 1-2-2. Power Cord................1-1 (E) 1-3. - Page 4 1-14. Switch Setting when Connecting Other Equipments ......1-35 (E) 1-14-1. Connection with Digital Video Switcher ......1-35 (E) 1-14-2. Connection with Source Selector Unit ....... 1-35 (E) 1-14-3. Connection with Video Routing Switcher ......1-36 (E) 1-15. Hard Reset of Control Panel ...............1-37 (E) 1-16.
- Page 5 http://getMANUAL.com Trouble Shooting 4-1. Trouble Shooting ................... 4-1 (E) 4-1-1. DME-3000/7000 ..............4-1 (E) 4-1-2. BKDM-3010 ................ 4-3 (E) 4-2. Self Diagnostics ..................4-4 (E) 4-2-1. BKDM-3010 (Menu 804 page) ..........4-4 (E) Overall Block Diagrams 5-1. Circuit Function of Printed Circuit Boards ..........5-1 5-1-1.
-
Page 7: Manual Structure
• Maintenance Manual Part 2 (Not supplied with DME-3000/7000.) This manual describes the information (adjustments, board layouts, schematic diagrams, parts list, etc.) that premise the service based on parts. If this manual is required, please contact to Sony’s service organization. 5 (E) -
Page 9: Installation
AC inlet the breaker of the AC power at the supply side will operate (Main unit) or the unit will abnormal operate. For the customer outside of the area as shown above, please consult with local Sony’s sale/service office. 1-1 (E) -
Page 10: Connectors
1-3. Connectors 1-3. Connectors When connecting cables to various connectors on the rear panel at the time of installing or servicing, connect the following connectors or their equivalents. 1-3-1. DME-3000/7000 1-3-2. BKDM-3010 Connector function Connector name and part Connector function Connector name and part name on the rear panel number of matching cable... -
Page 11: Input And Output Signals Of Connectors
1-4. Input and Output Signals of Connectors 1-4. Input and Output Signals of Connectors 1-4-1. DME-3000/7000 DME-7000 only NETWORK TERMINAL ANALOG INPUTS COMBINER OUTPUTS COMBINER INPUTS CONTROL PANEL KEY/Z EXT/C KEY/Z EXT/C THRU VIDEO/Y VIDEO/Y VIDEO/Y VIDEO/Y ANALOG OUTPUTS DIGITAL OUTPUTS DIGITAL INPUTS B-Y/B B-Y/B... - Page 12 1-4. Input and Output Signals of Connectors CONTROL PANEL : RS-422A (D-sub 25-pin) EDITOR : RS-422A (D-sub 9-pin) [DEVICE] from Control Panel BKDM-3010 etc. [DEVICE] from Editing Control Unit BVE-2000 etc. ( FEMALE ) ( FEMALE ) EXT VIEW EXT VIEW Pin No.
- Page 13 1-4. Input and Output Signals of Connectors AUX : RS-422A (D-sub 9-pin) TERMINAL : RS-232C (D-sub 9-pin) (DME-7000 only) [CONTROLLER] from Digital Video Switcher DVS- [CONTROLLER] to Terminal 7000 etc. ( FEMALE ) ( FEMALE ) EXT VIEW EXT VIEW Pin No.
-
Page 14: Bkdm-3010
1-4. Input and Output Signals of Connectors 1-4-2. BKDM-3010 SPARE MONITOR PROCESSOR [CONTROLLER] indicates a controlling device. [DEVICE] indicates a controlled device. SPARE : RS-232C (D-sub 9-pin) MONITOR : RGB output (D-sub 15-pin • 3 LINES) [CONTROLLER] to Mouse or ISR ( FEMALE ) ( MALE ) EXT VIEW... - Page 15 http://getMANUAL.com 1-4. Input and Output Signals of Connectors PROCESSOR : RS-422A (D-sub 25-pin) [CONTROLLER] to Digital Multi Effects DME-3000/ 7000 etc. ( FEMALE ) EXT VIEW Pin No. Signal Function Frame ground POWER +12 V input RX-A Received data (–) Common ground TX-A Transmitted data (–)
-
Page 16: External Dimensions And Installation Space
1-5. External Dimensions and Installation Space 1-5. External Dimensions and Installation Space 1-5-1. DME-3000/7000 External Dimensions Mass : 27kg (with all optional boards installed) ( 25.2 ) 475.2 (Top view) ( 482 ) 4-M4 101.6 83.7 304.8 (Front view) (Right side view) Unit : mm 1-8 (E) - Page 17 1-5. External Dimensions and Installation Space Installation Space • Be sure to install the unit in a stable place. If the unit is installed in a wobbly table or a slant surface, the unit may be dropped. This may cause a injury.
-
Page 18: Bkdm-3010
1-5. External Dimensions and Installation Space 1-5-2. BKDM-3010 External Dimensions 23.5 ( 408 ) Unit : mm Installation Space BKDM-3010 can be installed in a console. Unit : mm 1-10 (E) -
Page 19: Installation Of Track Ball
8 pcs • Screw for rack mounting (RK5 16): 4 pcs • Washer for rack mounting: 4 pcs (Sony part number: 2-297-913-01) • Screw (BVTT4 6 pcs 4. Push in the Z-ring while pressing it against the Z sensor plate. - Page 20 1-7. Rack Mounting [Procedures] 3. Loosen the screws secured the rear bracket to the outer 1. Pull out the inner member while pressing the stopper member. Adjust the position of the rear bracket in line of the rack mount rail RMM-30. with the rack depth.
- Page 21 1-7. Rack Mounting 5. For installing the unit in the rack, press the inner 7. After installing the unit in the rack, secure the unit to members fully to the outer members while pressing the the rack by the prepared four screws (RK5 16) and stoppers of the inner members.
-
Page 22: Switch Settings On Boards And Leds Description
1-8. Switch Settings on Boards and LEDs Description 1-8. Switch Settings on Boards and S301-2(D-16 (*1) /J-1) : Editor protocol selector LEDs Description Selects the protocol of the D-sub Editor connector on the rear panel. 1-8-1. DME-3000/7000 VTR protocol OFF: DME protocol (BVE-9000/9100 + BKE-9009) The addresses on the boards are shown by ( ) marks. - Page 23 1-8. Switch Settings on Boards and LEDs Description S301-5(D-16 (*1) /J-1) : Factory use CPU-196 board (DME-7000 only) This switch is used for the adjustment in the factory. COR407~COR412 Be sure to use this switch for factory setting (OFF). S301-6(D-16 (*1) /J-1) : Not used Factory setting: OFF...
- Page 24 1-8. Switch Settings on Boards and LEDs Description S801-6 through S801-8(H-1) : MPU-70 board Physical channel setting switch Sets the physical channel (*3) Physical channel S801-6 S801-7 S801-8 S201 D203 D202 A side ( Component side ) [Switch] S801-6 through S801-8 are set to OFF at the factory. S3(J-4) : Emulator mode setting switch (*3) : The physical channel is the number assigned to each Be sure to use this switch for setting at the factory.
-
Page 25: Bkdm-3010
http://getMANUAL.com 1-8. Switch Settings on Boards and LEDs Description 1-8-2. BKDM-3010 1-8-3. BKDM-3030 The addresses on the board are shown by ( ) marks. The addresses on the board are shown by ( ) marks. CPU-119 board MPU-72 board D902 S901 A side ( Component side ) D901... - Page 26 1-8. Switch Settings on Boards and LEDs Description D903 through D910(E-7) : STATUS indicator Display the operating state of the MPU-72 board in hexadecimal (HEX code) on 8 bits. LED lights. ( The data is "1". ) LED lights off. ( The data is "0".
- Page 27 1-8. Switch Settings on Boards and LEDs Description Status code Operating state (Example) Boot program version V1.30 Effect program version V1.50 System debugging Boot V 1.30 Time No display Version number Effect V 1.50 System debugging Indicates that the MPU-72 board is in operating failure. In this case, replace the board with a new one.
-
Page 28: Bkdm-3040
1-8. Switch Settings on Boards and LEDs Description 1-8-4. BKDM-3040 [Switch] S1(N-1) : Reset switch Resets the CPU on the WKG-13 board. The addresses on the board are shown by ( ) marks. Do not press this switch in normal times. WKG-13 board S2(P-1) : System debugging switch When this switch is pressed, the board enters the system... - Page 29 1-8. Switch Settings on Boards and LEDs Description D102 through D109(E-1) : STATUS indicator Display the operating state of the WKG-13 board and the WKG-16 board (BKDM-7041) in hexadecimal (HEX code) on 8 bits. LED lights. ( The data is "1". ) LED lights off.
- Page 30 1-8. Switch Settings on Boards and LEDs Description Status code Operating state (Example) Boot program version V1.30 Application program version V1.50 System debugging Boot V 1.30 Time No display Version number Application V 1.50 System debugging Indicates that the WKG-13 board is in operating failure. In this case, replace the board with a new one.
-
Page 31: Bkdm-7070
1-8. Switch Settings on Boards and LEDs Description [Switch] 1-8-5. BKDM-7070 S1(J-1) : Reset switch Resets the CPU and the all registers on the SKP-1 board. The addresses on the board are shown by ( ) marks. Do not press this switch in normal times. SKP-1 board S2(J-1) : System debugging switch When this switch is pressed, the board enters the system... - Page 32 1-8. Switch Settings on Boards and LEDs Description [LED] D1(Green)(D-1) : CPU RUN indicator Lights during the CPU operation. D2(E-1) through D9(F-1) : STATUS indicator Display the operating state of the SKP-1 board in hexadecimal (HEX code) on 8 bits. LED lights.
- Page 33 1-8. Switch Settings on Boards and LEDs Description Status code Operating state (Example) Boot program version V1.30 Application program version V1.50 System debugging Boot V 1.30 Time No display Version number Application V 1.50 System debugging Indicates that the SKP-1 board is in operating failure. In this case, replace the board with a new one.
-
Page 34: Installation Of Standard Boards
1-9. Installation of Standard Boards 1-9. Installation of Standard Boards Each plug-in board must be installed in the corresponding Example slot of DME-3000/7000. The board name and the slot number in which the board can be installed are displayed near the board lever on the left edge of the board (A side). -
Page 35: Dme-3000
––– ––– KPC-2(BKDM-3060) DPR-35 ––– ––– VIF-9A(BKDM-3020) VIF-6A(BKDM-3021) VIF-9(BKDM-3022) VIF-6(BKDM-3023) • Insert the appropriate I/O board for your system in slot 9. By inserting one of the four available I/O boards you can switch between component and composite modes. • When using a component mode, make the appropriate settings for the “525/625” and “4:3/16:9”... -
Page 36: Dme-7000
SKP-1(BKDM-7070) ––– KPC-9(BKDM-7060) DPR-70 ––– ––– VIF-9A(BKDM-3020) VIF-6A(BKDM-3021) VIF-9(BKDM-3022) VIF-6(BKDM-3023) • Insert the appropriate I/O board for your system in slot 9. By inserting one of the four available I/O boards you can switch between component and composite modes. • When using a component mode, make the appropriate settings for the “525/625” and “4:3/16:9”... -
Page 37: Installation Of Optional Boards
Connect the MPU-72 board to the MPU-70 board accord- DME-3000/7000 has the following optional boards. ing to the following procedures. VIF-9A board (BKDM-3020): 1. Remove the seven screws securing the dummy plate Digital Composite Input/Output Board and the shield plate. - Page 38 1-10. Installation of Optional Boards 1-10-2. MPU-80 Board (BKDM-7031) 1-10-3. WKG-16 Board (BKDM-7041) Installation Installation Connect the MPU-80 board to the MPU-72 board accord- Connect the WKG-16 board to the WKG-13 board accord- ing to the following procedures. ing to the following procedures. 1.
-
Page 39: Confirmation Of Secondary Power Supply Voltage
1-11. Confirmation of Secondary Power Supply Voltage 1-11. Confirmation of Secondary Power Supply Voltage DME-3000/7000 has a power supply of +5 V(A), +5 V(B), <DME-3000> –5 V, and +12 V. CPU-114 board The power indicator uses +5 V(A), and the fan uses +12 V. After installation of all required board is completed, confirm the power supply voltage inside the unit as ND301... - Page 40 1-11. Confirmation of Secondary Power Supply Voltage Voltage Measurement of +12 V If the specification is not satisfied, adjust the voltage as described below. It is not required to adjust a voltage of +12 V. The voltage adjustment is performed with the digital If it is necessary to confirm the voltage, confirm the voltmeter connected to the check terminals.
-
Page 41: Multi Channel Setting
1-12. Multi Channel Setting 1-12. Multi Channel Setting To control two or more DME-3000/7000 from one control The physical channel is not necessarily same as the logical panel, each DME-3000/7000 must be recognized on the channel number displayed on the control panel. The control panel by respective channel numbers. -
Page 42: Connection When Combiner Board Installation
1-13. Connection when Combiner Board Installation 1-13. Connection when Combiner Board Installation (*1) : For external video input, a serial digital signal can When optional CMB-1 board (BKDM-3050) are installed be input in the component mode, and this input and when multiple pictures are synthesized using a com- signal can be synthesized on the background screen biner function, each combiner input/output connectors of a DME picture. -
Page 43: Switch Setting When Connecting Other Equipments
1-14. Switch Setting when Connecting Other Equipments 1-14. Switch Setting when Connecting 1-14-1. Connection with Digital Video Other Equipments Switcher DVS-7000 When DME-3000/7000 is used in connection with other DVS-6000/6000C ( DVS-8000/8000C ) DME-3000/7000 equipments, set the switches of other equipments connect- ing to DME-3000/7000 in example of system connection. -
Page 44: Connection With Video Routing Switcher
1-14. Switch Setting when Connecting Other Equipments 1-14-3. Connection with Video Routing Switcher DVS-V1201 9 pin DME-3000/7000 REMOTE 1 DVS-V1201 REMOTE 2 UA2 = 02 REMOTE 1 OUTPUT INPUT 12 REMOTE 2 OUTPUT DIGITAL INPUTS A VIDEO 9 pin DVS-V1201 UA2 = 01 9 pin REMOTE 1... -
Page 45: Hard Reset Of Control Panel
http://getMANUAL.com 1-15. Hard Reset of Control Panel 1-15. Hard Reset of Control Panel Reset the control panel BKDM-3010 in the following [Procedures] cases. 1. Press the following six buttons on the control panel • When the software for BKDM-3010 is installed BKDM-3010 simultaneously. -
Page 46: Installation Of Software
1-16. Installation of Software 1-16. Installation of Software 1-16-2. DME-7000 The CPU programs of DME-3000/7000 and BKDM-3010 Software Installation are installed in flash memory that can be electrically erased Install the operation software for the processor in accor- from a floppy disk. Therefore, ROM replacement is not dance with the following procedures. -
Page 47: Bkdm-3010
1-16. Installation of Software 1-16-3. BKDM-3010 Starting BKDM-3010 by flash memory Load a program from the flash memory and start BKDM- Software Installation 3010 in accordance with the following procedures. Install the operation software for the control panel in accordance with the following procedures. [Procedures] 1. -
Page 49: Dme-3000/7000 Service Overview
Section 2 DME-3000/7000 Service Overview 2-1. Removal from Rack 2-2. Removal of Cabinet Opening/Closing and Removal of Front Panel Never pull out two or more units at a time. 1. Loosen the locking screw on the front panel using a If two or more units are pulled out, the rack falls down in flat-blade screwdriver. -
Page 50: Cleaning Of Front Panel
2-2. Removal of Cabinet 2-3. Cleaning of Front Panel 2-3. Cleaning of Front Panel Removing the Upper Chassis 1. Remove the four screws securing the rack angles of both sides. Clean the filter at the rear of the front panel periodically 2. -
Page 51: Location Of Main Parts
2-4. Location of Main Parts 2-5. Replacement of Main Parts 2-4. Location of Main Parts 2-5. Replacement of Main Parts 2-5-1. Power Supply Unit Power supply assembly To avoid shock hazards, be sure to turn the power switch Fan motors (Rear side) off, and unplug the power cord before replacing the power supply unit. -
Page 52: Fan Motor
2-5. Replacement of Main Parts 2-5-2. Fan Motor Fans on the Rear Side Replacement If the fan stops during normal operation, the alarm display • Locking compound: 7-432-114-11 indicates on the display connected to the control panel. In this case, replace the fan motor. 1. -
Page 53: Backup Battery (Only Dme-3000)
2-5. Replacement of Main Parts 2-5-3. Backup Battery (only DME-3000) 10. Connect the two connectors CN301 and CN302 to the connectors on the rear panel, then insert the harness between the upper fan motor and the lower fan motor. To store a setup data and a real-time clock, Ni-Cd battery 11. -
Page 54: Location Of Printed Circuit Boards
CPU-114 (A-8275-400-A) ––– ––– ––– MPU-70 (A-8275-402-A) MPU-72 (BKDM-3030) with MPU-80 (BKDM-7031) ––– WKG-13 (BKDM-3040) with WKG-16 (BKDM-7041) ––– CMB-1 (BKDM-3050) ––– ––– ––– KPC-2 (BKDM-3060) DPR-35 (A-8275-401-A) ––– ––– VIF-9A (BKDM-3020) VIF-6A (BKDM-3021) VIF-9 (BKDM-3022) VIF-6 (BKDM-3023) 2-6 (E) - Page 55 http://getMANUAL.com 2-6. Location of Printed Circuit Boards Except Plug-in Boards RE-104 board CN-753 board LE-76 board MB-438 board 2-7 (E)
-
Page 56: Dme-7000
CPU-196 (A-8272-261-A) ––– ––– ––– MPU-70 (A-8275-402-A) MPU-72 (BKDM-3030) with MPU-80 (BKDM-7031) ––– WKG-13 (BKDM-3040) with WKG-16 (BKDM-7041) ––– CMB-1 (BKDM-3050) ––– SKP-1 (BKDM-7070) ––– KPC-9 (BKDM-7060) DPR-70 (A-8272-263-A) ––– ––– VIF-9A (BKDM-3020) VIF-6A (BKDM-3021) VIF-9 (BKDM-3022) VIF-6 (BKDM-3023) 2-8 (E) - Page 57 2-6. Location of Printed Circuit Boards Except Plug-in Boards RE-104 board CN-1256 board LE-76 board MB-660 board 2-9 (E)
-
Page 58: Replacement Of Plug-In Boards
2-7. Replacement of Plug-in Boards 2-7. Replacement of Plug-in Boards 8. Confirm that the number on the board matches the number on the slot. This section explains the replacement procedure of the plug-in board. If the board is installed in an incorrect slot, a system For the board except the plug-in board, refer to the Mainte- error occurs. -
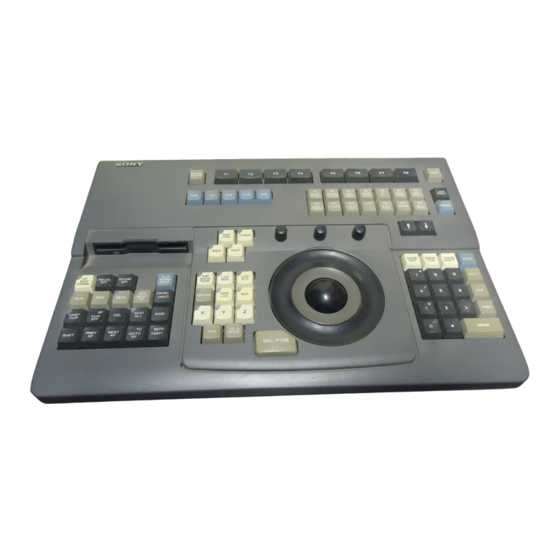
Page 59: Bkdm-3010 Service Overview
Section 3 BKDM-3010 Service Overview 5. Install the track ball. The power of BKDM-3010 is supplied from DME-3000/ 6. Push in the Z-ring while pressing it against the Z 7000. sensor plate. When servicing BKDM-3010, turn off the power of DME- 7. -
Page 60: Removal Of Bottom Plate
3-2. Removal of Bottom Plate 3-3. Location of Main Parts 3-2. Removal of Bottom Plate 3-3. Location of Main Parts 1. Turn BKDM-3010 upside down. Floppy disk drive Track ball 2. Remove the six screws shown in the figure, then open KEY-32B board the bottom plate in the direction indicated by the KEY-32A board... -
Page 61: Replacement Of Main Parts
3-4. Replacement of Main Parts 3-4. Replacement of Main Parts 3-4-1. Floppy Disk Drive 3-4-2. Key Top 1. Remove the bottom plate. (Refer to the section 3-2.) Only when using DME-7000 2. Remove the three screws securing the floppy disk When using DME-7000, change the two key tops shown in drive and FD bracket. -
Page 62: Backup Battery
3-4. Replacement of Main Parts 3-5. Replacement of Printed Circuit Boards 3-5. Replacement of Printed Circuit 3-4-3. Backup Battery Boards To store a part of setup data and a real-time clock, Ni-Cd 3-5-1. CPU-119 Board batteries are installed on CPU-119 board in BKDM-3010. To charge the Ni-Cd batteries sufficiently, turn on the power of DME-3000/7000 about ten hours. -
Page 63: Key-32A Board
3-5. Replacement of Printed Circuit Boards 3-5-2. KEY-32A Board 3-5-3. KEY-32B Board 1. Remove the three knobs. 1. Remove the bottom plate. (Refer to the section 3-2.) 2. Disconnect the connector CN1 on the KEY-32B board. 3. Remove the five screws on the KEY-32B board. Knobs 4. -
Page 64: Key-32C Board
3-5. Replacement of Printed Circuit Boards 3-5-4. KEY-32C Board 3-5-5. SE-214 Board 1. Remove the bottom plate. (Refer to the section 3-2.) Three SE-214 boards are used in BKDM-3010. 2. Disconnect the connector CN1 on the KEY-32C board. 3. Remove the four screws on the KEY-32C board. 1. - Page 65 http://getMANUAL.com Section 4 Trouble Shooting 4-1. Trouble Shooting 4-1-1. DME-3000/7000 The power cannot be turned on Flow1 The power of DME-3000/7000 cannot be turned on. (*1) : CPU-114 board (DME-3000)/CPU-196 board (DME-7000) Is the power cord of DME-3000/ Connect the power cord (*2) : VIF-6/9/6A/9A board 7000 connected correctly? correctly.
- Page 66 4-1. Trouble Shooting A picture does not appear on the monitor correctly Flow2 Though the power of DME-3000/ [Table 1 : Phenomenon if the standard board is not inserted] 7000 is turned on, a picture does not appear on the monitor correctly.
- Page 67 4-1. Trouble Shooting 4-1-2. BKDM-3010 The power cannot be turned on BKDM-3010 cannot control DME-3000/7000 Flow3 Flow5 The power of BKDM-3010 BKDM-3010 cannot control cannot be turned on. DME-3000/7000. (None of the CH1, CH2 and GLBL buttons light up.) Set the channel assign Is the channel assign correct? correctly.
-
Page 68: Self Diagnostics
4-2. Self Diagnostics 4-2. Self Diagnostics 4-2-1. BKDM-3010 (Menu 804 page) Menu 804 (DIAGNOSIS CONTROL PANEL) 1. Starting of the Menu 804 Press the PAGE button, and enter 804 by the numeric keypad. Then press the ENTER button. Start the menu 804. Knobs PAGE button ENTER button... - Page 69 4-2. Self Diagnostics 2. Check items (1) Button check Press the button on the control panel, and confirm that the color of the corresponding display on the monitor changes. (2) LED of the button check Press the button with LED on the control panel, confirm that the LED lights up. For the buttons with two-color LED (GLBL, CH1, CH2, CH3, CH4), confirm that the LED lights green and red alternately each time these buttons are pressed.
-
Page 71: Overall Block Diagrams
Component digital/analog input/output VIF-6A(BKDM-3021) Component digital input/output VIF-6(BKDM-3023) Component digital/analog input/output VIF-9(BKDM-3022) Composite digital/analog input/output VIF-6A(BKDM-3021) Component digital input/output VIF-9A(BKDM-3020) Composite digital input/output VIF-9(BKDM-3022) Composite digital/analog input/output WKG-13(BKDM-3040) Wipe pattern generator and graphics generator VIF-9A(BKDM-3020) Composite digital input/output WKG-16(BKDM-7041) Digital sketch generator... -
Page 72: Overall Block
DME-3000 DME-3000 Block Diagram Block Diagram 5-2. Overall Block 5-2-1. DME-3000 CN-753(4/6) BKDM-302X OUTPUTS CN-753(1/6) BKDM-302X BKDM-3040 DIGITAL VIDEO 1 VIF-XX(2/2) INPUTS WKG-13 DIGITAL VIDEO A VIF-XX(1/2) BKDM-7041 DIGITAL VIDEO 2 BKDM-3050 BKDM-3060 WKG-16 DIGITAL VIDEO B ANALOG VIDEO/Y/G 1 DPR-35(1/2) CMB-1 KPC-2(2/2) -
Page 73: Dme-7000
DME-7000 DME-7000 Block Diagram Block Diagram 5-2-2. DME-7000 CN-1256(4/6) BKDM-302X OUTPUTS CN-1256(1/6) BKDM-302X BKDM-3040 DIGITAL VIDEO 1 VIF-XX(2/2) INPUTS WKG-13 DIGITAL VIDEO A VIF-XX(1/2) BKDM-7041 DIGITAL VIDEO 2 BKDM-3050 BKDM-7060 WKG-16 DIGITAL VIDEO B ANALOG VIDEO/Y/G 1 DPR-70(1/2) CMB-1 KPC-9(2/2) ANALOG VIDEO/Y A VIDEO &... - Page 74 BKDM-3010 (CPU-119 board) BKDM-3010 (CPU-119 board) Block Diagram Block Diagram 5-2-3. BKDM-3010 (CPU-119 board) DATA BUS AD0~AD31 DATA BUS D0~AD31 AD31 IC2~IC4 ADDRESS BUS BE0~3 ADDRESS BUS BE0~3 ADDRESS BUS A20~23 ADDRESS BUS A0~23 ADDRESS LATCH IC10 IC52 IC8,9,11,12 IC16~23 MONITOR BACKUP FLASH...
-
Page 75: Bkdm-3010 (Cpu-119 Board)
http://getMANUAL.com BKDM-3010 (CPU-119 board) BKDM-3010 (CPU-119 board) Block Diagram Block Diagram IC68 DATA BUS AD0~31 D24~27 A2~5 REAL IC64 TIME A16~23 CLOCK 32.76KHz RESET LOGIC FLUSH ADDRESS BUS A0~A23 DEVICE IC77 IC80 IC65~67 CS3~5 UP/DOWN UDA2 D24~31 UDB2 COUNTER UDA3 UDB3 FROM UDA4... - Page 76 OHB-400/500/500WS & PAL OHB-450/451/550/550WS & PAL...
- Page 77 The material contained in this manual consists of and all other exposed metal parts for AC information that is the property of Sony Corporation and leakage. Check leakage as described below. is intended solely for use by the purchasers of the equipment described in this manual.
- Page 78 DME-3000 (SY) Printed in Japan DME-7000 (SY) Sony Corporation BKDM-3010 (WW) J, E 1996. 3 08 Broadcast Products Company © 1995 3-190-061-01 (1) Published by Broadcast Products Company...