Sony COM-2 Operating Instructions Supplement 2 Quick Start Manual
Personal communicator
Hide thumbs
Also See for COM-2 Operating Instructions Supplement 2:
- Operating instructions manual (270 pages) ,
- Quick start manual (27 pages) ,
- Addendum (12 pages)
Table of Contents

Related Manuals for Sony COM-2 Operating Instructions Supplement 2


Summary of Contents for Sony COM-2 Operating Instructions Supplement 2
- Page 1 Quick Start Guide Personal Communicator COM-2 3-213-854-11(2) © 2008 Sony Corporation...
- Page 2 Owner’s Record The serial number is located inside the battery compartment. Record the serial number in the space provided below. Refer to these numbers when you call your Sony Service Center. Model No. COM-2 Serial No. _______________________ WARNING You are cautioned that any changes or modifications not expressly approved in this manual could void your authority to operate this equipment.
- Page 3 The Personal Communicator COM-2 (FCC ID: AK8COM2) has been tested and found to comply with FCC radiation exposure limits set forth for an uncontrolled equipment and meets the FCC radio frequency (RF) Exposure Guidelines in Supplement C to OET65. Please refer to the SAR test report that was uploaded at FCC website. This device and its antenna(s) must not be co-located or operating with any other antenna or transmitter except Grant condition.
-
Page 4: Important Safety Instructions
If using wireless LAN near a pacemaker, make sure it is at least 8 inches (20 cm) away from the pacemaker. Sony is not responsible for any interference that you may experience or that may be caused when operating this device. - Page 5 If you have any questions about this product: Visit: http://www.sony.com/mylo Contact: Sony Customer Information Services Center at 1-866-420-7669 Write: Sony Customer Information Services Center 12451 Gateway Blvd., Ft. Myers, FL 33913 For an accessory or part not available from your authorized dealer, call:...
- Page 6 Such anomalies are caused by the nature of the LCD and do not indicate a malfunction. Please note that Sony does not guarantee a replacement or refund for such cases. Do not expose the LCD or camera lens to direct sunlight for prolonged periods of time.
- Page 7 Google Talk branded services, are provided by third parties. Sony does not guarantee such services or warrant their continued availability. Sony expects the features and nature of such services will change over time. Keep your mylo up-to-date Sony strongly recommends that you visit the mylo System Update Download Web site (http://www.sony.com/mylo/support) frequently and always keep...
- Page 8 Start up Parts Confirming the supplied parts Personal Communicator (this unit) Stylus Attach to the strap for carrying. Power Rechargeable battery pack Strap Set up...
- Page 9 Headset Headphones One Touch Answer Remote Controller with Microphone USB cable AC adapter START UP CD-ROM “Operating Instructions” manual (PDF file) Preinstalled contents (sample contents, mylo Widgets, Hotspot Database) Quick Start Guide ...
-
Page 10: Power Supply Setup
Start up Parts Power Supply set up Open the battery compartment cover Confirm the orientation of the supplied battery pack With label side up. Charge Power To DC IN 5.2V jack Set up To wall outlet AC adapter (supplied) -
Page 11: Turn On The Power
Turn on the power Slide and hold the switch until the POWER indicator turns on. POWER/HOLD switch POWER indicator If the screen does not turn on If the screen does not turn on even after sliding and holding the ... -
Page 12: Initial Setup
Start up Parts Initial Set up Follow the on-screen instructions Power Set up... - Page 13 Network connection set up is necessary for some applications such as Web browsing or instant messaging. Note Requires compatible wireless access point(s). Some features may rely on Internet services which may require a fee. START UP...
- Page 14 Wireless network set up Preparation Preparation Go to an area where a wireless network is available This unit is compliant with the IEEE802.11b/g wireless standard. Settings Registration...
- Page 15 NETWORK Set the WIRELESS LAN switch to “ON” WIRELESS LAN switch WIRELESS LAN indicator...
- Page 16 Wireless network set up Preparation Settings Select a wireless network to which to connect Tap the wireless network name to register. Note Be careful to use only networks that you trust. When you use a wireless network that does not require a security encryption key, you can skip the following set up procedure.
- Page 17 Enter the required information ( page 19) For help on item details Ask the administrator or the provider when you try to access your home, office, school, or public wireless hotspots. To input information Num (Number) key Fn (Function) key Space key To enter capital letters, numbers, and symbols, press the modifier...
- Page 18 Wireless network set up Preparation Registration Tap “Connect” When you register wireless network details The wireless network you registered appears at the top of the list on the Connection Manager. When the WIRELESS LAN switch is set to ON, the unit will try to ...
-
Page 19: Wireless Network Settings
Wireless network settings Be sure to input the setting value for the items marked with *. Inputting the “Display Name” is optional. When the field is blank, the SSID is displayed instead. For details about what values to input, ask the administrator of the network. Item Meaning Display Name The name displayed on the Network list (Optional) - Page 20 For details, refer to “Operating Instructions” manual (PDF) on the supplied CD-ROM. Installing “Operating Instructions” manual Install “Operating Instructions” manual (PDF) according to the steps below. Confirm the system requirements of your computer ( page 22). Turn on your computer, and insert the CD-ROM (supplied) into the CD drive of the computer.
-
Page 21: Additional Information
CD-ROM in your computer, click [Start] – [My Computer] on the Windows task bar, and then double- click the CD drive icon. The installation program will start. If the problem persists Visit: http://www.sony.com/mylo/support Contents of the supplied CD-ROM... -
Page 22: System Requirements
System requirements Internet Connection via Wireless LAN USB port (Hi-Speed USB recommended) USB port is required for connecting a PC to a Personal Communicator. Personal Computer with pre-installed Windows operating system Operating Systems: Microsoft Windows Vista ... -
Page 23: Hints On Use
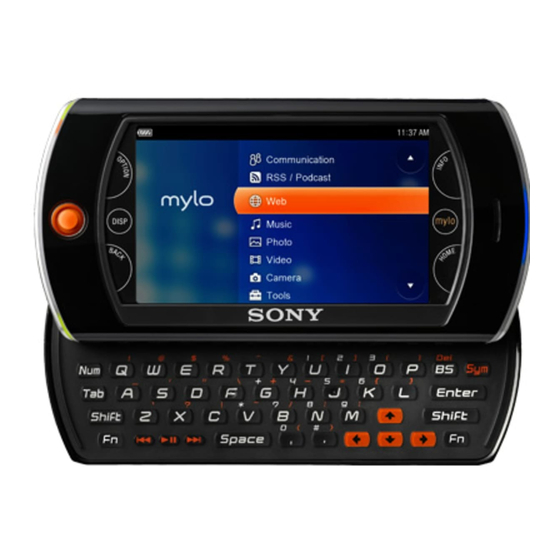
Troubleshooting 1. Refer to the “Operating Instructions” manual on the CD-ROM (supplied). 2. Check for troubleshooting issues on the support Web site. Visit: http://www.sony.com/mylo/support 3. If you are still unable to resolve the issue, consult the Customer Information Service Center. - Page 24 Parts and Controls Front Back Display Tap the desired item on the touch panel display with the stylus, thumb, or fingers to simultaneously select and execute an operation.
-
Page 25: Status Bar
Status bar Icon Meaning Remaining battery power (approximate) Wireless LAN signal status or strength “Memory Stick Duo” status Modifier keys status for the keyboard HOLD status Volume bar AVLS (Automatic Volume Limiter System) status or events Skype status or events Yahoo! Messenger status or events ... - Page 28 All other trademarks and registered trademarks are trademarks or registered trademarks of their respective holders. Printed on 70% recycled paper using VOC (Volatile Organic Compound)-free vegetable oil based ink. Printed in Japan and “Memory Stick Duo” are trademarks of Sony Corporation.