
Related Manuals for Makita CC02


Summary of Contents for Makita CC02
- Page 1 INSTRUCTION MANUAL MANUAL DE INSTRUCCIONES Cordless Cutter Cortador Inalámbrico CC02 IMPORTANT: Read Before Using. IMPORTANTE: Lea antes de usar.
-
Page 2: Specifications
ENGLISH (Original instructions) SPECIFICATIONS Model: CC02 Diamond wheel diameter 85 mm (3-3/8″) Max. wheel thickness 0.8 mm (1/32″) Max. Cutting depth at 0° bevel 25.5 mm (1″) at 45° bevel 16.5 mm (5/8″) Rated speed 1,600 /min Rated voltage D.C. 10.8 V - 12 V max... - Page 3 Do not overreach. Keep proper footing and Service balance at all times. This enables better control Have your power tool serviced by a qualified of the power tool in unexpected situations. repair person using only identical replacement Dress properly. Do not wear loose clothing or parts.
- Page 4 mask or respirator must be capable of filtrating Use special care when working corners, sharp particles generated by your operation. Prolonged edges etc. Avoid bouncing and snagging the exposure to high intensity noise may cause hear- accessory. Corners, sharp edges or bouncing ing loss.
-
Page 5: Functional Description
The followings show the symbols used for tool. have been altered, may result in the battery bursting causing fires, personal injury and damage. It will volts also void the Makita warranty for the Makita tool and charger. direct current Tips for maintaining maximum... -
Page 6: Battery Protection System
To install the battery cartridge, align the tongue on the Indicator lamps Remaining battery cartridge with the groove in the housing and slip capacity it into place. Insert it all the way until it locks in place with a little click. If you can see the red indicator on the Lighted upper side of the button, it is not locked completely. - Page 7 Sighting Installing or removing diamond wheel CAUTION: Use only the Makita wrench to install or remove the diamond wheel. CAUTION: When installing the diamond wheel, be sure to tighten the bolt securely. CAUTION: Always install the diamond wheel so that the arrow on the diamond wheel points in the same direction as the arrow on the diamond wheel case.
-
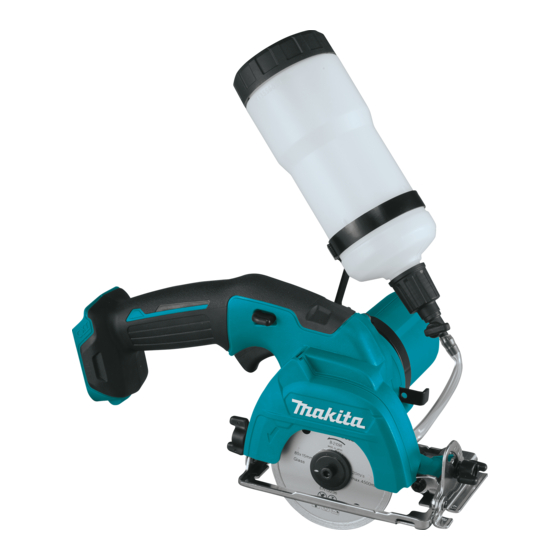
Page 8: Water Supply
► 1. Hex bolt 2. Outer flange 3. Diamond wheel ► 1. Screw A 2. Tank holder 3. Motor housing 4. Notch 4. Inner flange 5. Protrusion (bigger side) of the band (part of the tank holder) 5. Screw head of the tool NOTE: If an inner flange is removed by chance, Attach the tank on the tank holder so that the tank... -
Page 9: Operation
Do not use the tool with the dia- repairs, any other maintenance or adjustment should mond wheel in an upward or sideways position. be performed by Makita Authorized or Factory Service CAUTION: Centers, always using Makita replacement parts. The wheel for this tool is a wet-type diamond wheel for glass and tile applications. - Page 10 COMPLETE tool, freight prepaid, to one of Makita’s Factory or Authorized Service Centers. If inspection shows the trouble is caused by defective workmanship or material, Makita will repair (or at our option, replace) without charge. This Warranty does not apply where: •...
-
Page 11: Especificaciones
ESPAÑOL (Instrucciones originales) ESPECIFICACIONES Modelo: CC02 Diámetro de la rueda de diamante 85 mm (3-3/8″) Grosor máx. de la rueda 0,8 mm (1/32″) Profundidad de corte máxima bisel a 0° 25,5 mm (1″) bisel a 45° 16,5 mm (5/8″) Velocidad especificada 1 600 r/min Tensión nominal... - Page 12 Seguridad personal Guarde la herramienta eléctrica que no use fuera del alcance de los niños y no permita Manténgase alerta, preste atención a lo que que las personas que no están familiarizadas está haciendo y utilice su sentido común con ella o con las instrucciones la operen. Las cuando opere una herramienta eléctrica.
- Page 13 La protección para los ojos deberá ser capaz de Advertencias de seguridad para el detener los residuos que salgan volando a causa cortador inalámbrico de las distintas operaciones. La máscara contra polvo o respirador deberá ser capaz de filtrar las El protector que se incluye con la herramienta partículas generadas durante su operación.
- Page 14 Mantenga sujetada firmemente la herramienta Advertencias de seguridad adicionales: eléctrica y posicione su cuerpo y brazo de Antes de usar una rueda de diamante segmen- manera que pueda resistir las fuerzas del tada, asegúrese de que la rueda de diamante retroceso brusco.
-
Page 15: Descripción Del Funcionamiento
Asimismo, esto inva- y deslice en su lugar. Inserte por completo hasta que lidará la garantía de Makita para la herramienta y el se fije en su lugar con un pequeño clic. Si puede ver el cargador Makita. - Page 16 Sistema de protección de batería NOTA: Dependiendo de las condiciones de uso y la temperatura ambiente, la indicación podrá diferir ligeramente de la capacidad real. La herramienta está equipada con un sistema de pro- tección de batería. Este sistema corta en forma auto- Ajuste de la profundidad de corte mática el suministro de energía al motor para prolongar la vida útil de la batería.
-
Page 17: Montaje
Guía visual Instalación o extracción de la rueda de diamante PRECAUCIÓN: Use solamente la llave Makita para instalar o extraer la rueda de diamante. PRECAUCIÓN: Cuando instale la rueda de diamante, asegúrese de apretar el perno firmemente. PRECAUCIÓN: Siempre instale la rueda de diamante de tal forma que la flecha en la rueda de diamante apunte hacia la misma dirección que... -
Page 18: Instalación Del Suministro De Agua
► 1. Perno hexagonal 2. Brida exterior 3. Rueda de ► 1. Tornillo A 2. Soporte del tanque 3. Carcasa diamante 4. Brida interior 5. Protuberancia (lado del motor 4. Muesca de la abrazadera (parte del mayor) soporte del tanque) 5. Cabeza del tornillo de la herramienta NOTA: Si la brida interior es retirada sin querer, coló- Fije el tanque en el soporte del tanque de manera que... -
Page 19: Operación
Afile presio- de servicio autorizados o de fábrica Makita, empleando nando ligeramente sobre el borde exterior de la rueda siempre repuestos Makita. - Page 20 Makita. Si la inspección muestra que el problema ha sido a causa de un defecto de mano de obra o material, Makita hará la reparación (o a su discreción, el reemplazo) sin ningún cargo. Esta garantía no aplica cuando: •...
- Page 24 Para reducir la exposición a estos productos químicos: trabaje en un área bien ventilada y póngase el equipo de seguridad indicado, tal como las máscaras contra polvo que están especialmente diseñadas para filtrar partículas microscópicas. Makita Corporation 3-11-8, Sumiyoshi-cho, Anjo, Aichi 446-8502 Japan 885502B942...