Chapters
Table of Contents

Related Manuals for Yamaha NS-ICS600

Summary of Contents for Yamaha NS-ICS600
- Page 1 IN-CEILING SPEAKER ENCEINTE ENCASTRABLE POUR PLAFOND NS-ICS600 OWNER'S MANUAL MODE D'EMPLOI BEDIENUNGSANLEITUNG MANUALE DI ISTRUZIONI MANUAL DE INSTRUCCIONES ИНСТРУКЦИЯ ПО ЭКСПЛУАТАЦИИ...
-
Page 2: Consumer Precautions
7. Please backup any custom settings or data, as Yamaha may not be held responsible for any alteration or loss to such settings or data. 8. This guarantee does not affect the consumer’s statutory rights under applicable national laws in force or the consumer’s rights against the... -
Page 3: Table Of Contents
• Do not place the speaker in a location where foreign objects The NS-ICS600 can provide actual stereo sounds from such as water drops may come into contact with the speaker just one in-ceiling speaker, making it perfect for smaller or near heat. -
Page 4: Installation
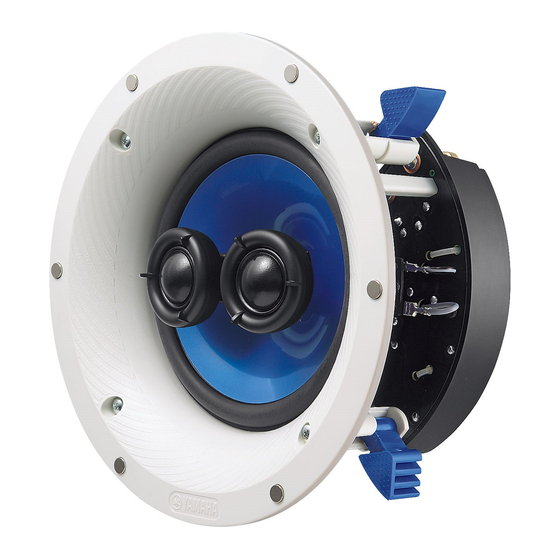
If you are not sure of a safe way to install this speaker, consult a professional installer or a building contractor. • When installing your NS-ICS600 in-ceiling speaker, be aware of the product weight (See specification NS-ICS600 page) and the sturdiness of the material into which Diameter A 231 mm (9-1/8”) -
Page 5: How To Install
How to install This is the recommended installation procedure when Insert the tip of a keyhole saw into the pilot hole, the material of the installation location is plasterboard. and then cut all of the way around the circular outline. Position the cutout template where you are installing the speaker. - Page 6 Insert the speaker into the hole. Loosen four Adjust the angle of the tweeters. screws approximately one turn counter- • Gently press the outer edge of the tweeter housing clockwise. It will allow the clamps to open easily. toward the listening position. •...
-
Page 7: Connecting Your Amplifier/Receiver
• Test the firmness of the connection by pulling lightly on the cable at the terminal. SPECIFICATIONS CAUTION NS-ICS600 • Do not let the bare speaker wires touch each other as this could damage the speaker or amplifier/receiver, or both. Type... - Page 8 à son remplacement à l’appréciation de Yamaha en prenant à sa charge les coûts relatifs aux pièces détachées et à la main d’oeuvre. Yamaha se réserve le droit de remplacer le produit par un modèle semblable, de par sa valeur et ses caractéristiques, dès lors que la commercialisation dudit produit a cessé...
- Page 9 Elle convient parfaitement aux enceinte encastrable pour plafond salles de bains, petits placards, entrées, cuisines et L’enceinte NS-ICS600 peut fournir de vrais sons stéréo autres petites pièces. avec une seule enceinte encastrable pour plafond, ce • Ne placez pas l’enceinte dans un endroit où des objets qui la rend idéale pour les petites pièces ne nécessitant...
-
Page 10: Préparatifs
• Lors de l’installation de l’enceinte encastrable pour plafond NS-ICS600, il est important de connaître le poids du produit (voir la page des caractéristiques techniques) et la robustesse du matériau dans lequel NS-ICS600 vous installez l’enceinte. -
Page 11: Comment Procéder À L'installation
Comment procéder à l’installation Voici la procédure d’installation recommandée lorsque Insérez la pointe d’une scie à guichet dans le matériau de l’emplacement d’installation est en l’avant-trou, puis découpez tout autour du tracé placoplâtre. circulaire. Placez le gabarit de découpe là où vous installerez l’enceinte. - Page 12 Insérez l’enceinte dans le trou. Desserrez quatre Ajustez l’angle des haut-parleurs d’aigus. vis d’environ un tour dans le sens contraire des • Appuyez délicatement sur le bord externe du boîtier aiguilles d’une montre. Ceci vous permettra du haut-parleur d’aigus en direction de la position d’ouvrir facilement les pinces.
-
Page 13: Raccordement De L'amplificateur/Récepteur
Dimensions (avec grille) 242 × 119 P mm Poids (avec grille) 1,8 kg * Dans un souci d’amélioration de ses produits, Yamaha se réserve le droit de modifier les caractéristiques techniques sans préavis. * Aucun câble d’enceinte n’est fourni avec ce modèle. - Page 14 Begrenzte Garantie für den Europäischen Wirtschaftsraum (EWR) und die Schweiz Herzlichen Dank, dass Sie sich für ein Yamaha Produkt entschieden haben. In dem unwahrscheinlichen Fall, dass die Garantie für das Yamaha-Produkt in Anspruch genommen werden muss, wenden Sie sich bitte an den Händler, bei dem es gekauft wurde. Sollten Sie auf Schwierigkeiten stoßen, wenden Sie sich bitte and die Yamaha Repräsentanz in Ihrem Land.
- Page 15 Schwingspulen, was Stereowiedergabe mit nur einem Lautsprecher erlaubt. Er eignet sich perfekt für Deckeneinbaulautsprecher Badezimmer, Einbauschränke, Eingänge und andere Der NS-ICS600 erzeugt reellen Stereoklang mit nur beengte Verhältnisse. einem Deckeneinbaulautsprecher, womit es sich • Platzieren Sie den Lautsprecher nicht an einem Ort, an dem perfekt für kleinere Räume eignet, die keine zwei...
-
Page 16: Vorbereitung
Vergewissern Sie sich nach dem Auspacken, dass Zum Installieren der Lautsprechers an der Decke die folgenden Artikel enthalten sind. sind die folgenden Werkzeuge bereitzuhalten. * Verwenden Sie Werkzeug, das für das Material der Montagefläche geeignet ist. Lautsprecher NS-ICS600 Kreuzschlitz- Bleistift Bohrmaschine Schraubendre Stichsäge Abisolierzange... -
Page 17: Vorgehen Zum Installieren
Vorgehen zum Installieren Hier ist das empfohlene Vorgehen für die Installation in Stecken Sie die Stichsäge mit der Spitze in das einer Gipskartondecke beschrieben. Führungsloch und schneiden Sie am Kreisumriss entlang das Loch aus. Positionieren Sie die Lochschablone an der für den Lautsprecher vorgesehenen Stelle. - Page 18 Schieben Sie den Lautsprecher in das Loch. Richten Sie die Hochtöner aus. Lockern Sie die vier Schrauben um ca. eine • Richten Sie den Hochtöner durch vorsichtiges Drehung gegen den Uhrzeigersinn. Dadurch Drücken am Chassisrand auf die Hörposition. können sich die Klemmen leichter öffnen. •...
-
Page 19: Anschliessen An Den Verstärker/Receiver
Sie an der Klemme leicht am Kabel ziehen. ACHTUNG • Do not let the bare speaker wires touch each other as this could damage the speaker or amplifier/receiver, or both. TECHNISCHE DATEN NS-ICS600 NS-ICS600 Hinten offener 2-Wege-Lautsprecher Ⓛ Hochtöner 2,5-cm-Weichkalotte Chassis Ⓡ... - Page 20 Yamaha si impegna, entro i limiti delle condizioni illustrate di seguito, a riparare (o sostituire, a discrezione esclusiva di Yamaha) il prodotto difettoso o qualsiasi sua parte senza alcun addebito per le parti o per il lavoro. Yamaha si riserva il diritto di sostituire un prodotto con uno di tipo, valore e/o condizione simile nel caso un modello particolare non sia più...
- Page 21 • Non collocare l’altoparlante in un posto in cui può entrare in Il NS-ICS600 fornisce suoni stereo reali con un solo contatto con elementi quali gocce d’acqua o vicino a fonti di altoparlante da incasso a soffitto ed è perfetto per calore/umidità.
- Page 22 • Quando installate l’altoparlante da incasso a soffitto NS-ICS600 fate attenzione al peso del prodotto (si veda la pagina delle specifiche) e alla resistenza del materiale in cui state installando l’altoparlante.
- Page 23 Come installare Questa è la procedura d’installazione consigliata quando Inserire la punta di un gattuccio nel foro pilota e si effettua l’installazione su lastra di cartongesso. poi segare tutt’attorno il contorno circolare. Posizionare la sagoma modello nel punto in cui s’installa l’altoparlante.
- Page 24 Inserire l’altoparlante nel foro. Allentare quattro viti Regolare l’angolo dei tweeter. approssimativamente una va in senso antiorario. • Premere con cautela il bordo esterno Ciò consente una facile apertura dei morsetti. dell’alloggiamento del tweeter verso la posizione di ascolto. • Il presente angolo movibile dei tweeter è di circa 5° a destra o a sinistra.
- Page 25 Inserire il filo nudo nel foro nel lato di ogni sull’altoparlante. terminale 10mm Sbagliato Giusto SPECIFICHE Rilascio del terminale. • Testare la stabilità del collegamento tirando NS-ICS600 leggermente il cavo sul terminale. Tipo 2 vie retro aperto Tweeter 2,5 cm tipo cupola leggera ATTENZIONE Driver Woofer 16 cm tipo conico (voice coil doppio) •...
- Page 26 (o piezas) que tenga defectos, o a sustituirlo, a discreción de Yamaha, sin cobrar ningún honorario por las piezas o la mano de obra. Yamaha se reserva el derecho de reemplazar un producto por otro de clase y/o precio y condiciones similares, en el caso de que éste no se fabrique más o se considere que las reparaciones resultan poco económicas.
- Page 27 Esto puede causar no requieren dos altavoces. mal funcionamiento del altavoz. El diseño del NS-ICS600 incluye altavoces de agudos duales y altavoces de graves con bobina de voz duales,...
-
Page 28: Preparación
• Al instalar su altavoz empotrado en el techo NS-ICS600 , tenga en cuenta el peso del producto (consulte la página de especificaciones) y la robustez del material en el cual está instalando el altavoz. -
Page 29: Cómo Instalar
Cómo instalar Este es el procedimiento de instalación recomendado Introduzca la punta del serrucho de punta en el cuando el material del lugar de la instalación es cartón- agujero piloto, y a continuación corte yeso. completamente alrededor del contorno circular. Coloque la plantilla de corte donde va a instalar el altavoz. - Page 30 Introduzca el altavoz en el agujero. Afloje cuatro Ajuste el ángulo de los altavoces de agudos. tornillos aproximadamente una vuelta en sentido • Presione con cuidado el borde exterior del alojamiento antihorario. Esto permitirá que las abrazaderas se del altavoz de agudos hacia la posición de audición. abran fácilmente.
-
Page 31: Conexión De Su Amplificador/Receptor
PRECAUCIÓN • Do not let the bare speaker wires touch each other as this could damage the speaker or amplifier/receiver, or both. ESPECIFICACIONES NS-ICS600 NS-ICS600 Tipo 2 vías con apertura posterior Ⓛ Altavoz de agudosr 2,5 cm Tipo cúpula blanda Ⓡ... - Page 32 NS-ICS600. • • • 2002/96/ • • Yamaha. • • . Yamaha...
- Page 33 ..... 6 ............1 ............6 ............2 ..........6 .............2 ..........6 ..2 ....... 6 ...............3 ......6 ...........3 ............4 NS-ICS600 NS-ICS600 • NS-ICS600...
- Page 34 NS-ICS600 × 1 × 1 × 1 • • • • • 5 – 30 • • • NS-ICS600 NS-ICS600 • 231 mm 113.5 mm 109 mm 204 mm • . 6 “ ”...
- Page 35 • • • “ ”. • • • • 360° •...
- Page 36 • • 5° 5° 5° • • • • • • •...
- Page 37 • • , FM • “ ”. • • (L), (R), “+” ( “–” • • • NS-ICS600 • 2,5- NS-ICS600 Ⓛ – 28 (-10 Ⓡ / 2,83 , 1 ×...
- Page 38 NS-ICS600 • • • • • Yamaha • • Yamaha...
- Page 39 ...............1 ..........6 ................2 ................6 ................2 ..............6 ............2 ..............6 ................3 ............6 ..............3 ................6 ..............4 NS-ICS600 NS-ICS600 • NS-ICS600...
- Page 40 NS-ICS600 × 1 × 1 × 1 • • • • 5 – 30 mm • • • • NS-ICS600 • NS-ICS600 231 mm 113.5 mm 109 mm 204 mm • “ ”...
- Page 41 • • • “ ” • • • • 360° •...
- Page 42 • • 5° 5° • • • • • • •...
- Page 43 • • “ ” • • 10 mm • • 10mm • • NS-ICS600 2.5 cm NS-ICS600 16 cm Ⓛ 65 Hz 28 kHz (-10dB) Ⓡ 20 W 60 W 89 dB / 2.83 V, 1 m 3.2 kHz 242 × 119...
- Page 44 Printed in Indonesia WV73980 © 2010 Yamaha Corporation...