Table of Contents
Advertisement
Quick Links
Advertisement
Table of Contents

Related Manuals for Pioneer MVH-AV179


Summary of Contents for Pioneer MVH-AV179
- Page 1 MVH-AV179 RDS AV RECEIVER Owner’s Manual...
-
Page 2: Table Of Contents
Contents Tuning into strong frequencies ......9 Adjusting the subwoofer settings ....17 Copyright and trademark notice .....26 Thank you for buying this Pioneer product. Setting the FM or AM tuning step .....9 Switching the rear speaker output ....17 WMA ..............26 Please read through these instructions so you Setting the alternative frequency search ..9... -
Page 3: Precaution
(ACC OFF) immediately and consult your dealer or the WARRANTY ARE THE ONLY WARRANTIES MADE BY PIONEER MAY VIOLATE APPLICABLE LAW AND MAY RESULT nearest authorized Pioneer Service Station. Do not use this OR ANY OF ITS LICENSORS, AS APPLICABLE. PIONEER IN SERIOUS INJURY OR DAMAGE. -
Page 4: Rear View Camera
Resetting the microprocessor Installing the battery transferred. ● Pioneer cannot guarantee compatibility with all USB mass storage devices and assumes no responsibility for any loss Slide the tray on the back of the remote control out and insert the CAUTION battery with the plus (+) and minus (–) poles aligned properly. - Page 5 Precaution like. CAUTION ● Remove the battery if the remote control is not used for a month or longer. ● There is a danger of explosion if the battery is incorrectly replaced. Replace only with the same or equivalent type. ●...
-
Page 6: Basic Operation
Basic operation Checking part names and MODE Press to turn the display on or off. Press to cycle through all the available sources. functions Press and hold to turn the source off. Not used. MENU MENU Not used. Thumb Not used. 1 USB cable MUTE Press to switch the mute setting to on or off. -
Page 7: How To Use The Screens
Basic operation How to use the screens Time and date setting screen 2015 Month/Date d/m/y m/d/y Time Format 12hour 24hour Setting menu screen Top menu screen System 6/10 Radio Current source AV source icons Rear View Radio By pressing the button on any screen you can display the Top menu screen. -
Page 8: Supported Av Source
Basic operation Radio ● : Closes the screen. Supported AV source Displays the preset channel list. Select an item on the list ("1" to "6") Operating list screens You can play or use the following sources with this product. ● to switch to the preset channel. -
Page 9: Starting Procedure
Radio ● 9kHz (default) Displaying the “Radio settings” p By keeping pressing and holding , you can ● 10kHz perform non stop seek tuning. If you press again, non stop screen seek tuning is canceled and the preset channel is switched. Setting the alternative fre- Starting procedure 1 Press . -
Page 10: Receiving News Announcements
Compressed audio files Radio 1 Display the “Radio settings” screen. Displays the artwork when the le Plays les in random order. Displaying the “Radio settings” screen on page 9 with the artwork is being played. 2 Touch [TA Interrupt] to switch “On” or “Off” : Does not play les in random order. -
Page 11: Starting Procedure
Compressed video files Compressed audio files Hides the touch panel keys. 6/10 To display again the keys, Starting procedure touch anywhere on the screen. 1 Press . Stop 2 Plug the USB storage device. 6/10 Abcdefghi Abcdefghi Plugging and unplugging a USB storage device on page 6 Full 3 Touch [USB]. -
Page 12: Selecting Files From The File Name List
Still image files Compressed video files Hides the touch panel keys. 6/10 To display again the keys, Selecting files from the file touch anywhere on the screen. name list Rotates the displayed picture 90° clockwise. You can select files to view using the file name list. Abcdefghi Abcdefghi 1 Touch... -
Page 13: Setting The Slideshow Interval
Still image files AUX source p Touching a folder on the list shows its contents. You can play The image is displayed on the screen. Hides the touch panel keys. a file on the list by touching it. To display again the keys, Setting the video signal Setting the slideshow interval touch anywhere on the screen. -
Page 14: System Settings
CAUTION 2 Touch [Steering Wheel Control]. If no operations are performed for seven seconds on the AV Pioneer recommends the use of a camera which outputs operation screen, the camera view will appear automatically. 3 Touch [With Adapter]. p To set the rear view camera for Rear View mode, set “Back mirror reversed images, otherwise the screen image may 4 Touch [OK]. -
Page 15: Setting The Beep Sound
System settings Displaying the “System” setting screen on page 14 The adjustment results are saved. p This setting is available only when you stop your vehicle in a safe place and apply the parking brake. 2 Touch [System Language]. Setting the dimmer 1 Display the “System”... -
Page 16: Audio Adjustments
System settings Audio adjustments 3 Touch [Picture Adjustment]. Displaying the “Audio” setting Adjusting source levels 4 Touch the item to select the function to be screen SLA (source level adjustment) lets you adjust the volume level of adjusted. each source to prevent radical changes in volume when switch- ●... -
Page 17: Adjusting The Subwoofer Settings
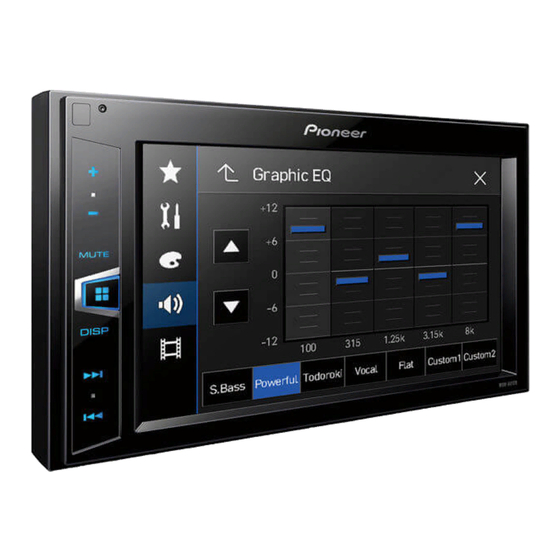
Audio adjustments Adjusting the subwoofer Boosting the bass Customizing the equalizer curves settings 1 Display the “Audio” setting screen. You can adjust the currently selected equalizer curve setting as desired. Adjustments can be made with a 5-band graphic Displaying the “Audio” setting screen on page 16 p This function is available only when “Subwoofer”... -
Page 18: Theme Menu
Theme menu Favorite menu Common operations Registering your favorite menu items in shortcuts allows you to Selecting the theme color quickly jump to the registered menu screen by a simple touch on the “Favorites” screen. A theme color can be selected from 3 different colors. p Up to 12 menu items can be registered in the favorite menu. -
Page 19: Other Functions
Common Other functions operations Setting the video signal for the CAUTION Do not turn off the engine while restoring the settings. ● rear view camera Full: A 4:3 picture is enlarged in the horizontal direction only, 1 Display the “System” setting screen. enabling you to enjoy an image without any omissions. -
Page 20: Connection
● When replacing the fuse, be sure to only use a fuse of malfunction and permanent damage to the product. Pioneer does not recommend that you install this the rating prescribed on this product. ● Do not shorten any leads. If you do, the protection ●... -
Page 21: Notice For The Blue/White Lead
Connection lead must be connected to the power supply side of the Notice for the blue/white lead Power cord parking brake switch. a Power supply side ● When the ignition switch is turned on (ACC ON), a control b Parking brake switch signal is output through the blue/white lead. -
Page 22: Power Amp (Sold Separately)
Connection WARNING USE INPUT ONLY FOR REVERSE OR MIRROR IMAGE REAR VIEW CAMERA. OTHER USE MAY RESULT IN INJURY OR DAMAGE. CAUTION ● The screen image may appear reversed. ● With the rear view camera you can keep an eye on trailers, or back into a tight parking spot. -
Page 23: External Video Component And The Display
Installation Connection a To Yellow External video component and Precautions before installation b To Red, white the display c To video output CAUTION d To audio outputs e External video component (sold separately) Never install this product in places where, or in a manner The appropriate setting is required to use the external video that: ●... -
Page 24: Installation Using The Screw Holes On The Side Of This Product
The most common problems are listed below, along with likely causes and solutions. If a solution to your problem cannot be found here, contact your dealer or the nearest authorized Pioneer service facility. 30° Problems with the AV screen The screen is covered by a caution message and the video ●... -
Page 25: Detailed Information For Playable Media
● disappear even after the engine is switched off/on, contact Protocol: bulk ● your dealer or an authorized Pioneer Service Station for You cannot connect a USB storage device to this product via Video resolution not supported a USB hub. -
Page 26: Copyright And Trademark Notice
Appendix Bit rate: 8 kbps to 320 kbps (CBR), VBR California, Berkeley and its contributors. Folder selection sequence or other operations may be Sampling frequency: 8 kHz to 48 kHz 4. Neither the name of the University nor the names of its con- altered, depending on the encoding or writing software. -
Page 27: Using The Lcd Screen Correctly
● File system ..............FAT16, FAT32 nearest authorized Pioneer Service Station. The LCD screen is exposed in order to increase its visibility MP3 decoding format ......MPEG-1 & 2 Audio Layer 3 within the vehicle. - Page 32 TEL: 65-6472-7555 PIONEER ELECTRONICS AUSTRALIA PTY. LTD. 5 Arco Lane, Heatherton, Victoria, 3202, Australia TEL: (03) 9586-6300 PIONEER ELECTRONICS DE MEXICO S.A. DE C.V. Blvd. Manuel Avila Camacho 138, 10 piso Col.Lomas de Chapultepec, Mexico, D.F. 11000 Tel: 52-55-9178-4270, Fax: 52-55-5202-3714 先鋒股份有限公司...