Advertisement
Quick Links
Ceiling Fan & Light Remote Control
User Guide
PACKAGE CONTENTS
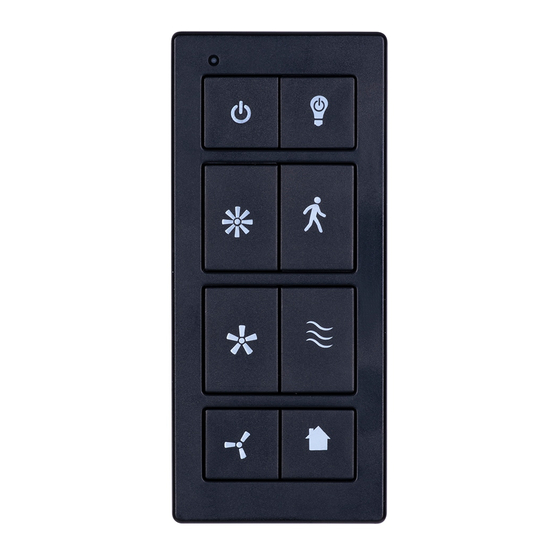
Remote
HARDWARE CONTENTS
Note: Some extra hardware may be included. The quantity listed above is the number
required for installation.
IMPORTANT SAFETY INSTRUCTIONS
CAUTION:
1. Read and keep this instruction sheet for future reference.
2. Switch off the power at the circuit breaker before working on receiver or ceiling fan.
3. If you are unfamiliar with installing electrical wiring contact a qualified electrician.
4. This unit is to be used for the control of a ceiling fan and its electrical source must be
AC 110/120V, 60Hz.
5. Rated for indoor or damp locations. Do not immerse in water.
6. Do not use this remote with fans that have pre-installed remote controls.
7. To reduce the risk of fire or injury, do not use this product in conjunction with any
variable (rheostat) wall control.
8. Exhausted batteries should be removed from the remote. Do not mix old and new
batteries.
9. Non-rechargeable batteries should not be recharged.
RECEIVER INSTALLATION
For fans mounted to a vaulted ceiling, ensure the ceiling angle is less than 20 degrees.
For hugger-style fans, installation is only recommended when its mounting bracket is
specifically designed to hold a receiver.
1. Turn power off at the circuit breaker.
2. Remove ceiling fan canopy from the mounting bracket. If necessary, disconnect
existing wiring between ceiling fan and supply at electrical junction box. (Tool
required for assembly: Phillips screwdriver, not included).
3. Slide the receiver into the mounting bracket (Figure 1), being careful not to
pinch the antenna wire.
4. Make wiring connections (Figure 2). Warning: Incorrect wire connection can damage
this receiver and could cause injury or fire.
5. Push all connected wires back into the junction box and re-install the canopy onto
the mounting bracket.
6. Switch power back on at the circuit breaker.
7. Using the pull chains on the fan, set fan speed to high and light to on. Note: Once
remote is installed, do not use pull chains to change fan or light settings.
ACTIVATE THE SYNCING PROCESS (SMART SYNC™)
The remote is synced at the factory and should work right out of the box. Should it become necessary to re-sync the remote, please
follow the steps below:
1. After assembly is complete, switch the power on. Within 30 seconds, remove the battery door from the back of the remote using a
flat-head screwdriver (not included). Insert the two CR2032 batteries into the remote; ensure the positive pole of the batteries face
up (as pictured) and then replace the battery door.
2. Switch the power to the fan off and back on again. Within 30 seconds, press and hold the HIGH SPEED and LOW SPEED buttons
(or the "LEARN" button, located in the battery compartment) for 5 seconds. Fan will turn on at low speed and light off. This
confirms the syncing process is successful.
It is not necessary to ACTIVATE THE SYNCING PROCESS after replacing the battery.
Note: To control two receivers with one transmitter, turn power on to both receivers simultaneously and ACTIVATE THE SYNCING
PROCESS.
Push-in
Connector (x 2)
3V Battery (x 2)
Receiver
Wire Connector (x 3)
Item #0899466
Model #42136
Antenna
Note: Insert the receiver into the mounting
bracket with the flat side facing the ceiling.
Figure 1
White (neutral)
Black (hot/power)
Push-in
Connector
Wire Connector
Figure 2
LED Indicator
Battery
Compartment
Battery Door
Figure 3
Receiver
Battery
Advertisement

Related Manuals for Honeywell 42136


Summary of Contents for Honeywell 42136
- Page 1 Ceiling Fan & Light Remote Control Item #0899466 Model #42136 User Guide PACKAGE CONTENTS Receiver Antenna Push-in Connector (x 2) Note: Insert the receiver into the mounting Remote 3V Battery (x 2) Receiver bracket with the flat side facing the ceiling.
- Page 2 FCC ID 2AQZU-18007 The Honeywell Trademark is used under license from Honeywell International Inc. Honeywell International Inc. makes no representations or warranties with respect to this product.