Advertisement
English
Français
Before operating this unit, please read these instructions completely.
Avant d'utiliser cet appareil, nous vous recommandons de lire l'ensemble
de ces instructions et de les ranger dans un endroit accessible pour une
consultation ultérieure.
Operating Instructions
Household Massage Lounger
1
F1
Mode d'emploi
Fauteuil vibromasseur
Model No./Nº de modèle
EP-MA50
Advertisement
Table of Contents

Summary of Contents for Panasonic EP-MA50
- Page 1 Operating Instructions Mode d’emploi Household Massage Lounger Fauteuil vibromasseur EP-MA50 Model No./Nº de modèle English Français Before operating this unit, please read these instructions completely. Avant d’utiliser cet appareil, nous vous recommandons de lire l’ensemble de ces instructions et de les ranger dans un endroit accessible pour une...
-
Page 2: Important Safety Instructions
IMPORTANT SAFETY INSTRUCTIONS Basic precautions should always be followed when using an electrical unit, including the following. Please ensure that you read all instructions before using the Household Massage Lounger. DANGER – To reduce the risk of electric shock: 1. Always unplug this unit from the electrical outlet immediately after using and before cleaning. WARNING –... -
Page 3: Safety Precautions
SAFETY PRECAUTIONS CAUTION: To avoid the risk of injury: 1. Persons with any of the conditions listed below or who are undergoing medical treatment or suffer from medical conditions should consult with their physicians before using the unit: a) Pregnant women, people who are ill, in poor physical shape. b) People suffering from back, neck, shoulder, or hip pain. -
Page 4: Operating Precautions
11. Do not sit on the chair with wet body or hair. 12. The unit must not be used in “wet rooms” (sauna, swimming pool) or outdoors. 13. Do not attempt to open or disassemble any part of the unit. Only use an authorized Panasonic servicer to fix your unit. -
Page 5: Grounding Instructions
GROUNDING INSTRUCTIONS This product must be grounded. If it should malfunction or break down, grounding provides a path of least resistance for electric current to reduce the risk of electric shock. This product is equipped with a cord having an equipment-grounding conductor and a grounding plug. -
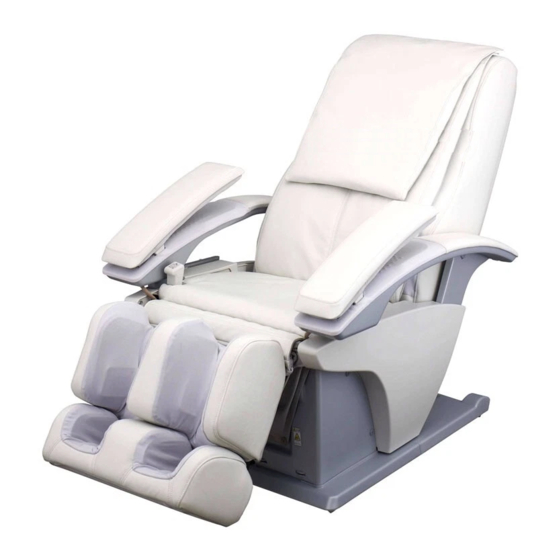
Page 6: Part Names And Functions
Part names and functions Main unit Front Retracted position of massage Seat Legrest heads • Air bag for Stretch program is Legrest Slide Lever built in. Pillow • Extendable length to approx. Leg/Sole massage section 4.7 in. (12 cm). Back Cushion •... - Page 7 Back Back Cover Power Cord Controller tray Power plug Controller Safety Precaution Label • See page 7 to 8. Leg cover Child Safety Decal Power Supply Box Lock Switch Power Switch Lock Switch Key Lock Switch Key Tag • For preventing children from swallowing it by accident.
- Page 8 Controller Cover closed Off/On button Program Selection buttons Cover open • See page 17. Massage intensity adjustment dial • Intensity of the massage (pressure of the massage heads pressing onto the body) can be adjusted. • Intensity of the Stretch program can be adjusted.
- Page 9 Display Time Remaining Display Operation Display Massage Area Display • Current massage operation is • Current general massage area (During massage) displayed while massaging. will flash. • Currently selected operation is displayed when Manual (After finishing massage) Operation is selected. FULL ROLL Massage Intensity Display •...
- Page 10 Setting up the massage lounger 1 Where to use the unit • Ensure there is adequate space to recline. Keep at least 4" (10 cm) away from the wall. • Do not expose the massage lounger to direct sunlight or high temperatures, such as in front of heating sources, because this can Approx.
- Page 11 Confirm that the main unit and the accessories are in the box. Main unit Controller Accessories Armrests (Right/Left) Back Cushion Pillow Sole Reflexology Plates Right/Left indication • This is installed on the sole massage section prior to leaving the factory. Air plug •...
- Page 12 Assembly 1 Attaching the armrests (On both the right and left sides) Armrest Insert the armrest into the unit. • Be careful to avoid pinching your fingers. Protrusion Align the position. Groove Fit in the grooves and protrusions in Front Back Groove the front and back of the unit and...
- Page 13 2 Connecting the air plugs (On both the right and left sides) • Insert the air plugs into the unit. Push on the air plugs until you hear it click into place. Front Air plug 3 Raising the backrest to the upright position Insert the power plug into the power outlet.
- Page 14 4 Mount the controller tray on the right side • Mount it on the left side if the right side will be next to the wall or similar. If you want to mount the controller on the left side Legrest Press the button on the controller to turn on the power.
- Page 15 5 Attaching the controller Fasten the cord to the groove at the bottom Place the controller onto the of tray. controller tray. 6 Attaching the back cushion Attach the back cushion to the velcro fasteners on the unit. Back Cushion Velcro fasteners 7 Attaching the pillow Attach the pillow to the velcro fasteners.
- Page 16 Before sitting down Check the following before using the unit 1 Check the surrounding area Make sure there are no objects, people, or pets in the vicinity of the unit. 2 Check the power cord and the power plug See Warning No. 8 on page 1. 3 Switching on the power supply Insert the power plug into an electrical outlet.
- Page 17 Make sure there is no foreign matter Hand/Arm massage section between the unit. See Caution No. 17 on page 3. Seat Make sure the massage heads are in the retracted position. When the massage heads are not in the retracted position Press the button twice to return the massage heads to the retracted position.
- Page 18 When you want a complete massage Auto program Press the button to turn on the power. Flash • The power will turn off automatically if the massage does not start within 3 minutes after turning on the power. Press one of the flashing buttons ) to select the program.
- Page 19 Body scanning will commence when the program is selected. • The body scanning will properly detect height ranges between approximately 55 and 72.8 in. (140 and 185 cm). Sit as far back in the seat as possible The unit will automatically recline to the correct with your head on the pillow.
- Page 20 To customize 1 Adjusting the intensity of massage for neck, shoulder, back, or lower back Intensity of the massage for current position can be adjusted by turning the dial on the controller. • For Auto program Intensity Sensor will function. Movement of the massage head is adjusted automatically so the pressure of the massage head pressing the body stays same even if the curve or...
- Page 21 3 Adjusting the reclining angle and legrest to massage in relaxing position To adjust the reclining angle and the legrest angle: To adjust the length of the legrest: Length of the legrest can be adjusted by Adjust by pressing button. pulling on the legrest slide lever and pushing with the soles of your feet.
- Page 22 When you want to register the Auto program with intensity of massage adjusted to your preference User Memory Program Press the button while massaging. Flash Press the button you want to register from , or Settings that can be registered •...
- Page 23 To start the registered program Press the button to turn on the power. The registered button will flash. Select your favorite program. Press Massage for the registered program will start after the body scanning. To change and overwrite the registered settings Press button.
- Page 24 When you want the hip area stretched Stretch Program About the Stretch program • This is a program to flex the muscles around the pelvis by twisting or lifting using the airbags built-in in the backrest and seat. Press the button to turn on the power.
- Page 25 To customize Adjusting the intensity of the Stretch program Step 1 Step 2 Intensity can be adjusted with the dial on the controller. (4 steps) Step 3 Step 4 To use the Stretch program effectively It will be more effective by reclining the backrest. Press the button.
- Page 26 When you want a concentrated massage of a particular body part with a specific massage mode, such as “Kneading on the Neck” or “Tapping on the Shoulder” Manual Operation Press the button to turn on the power. • The power will turn off automatically if the massage does not start within 3 minutes after turning on the power.
- Page 27 Body scanning for Manual Operation Neck/Shoulder/Full roll... Normal body scanning. Back/Lower back .... Simple body scanning. (The massage heads will not come up to the shoulder position.) To change an action in the middle of a massage Select your favorite one again in Steps •...
- Page 28 3 Adding tapping actions to the current operation Press the button. • Select with steps 3 to 5 on page 25 if you only want the tapping actions to be performed. 4 Fine adjustment of the position It can be adjusted with the button.
- Page 29 When you want to perform Leg/Sole air massage, Hand/Arm air massage and/or Leg Stretch Air Massage Press the button to turn on the power. • The power will turn off automatically if the massage does not start within 3 minutes after turning on the power. Open the cover.
- Page 30 Effective method for using the leg/sole massage • See page 31 for details about the operations of the Leg/Sole massage. Adjust the legrest so that your sole fits on it completely. For a person with small body dimensions For a person with large body dimensions •...
- Page 31 How to use the Hand/Arm massage • See page 31 for details about the operations of the Hand/Arm massage. See Caution No. 14 on page 2. Lift the Hand/Arm massage section up. Insert the hand with fingers extended. Effective method for using the Hand/Arm massage Position the forearm and hand at the center of the armrest.
- Page 32 Operations of the Leg/Sole massage, Hand/Arm massage, and Leg Stretch Operation of the Leg/Sole massage Sole Calves will be compressed by pressure from both sides. Foot will be compressed from side and bottom using the air. Operation of the Hand/Arm massage Hand/Arm Hand to arm will be compressed as it is clamped from top and bottom.
- Page 33 When you want to adjust the reclining angle, legrest, and/or pillow Adjusting the reclining angle and the angle of the legrest Press the button to turn on the power. Press the button to adjust the angle. • Movement will continue until a “beep-beep-beep” sound is heard if the buttons are held down. •...
- Page 34 Sliding the legrest Slide the legrest to your favorite position by pulling the legrest slide lever. [The legrest will slide approximately 4.7 in. (12 cm).] Pull the legrest slide lever back. Push with the soles of your feet to slide the legrest out.
- Page 35 After completing the massage Interrupting the massage Return the legrest to the original position and then press the button. • The massage heads move to the retracted position. • The legrest lowers and the backrest raises automatically. (The backrest will move after the massage heads retract.) Pull the legrest slide lever.
- Page 36 Disconnecting the power See Danger No. 1 on page 1, Caution No. 2 on page 2, and No. 10 on page 3. Slide the power switch to the “off” Turn the lock switch key to the “lock” position. position. Power supply box Remove the power plug from the The lock switch key must be stored electrical outlet.
-
Page 37: Cleaning And Maintenance
Cleaning and Maintenance See Danger No. 1 on page 1. Areas covered with synthetic leather Wipe these areas with a soft, dry cloth. • When using the commercially available leather-care products (wipes), follow its instructions. • If the synthetic leather is particularly dirty, wipe it in the following manner. 1. -
Page 38: Moving The Unit
Moving the Unit See Caution No. 18 on page 3. • When moving the unit, lift it with 2 persons, or move it with the wheels after placing a mat or something on the floor, so the floor will not be scratched. You may damage the floor by dragging or pushing the unit while it is still in a state of installment. - Page 39 Using the wheels to move the unit Move the unit by holding onto the fabric section on the underside of the legrest and using the wheels. Fabric section Roll the unit slowly Hold onto the fabric section on Place the controller and the underside of the legrest power cord on the seat Lift it no higher than...
-
Page 40: Error Display
Error display Contents of the error will be displayed in the remaining time display area when an error occurs during the operation. Time Remaining Display <Example of error display> • For the error “U10” will flash alternately. Error display Contents For safety reasons, operation will terminate automatically when it cannot detect if someone is seated. - Page 41 Problem Cause and Remedy The massage heads stop during operation. (All the displays and buttons on the controller will flash and then turn off.) If excessive force is applied to the massage heads during operation, in the interests of safety the massage heads may stop moving.