Cisco RV120W Administration Manual
Wireless-n vpn firewall
Hide thumbs
Also See for RV120W:
- Administration manual (154 pages) ,
- Quick start manual (21 pages) ,
- Manual (2 pages)
Table of Contents
Advertisement
Advertisement
Table of Contents

Related Manuals for Cisco RV120W


Summary of Contents for Cisco RV120W
- Page 1 ADMINISTRATION GUIDE Cisco Small Business RV120W Wireless-N VPN Firewall...
- Page 2 Revised June 2011 Cisco and the Cisco Logo are trademarks of Cisco Systems, Inc. and/or its affiliates in the U.S. and other countries. A listing of Cisco's trademarks can be found at www.cisco.com/go/trademarks. Third party trademarks mentioned are the property of their respective owners. The use of the word partner does not imply a partnership relationship between Cisco and any other company.
-
Page 3: Table Of Contents
Product Overview Getting to Know the Cisco RV120W Mounting the Cisco RV120W Connecting the Equipment Setting Up the Cisco RV120W Using the Setup Wizard Using the Getting Started Page Navigating through the Pages Saving Your Changes Viewing the Help Files... - Page 4 Configuring the WAN (Internet) Settings Configuring the LAN (Local Network) Settings Configuring Routing Configuring Port Management Configuring Dynamic DNS (DDNS) Cisco RV120W Administration Guide Configuring the IPv4 WAN (Internet) Configuring Automatic Configuration (DHCP) Configuring Static IP Configuring PPPoE Configuring PPTP...
- Page 5 Configuring IPv6 Chapter 3: Configuring the Wireless Network A Note About Wireless Security Understanding the Cisco RV120W’s Wireless Networks Configuring Basic Wireless Settings Configuring Advanced Wireless Settings Configuring Wi-Fi Protected Setup Configuring a Wireless Distribution System (WDS) Cisco RV120W Administration Guide...
- Page 6 Chapter 4: Configuring the Firewall Cisco RV120W Firewall Features Configuring Access Rules Configuring Attack Prevention Configuring Content Filtering Configuring URL Blocking Configuring Port Triggering Configuring Port Forwarding Configuring a DMZ Host Configuring Advanced Firewall Settings Firewall Configuration Examples Chapter 5: Configuring Virtual Private Networks (VPNs) and Security...
- Page 7 Configuring VPN Passthrough Using Certificates for Authentication Generating New Certificates Importing a Certificate from a File Exporting the Router’s Current Certificate Using the Cisco RV120W With a RADIUS Server Configuring 802.1x Port-Based Authentication Configuring Web Access Configuring Remote Management Configuring User Accounts...
- Page 8 Configuring Time Settings Backing Up and Restoring the System Upgrading Firmware Rebooting the Cisco RV120W Restoring the Factory Defaults Chapter 8: Viewing the Cisco RV120W Status Viewing the Dashboard Viewing the System Summary Viewing the Wireless Statistics IPsec Connection Status...
- Page 9 Viewing Available LAN Hosts Viewing Port Triggering Status Viewing Port Statistics Viewing Open Ports Appendix A: Using Cisco QuickVPN for Windows 7, 2000, XP, or Vista Overview Before You Begin Installing the Cisco QuickVPN Software Using the Cisco QuickVPN Software...
-
Page 10: Chapter 1: Introduction
Introduction This chapter describes the features of the Cisco RV120W, guides you through the installation process, and gets you started using the Device Manager, a browser- based utility for configuring the Cisco RV120W. • • • • • • •... -
Page 11: Lan Ethernet Interfaces
Introduction Product Overview LAN Ethernet Interfaces The Cisco RV120W provides four full-duplex 10/100 Ethernet LAN interfaces that can connect up to four devices. Wireless Access Point The wireless access point supports the 802. 1 1n standard with MIMO technology, which multiplies the effective data rate. This technology provides better throughput and coverage than 802. -
Page 12: Security
Voice over IP (VoIP) applications and bandwidth-intensive video streaming applications. Configuration and Administration With the Cisco RV120W’s embedded web server, you can configure the firewall’s settings using the browser-based Device Manager. The Cisco RV120W supports Internet Explorer, Firefox, and Safari web browsers. -
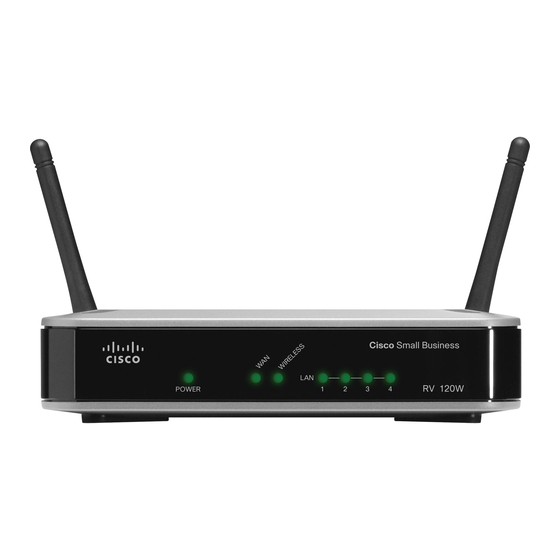
Page 13: Getting To Know The Cisco Rv120W
LAN—These four LEDs correspond to the four LAN (Ethernet) ports of the Cisco RV120W. If the LED is continuously lit green, the Cisco RV120W is connected to a device through the corresponding port (1, 2, 3, or 4). The LED for a port flashes green when the Cisco RV120W is actively sending or receiving data over that port. -
Page 14: Back Panel
WAN Port—The WAN port is connected to your Internet device, such as a cable or DSL modem. ON/OFF Power Switch—Press this button to turn the Cisco RV120W on and off. When the button is pushed in, power is on. Power Port—The power port is where you connect the AC power cable. -
Page 15: Mounting The Cisco Rv120W
Introduction Mounting the Cisco RV120W Mounting the Cisco RV120W You can place your Cisco RV120W on a desktop or mount it on a wall. Installation Guidelines • • • For desktop placement, place the Cisco RV120W device horizontally on a flat surface so that it sits on its four rubber feet. -
Page 16: Cisco Rv120W Administration Guide
Introduction Mounting the Cisco RV120W Place the wall-mount slots over the screws and slide the device down until the STEP 3 screws fit snugly into the wall-mount slots. Cisco RV120W Administration Guide... -
Page 17: Connecting The Equipment
• Optional • • Cisco RV120W Administration Guide Functional Internet Connection (Broadband DSL or cable modem). Ethernet cable for WAN (Internet) connection. PC with functional network adapter (Ethernet connection) to run the Setup Wizard or the Device Manager. The Setup Wizard is supported on Microsoft Windows 2000, Windows XP, Windows Vista, and Windows 7. - Page 18 Power off all equipment, including the cable or DSL modem, the PC you will use to STEP 1 connect to the RV120W, and the RV120W. Use an Ethernet cable to connect the WAN port of the Cisco RV120W to your STEP 2 cable or DSL modem.
- Page 19 Connect one end of a different Ethernet cable to one of the LAN (Ethernet) ports on STEP 3 the back of the RV120W. (In this example, the LAN 2 port is used.) Connect the other end of the cable to an Ethernet port on the PC.
- Page 20 Introduction Connecting the Equipment Connect the power adapter to the Cisco RV120W power port (12VDC). STEP 5 Use only the power adapter that is supplied with the device. Using a different CAUTION power adapter could damage the device. Plug the other end of the adapter into an electrical outlet. You may need to use a STEP 6 specific plug (supplied) for your country.
-
Page 21: Setting Up The Cisco Rv120W Using The Setup Wizard
Setting Up the Cisco RV120W Using the Setup Wizard With the RV120W powered on and connected to a PC, use the Setup Wizard to configure the Cisco RV120W. To use the Setup Wizard: Start the PC connected to the RV120W. -
Page 22: Using The Getting Started Page
While you are entering the password, the Setup Wizard provides you with instant feedback regarding the strength of the password. After the Setup Wizard is done configuring the RV120W, the Getting Started page appears. See information. -
Page 23: Initial Settings
Firmware Backup/Restore Settings Configure Site to Site Configure Web Access Cisco RV120W Administration Guide Click this link to launch the Setup Wizard. Click this link to open the Internet Setup page. Configuring the IPv4 WAN (Internet), page Click this link to open the LAN Configuration page. -
Page 24: Device Status
Viewing the Wireless Statistics, page Click this link to open the IPsec Connection Status page. IPsec Connection Status, page Click this link to open Cisco’s support page. Click this link to visit Cisco’s online support forums. 136. 139. 142. 143. - Page 25 Introduction Navigating through the Pages Click a menu item on the left panel to expand it. Click the menu names displayed underneath to perform an action or view a sub-menu. Cisco RV120W Administration Guide...
-
Page 26: Saving Your Changes
Introduction Saving Your Changes Saving Your Changes When you finish making changes on a configuration page, click Save to save the changes, or click Cancel to undo your changes. Cisco RV120W Administration Guide... -
Page 27: Viewing The Help Files
Connecting Devices to Your Wireless Network To connect a device such as a PC or printer to your wireless network, you must configure the wireless connection on the device using the security information you configured for the Cisco RV120W: • •... -
Page 28: Chapter 2: Configuring Networking
• • • • • Cisco recommends you use the Setup Wizard to configure basic networking on the NOTE Cisco RV120W. You can then make changes and provision advanced features using the Device Manager. Configuring the WAN (Internet) Settings If you have an IPv4 network, use these sections to configure your network. If you... -
Page 29: Configuring The Ipv4 Wan (Internet)
STEP 3 Enter MAC Address information. (See STEP 4 Click Save. STEP 5 Cisco RV120W Administration Guide Configuring Automatic Configuration (DHCP), page 20 Configuring Static IP, page 21 Configuring PPPoE, page 21 Configuring PPTP, page 22 Configuring L2TP, page 23 Configuring MTU Settings, page 24.) -
Page 30: Configuring Static Ip
Networking > WAN (Internet) > PPPoE Profiles. See Profiles, page 25 Enter MTU information. (See STEP 4 Cisco RV120W Administration Guide Enter the IP address of the WAN port. Enter subnet mask of the WAN port. Enter the IP address of the default gateway. -
Page 31: Configuring Pptp
My IP Address Server IP Address Enter MTU information. (See STEP 4 Cisco RV120W Administration Guide Configuring the MAC Address, page Enter your username assigned to you by the ISP. Enter your password assigned to you by the ISP. If your ISP supports Microsoft Point-to-Point Encryption (MPPE), check to enable MPPE encryption. -
Page 32: Configuring L2Tp
My IP Address Server IP Address Enter MTU information. (See STEP 4 Cisco RV120W Administration Guide Configuring the MAC Address, page Enter your username assigned to you by the ISP. Enter your password assigned to you by the ISP. (Optional) Enter your secret phrase. This phrase is known to you and your ISP for use in authenticating your logon. -
Page 33: Configuring Mtu Settings
Configuring the MAC Address The Cisco RV120W has a unique 48-bit local Ethernet hardware address. In most cases, the default MAC address is used to identify your Cisco RV120W to your ISP. However, you can change this setting if required by your ISP. -
Page 34: Configuring Pppoe Profiles
STEP 3 PPPoE login information): Profile Name Username Password Cisco RV120W Administration Guide Use Default Address—(Recommended) choose this option to use the default MAC address. Use This Computer's Address—Choose this option to assign the MAC address of your computer. Use This MAC—Choose this option if you want to use the MAC address of the PC on which you are connecting to the Device Manager. - Page 35 Choose the authentication type from the drop-down menu: Auto-negotiate—The server sends a configuration request specifying the security algorithm set on it. Then, the Cisco RV120W sends back authentication credentials with the security type sent earlier by the server. PAP—The Cisco RV120W uses the Password Authentication Protocol (PAP) to connect to the ISP.
-
Page 36: Configuring The Lan (Local Network) Settings
To configure the host name of the Cisco RV120W: Choose Networking > LAN (Local Network) > IPv4 LAN (Local Network). STEP 1 In the Host Name field, enter the host name of the Cisco RV120W. You can use STEP 2 only alpha-numeric characters and the hyphen. -
Page 37: Configuring Dhcp
To reconnect your PC to the Cisco RV120W: STEP 4 • • Open a new browser window and enter the new IP address of the Cisco RV120W STEP 5 to reconnect. Configuring DHCP By default, the Cisco RV120W functions as a DHCP server to the hosts on the Wireless LAN (WLAN) or LAN network and assigns IP and DNS server addresses. -
Page 38: Configuring The Dns Proxy
DHCP clients receive the DNS IP addresses of the ISP. Cisco RV120W Administration Guide None—Choose this option if the Cisco RV120W is not going to act as a DHCP server. DHCP Server—Choose this option to configure the Cisco RV120W to be a DHCP server and enter this information: Domain Name—... -
Page 39: Configuring Virtual Lan (Vlan) Membership
Choose Networking > LAN (Local Network) > IPv4 LAN (Local Network). STEP 1 In the DNS Proxy field, check to enable the Cisco RV120W to act as a proxy for all STEP 2 DNS requests and communicate with the ISP's DNS servers. -
Page 40: Configuring Multiple Vlan Subnets
Enter the Subnet Mask for the new IP address. c. Click Save. If you are connected to the Cisco RV120W by the LAN port that is a member of this VLAN, you might have to release and renew the IP address on the PC connected to the LAN port, or manually assign an IP address to your PC that is in the same subnet as the VLAN. -
Page 41: Configuring Static Dhcp
IP address subnet as the VLAN’s IP address. Primary and Secondary DNS Server—DNS servers map Internet domain names (for example, www.cisco.com) to IP addresses. Enter the server IP addresses in these fields if you want to use different DNS servers than are specified in your WAN settings. -
Page 42: Configuring Advanced Dhcp Settings
STEP 5 Configuring Advanced DHCP Settings Configuring Automatic Configuration Download You can configure the Cisco RV120W to download a configuration file from a TFTP server. Upon rebooting, the firewall downloads the file. To configure automatic configuration download: Choose Networking > LAN (Local Network) > Advanced DHCP Configuration. -
Page 43: Adding A Dhcp Client To Configuration File Map
Internet. If your ISP has assigned you a single IP address, you want to use NAT so that the computers that connect through the Cisco RV120W are assigned IP addresses from a private subnet (for example, 192. 1 68. 1 0.0). -
Page 44: Viewing Routing Information
Information about your network routing is displayed, including the following: IPv4 Routing Table • • • • Cisco RV120W Administration Guide 37, or Destination—Destination host/network IP address for which this route is added. Gateway—The gateway used for this route. Genmask—The netmask for the destination network. - Page 45 • • • • IPv6 Routing Table • • • Cisco RV120W Administration Guide Gateway—Use gateway. R—Reinstate route for dynamic routing. D—Dynamically installed by daemon or redirect. M—Modified from routing daemon or redirect. addrconf A—Installed by C—Cache entry. !—Reject route.
-
Page 46: Configuring Static Routes
For a standard Class C IP domain, the network address is the first three fields of the Destination LAN IP; the last field should be zero. Cisco RV120W Administration Guide Metric—The distance to the target (usually counted in hops). Ref—Number of references to this route. -
Page 47: Configuring Dynamic Routing
Configuring Dynamic Routing RIP (Routing Information Protocol, RFC 2453) is an Interior Gateway Protocol (IGP) that is commonly used in internal networks. It allows the Cisco RV120W to exchange its routing information automatically with other routers, and allows it to dynamically adjust its routing tables and adapt to changes in the network. - Page 48 • • Click Save. STEP 5 Cisco RV120W Administration Guide Out Only—The firewall broadcasts its routing table periodically but does not accept RIP information from other routers. Both—The firewall both broadcasts its routing table and also processes RIP information received from other routers.
-
Page 49: Configuring Port Management
Configuring Networking Configuring Port Management Configuring Port Management The Cisco RV120W has four LAN ports. You can enable or disable ports, configure if the port is half- or full-duplex, and set the port speed. To configure LAN ports: Choose Networking > Port Management. - Page 50 Host Name. This option can be enabled here if not done on the DynDNS Web site. e. In the Update Period field, enter the number of hours before the Cisco RV120W updates the host information on DynDNS.com. If you selected TZO.com: a.
-
Page 51: Configuring Ipv6
Internet connection you have. See the sections below for detailed instructions. The Cisco RV120W can be configured to be a DHCPv6 client of the ISP for this WAN or a static IPv6 address provided by the ISP can be assigned. -
Page 52: Configuring A Static Ip Address
Under LAN TCP/IP Setup, in the IPv6 Address field, enter the IP address of the STEP 2 Cisco RV120W. The default IPv6 address for the gateway is fec0::1. You can change this 128 bit IPv6 address based on your network requirements. - Page 53 Choose the DHCP mode. If stateless is selected, an external IPv6 DHCP server is STEP 5 not required as the IPv6 LAN hosts are auto-configured by the Cisco RV120W. In this case, the router advertisement daemon (RADVD) must be configured on this device and ICMPv6 router discovery messages are used by the host for auto- configuration.
-
Page 54: Configuring Ipv6 Address Pools
Configuring IPv6 Address Pools This feature allows you to define the IPv6 delegation prefix for a range of IP addresses to be served by the Cisco RV120W’s DHCPv6 server. Using a delegation prefix, you can automate the process of informing other networking equipment on the LAN of DHCP information specific for the assigned prefix. -
Page 55: Configuring Static Routing
STEP 6 that define the destination subnet. Choose the physical network interface through which this route is accessible: STEP 7 • • Cisco RV120W Administration Guide WAN—The route goes through the WAN interface. LAN—The route goes through the LAN interface. -
Page 56: Configuring Tunneling
STEP 10 Configuring Tunneling The Cisco RV120W provides several IPv6 tunneling methods. 6to4 tunneling allows IPv6 packets to be transmitted over an IPv4 network. 6to4 tunneling is typically used when a site or end user wants to connect to the IPv6 Internet using the existing IPv4 network. -
Page 57: Configuring Intra-Site Automatic Tunnel Addressing Protocol (Isatap) Tunnels
IPv6 packets between dual-stack nodes over an IPv4 network. The Cisco RV120W is one endpoint (a node) for the tunnel. You must also set a local endpoint, as well as the ISATAP Subnet Prefix that defines the logical ISATAP subnet to configure a tunnel. -
Page 58: Configuring Router Advertisement
Click Delete. STEP 3 Configuring Router Advertisement The Router Advertisement Daemon (RADVD) on the Cisco RV120W listens for router solicitations in the IPv6 LAN and responds with router advertisements as required. This is stateless IPv6 auto configuration, and the Cisco RV120W distributes IPv6 prefixes to all nodes on the network. -
Page 59: Configuring Router Advertisement Prefixes
Click Save. STEP 6 Cisco RV120W Administration Guide 6to4—6to4 is a system that allows IPv6 packets to be transmitted over an IPv4 network. It is used when an end user wants to connect to the IPv6 Internet using their existing IPv4 connection Global/Local/ISATAP—By using ISATAP, you can integrate IPv6 traffic into a... -
Page 60: Chapter 3: Configuring The Wireless Network
• • Cisco RV120W Administration Guide A Note About Wireless Security, page 51 Understanding the Cisco RV120W’s Wireless Networks, page 54 Configuring Basic Wireless Settings, page 54 Configuring Advanced Wireless Settings, page 61 Configuring Wi-Fi Protected Setup, page 62 Configuring a Wireless Distribution System (WDS), page 63... -
Page 61: Wireless Security Tips
Enable MAC address filtering Cisco routers and gateways give you the ability to enable Media Access Control (MAC) address filtering. The MAC address is a unique series of numbers and letters assigned to every networking device. With MAC address filtering enabled, wireless network access is provided solely for wireless devices with specific MAC addresses. -
Page 62: General Network Security Guidelines
A Note About Wireless Security • • • • General Network Security Guidelines Wireless network security is useless if the underlying network is not secure. Cisco recommends that you take the following precautions: • • • • Cisco RV120W Administration Guide Enable encryption Encryption protects data transmitted over a wireless network. -
Page 63: Understanding The Cisco Rv120W's Wireless Networks
Configuring Basic Wireless Settings The following sections contain information on how to configure basic wireless settings on the Cisco RV120W. These settings apply to all of the wireless networks. Configuring Radio, Mode, and Channel Settings Choose Wireless >... -
Page 64: Configuring Wireless Security And Other Settings
The channel field specifies the frequency that the radio uses to transmit wireless STEP 6 frames. Select a channel from the list of channels or choose auto to let the Cisco RV120W determine the best channel to use based on the environment noise levels for the available channels. -
Page 65: Configuring Security
Click Enable under Wireless Isolation within SSID to separate this network from STEP 5 the other three wireless networks on the Cisco RV120W. When this feature is enabled, the network can communicate with the Cisco RV120W, but not with any of the other three networks. - Page 66 WEP Key field. The length of the key should be 5 ASCII characters (or 10 hexadecimal characters) for 64-bit WEP and 13 ASCII Cisco RV120W Administration Guide personal authentication is the preshared key (PSK) that is an alphanumeric passphrase shared with the wireless peer.
-
Page 67: Configuring Mac Filtering
If you want to see the password as you are entering it, check the Unmask Password box. c. In the Key Renewal field, enter the number of seconds after which the Cisco RV120W will generate a new key. These keys are internal keys exchanged between the Cisco RV120W and connected devices. -
Page 68: Configuring Wi-Fi Multimedia
In the DSCP to Queue table, for each ingress DSCP, you can choose the output STEP 6 queue for the traffic. The Differentiated Services Code Point (DSCP) field identifies Cisco RV120W Administration Guide Block following MAC addresses from connecting to wireless network— Blocks MAC addresses specified below from connecting to the wireless network. -
Page 69: Configuring Wireless Network (Ssid) Scheduling
Configuring Wireless Network (SSID) Scheduling You can configure each of the four available wireless networks on the Cisco RV120W to be active during certain times of the day. To configure the schedule for a wireless network: Choose Wireless > Basic Settings. -
Page 70: Configuring Advanced Wireless Settings
STEP 3 message should be sent. A DTIM field is a countdown field informing clients of the next window for listening to broadcast and multicast messages. When the Cisco RV120W has buffered broadcast or multicast messages for associated clients, it sends the next DTIM with a DTIM Interval value. -
Page 71: Configuring Wi-Fi Protected Setup
The Short Retry Limit and Long Retry Limit fields determine the number of times STEP 8 the Cisco RV120W will reattempt a frame transmission that fails. The limit applies to both long and short frames of a size less than or equal to the RTS threshold. -
Page 72: Configuring A Wireless Distribution System (Wds)
WPS. The device should begin communication with the Cisco RV120W. Setup Using a WPS Button—If the device you want to connect has a WPS button, push the button on the device. Then, on the Cisco RV120W, click Configure via PBC (push button configuration). - Page 73 Configuring the Wireless Network Configuring a Wireless Distribution System (WDS) You can manually add WDS peers that can connect to the Cisco RV120W: In the WDS Peer Table, click Add. STEP 1 Enter the MAC (hardware) address of the WDS peer and click Save.
-
Page 74: Chapter 4: Configuring The Firewall
Cisco RV120W Firewall Features You can secure your network by creating and applying access rules that the Cisco RV120W uses to selectively block and allow inbound and outbound Internet traffic. You then specify how and to what devices the rules apply. You can configure the following: •... - Page 75 WAN ports are configured; for the Cisco RV120W, you may use the IP address if a static address is assigned to the WAN port, or if your WAN address is dynamic, a DDNS (Dynamic DNS) name can be used.
-
Page 76: Configuring Access Rules
Configure access rules to control traffic to and from your network. To configure access rules, choose Firewall > Access Rules. All configured firewall rules on the Cisco RV120W are displayed in the Access Rule Table. Configuring the Default Outbound Policy You can configure the default outbound policy for the traffic that is directed from your secure network (LAN) to the Internet. - Page 77 • • • • Cisco RV120W Administration Guide Always Block—Always block the selected type of traffic. Always Allow—Never block the selected type of traffic. Block by schedule, otherwise allow—Blocks the selected type of traffic according to a schedule. Choose the schedule from the drop-down list. See Creating Firewall Schedules, page Allow by schedule, otherwise block—Allows the selected type of traffic...
- Page 78 • • • • • • • • • Cisco RV120W Administration Guide PING POP3 (Post Office Protocol) PPTP (Point-to-Point Tunneling Protocol) RCMD (command) REAL-AUDIO REXEC (Remote execution command) RLOGIN (Remote login) RTELNET (Remote telnet) RTSP (Real-Time Streaming Protocol) TCP or UDP...
- Page 79 IP address on your private network. Under Use This SNAT IP Address, check Enable and enter the SNAT IP Address. Cisco RV120W Administration Guide Any—The rule applies to traffic originating from any IP address in the local network.
-
Page 80: Configuring Attack Prevention
Configuring Attack Prevention Attacks are malicious security breaches or unintentional network issues that render the Cisco RV120W unusable. Attack prevention allows you to manage WAN security threats such as continual ping requests and discovery via ARP scans. TCP and UDP flood attack prevention can be enabled to manage extreme usage of WAN resources. -
Page 81: Configuring Content Filtering
STEP 3 Configuring Content Filtering The Cisco RV120W supports several content filtering options. You can block certain web applications or components (such as ActiveX or Java). You can set up trusted domains from which to always allow content. You can block access to Internet sites by specifying keywords to block. -
Page 82: Blocking Web Components
Click Save. STEP 3 Cisco RV120W Administration Guide Proxy—A proxy server (or simply, proxy) allows computers to route connections to other computers through the proxy, thus circumventing certain firewall rules. For example, if connections to a specific IP address are blocked by a firewall rule, the requests can be routed through a proxy that is not blocked by the rule, rendering the restriction ineffective. -
Page 83: Adding Trusted Domains
Select the group to which to apply the keyword blocking. If you need to configure STEP 4 a new group, click Configure LAN Groups. (See Network) Groups, page Enter the keyword to block. STEP 5 Click Save. STEP 6 Cisco RV120W Administration Guide Configuring LAN (Local 86.) Enabling... -
Page 84: Configuring Port Triggering
Select whether the port uses TCP, UDP, or both protocols. STEP 5 In the Outgoing (Trigger) Port Range section, specify the port number or range of STEP 6 port numbers that will trigger this rule when a connection request from outgoing Cisco RV120W Administration Guide... -
Page 85: Configuring Port Forwarding
• • • • Cisco RV120W Administration Guide Action—Whether to block or allow traffic (always or by schedule) that meets these filter rules, and when the rule is applicable. Service—Service for which this port forwarding rule is applicable. Status—A port forwarding rule can be disabled if not in use and enabled when needed. - Page 86 • • • • Cisco RV120W Administration Guide Always Block—Always block the selected type of traffic. Always Allow—Never block the selected type of traffic. Block by Schedule—Blocks the selected type of traffic according to a schedule. Choose the schedule from the drop-down list. See Firewall Schedules, page Allow by Schedule—Allows the selected type of traffic according to a...
- Page 87 • • • • • • • • • • Cisco RV120W Administration Guide NEWS NFS (Network File System) NNTP (Network News Transfer Protocol) PING POP3 (Post Office Protocol) PPTP (Point-to-Point Tunneling Protocol) RCMD (command) REAL-AUDIO REXEC (Remote execution command)
- Page 88 Otherwise, choose Specify Port and enter the port number in the Port Number field. Click Save. STEP 8 Cisco RV120W Administration Guide VDOLIVE (live web video delivery) SSH (secure shell) SIP-TCP or SIP-UDP Any—Specifies that the rule being created is for traffic from the given...
-
Page 89: Configuring A Dmz Host
Configuring a DMZ Host Configuring a DMZ Host The Cisco RV120W supports DMZ options. A DMZ is a sub-network that is open to the public but behind the firewall. DMZ allows you to redirect packets going to your WAN port IP address to a particular IP address in your LAN. It is recommended that hosts that must be exposed to the WAN (such as web or e-mail servers) be placed in the DMZ network. -
Page 90: Configuring Mac Address Filtering
Traffic coming in from a specified MAC address will be filtered depending upon the policy. Cisco RV120W Administration Guide Private Range Begin—The starting IP address in the private (LAN) IP address. -
Page 91: Configuring Ip/Mac Address Binding
IP/MAC Binding allows you to bind IP addresses to MAC address. Some machines are configured with static addresses. To prevent users from changing static IP addresses, IP/MAC Binding should be enabled. If the Cisco RV120W sees packets with matching IP address but inconsistent MAC addresses, it drops those packets. -
Page 92: Creating Custom Services
If you chose TCP or UDP, in the Start Port field, enter the first TCP or UDP port of STEP 5 the range that the service uses. In the Finish Port field, enter the last TCP or UDP port of the range that the service uses. Cisco RV120W Administration Guide... -
Page 93: Creating Firewall Schedules
Configuring Sessions You can limit the maximum number of unidentified sessions and half-open sessions on the Cisco RV120W. You can also introduce timeouts for TCP and UDP sessions to ensure Internet traffic is not deviating from expectations in your private network. -
Page 94: Configuring Internet Group Management Protocol (Igmp)
IGMP. Routers use IGMP periodically to check if the known group members are active. IGMP provides a method called dynamic membership by which a host can join or leave a multicast group at any time. Cisco RV120W Administration Guide... -
Page 95: Configuring Lan (Local Network) Groups
IP address. After creating a group, you can then configure actions, such as blocked keywords in a firewall rule, that apply to the group. (See Blocking, page Cisco RV120W Administration Guide Network Address—The network address from which the multicast packets originate. -
Page 96: Enabling Session Initiation Protocol Application-Level Gateway (Sip Alg)
Choose Firewall > Advanced Settings > SIP ALG. STEP 1 Check the Enable box to enable SIP ALG support. If disabled, the router will not STEP 2 allow incoming calls to the UAC (User Agent Client) behind the Cisco RV120W. Click Save. STEP 3 Firewall Configuration Examples Example 1: Allow inbound HTTP traffic to the DMZ In this example, you host a public web server on your local DMZ network. - Page 97 IP addresses. Parameter Connection Type Action Service Source IP Start Finish Send to Local Server (DNAT IP) Rule Status Cisco RV120W Administration Guide Value Inbound Always Allow HTTP 192. 1 68.5.2 (web server IP address) Enabled Value Inbound Always Allow...
- Page 98 Start Send to Local Server (DNAT IP) Rule Status Cisco RV120W Administration Guide WAN IP address: 10. 1 .0. 1 18 LAN IP address: 192. 1 68. 1 . 1 ; subnet 255.255.255.0 Web server PC in the DMZ, IP address: 192. 1 68. 1 .2 Access to Web server: (simulated) public IP address 10.
- Page 99 Create an outbound access rule with the following parameters: Parameter Connection Type Action Schedule Service Source IP Start Finish Destination IP Rule Status Cisco RV120W Administration Guide Value Outbound Block by Schedule Weekend HTTP Address Range starting IP address ending IP address Enabled...
- Page 100 Configuring the Firewall Firewall Configuration Examples Create an inbound access rule with the following parameters: Parameter Connection Type Action Schedule Service Source IP Rule Status Cisco RV120W Administration Guide Value Inbound Block by Schedule Weekend All Traffic Enabled...
-
Page 101: Chapter 5: Configuring Virtual Private Networks (Vpns) And Security
PC client and a gateway router. The following types of tunnels can be created: • • • Cisco RV120W Administration Guide 107. Configuring VPNs, page 92 Configuring a Basic VPN, page 93 Configuring Advanced VPN Parameters, page 94 Configuring Security, page 107 Gateway-to-gateway VPN—Connects two or more routers to secure traffic... -
Page 102: Creating Cisco Quickvpn Client Users
• Cisco RV120W Administration Guide Configuring Remote Management, page Configuring VPN Users, page Gateway—Connects the Cisco RV120W to a gateway using a secure tunnel. VPN Client—Connects the Cisco RV120W to remote clients. The remote clients must run VPN client software. -
Page 103: Viewing The Default Vpn Settings
• • If you chose gateway in Step 2, enter the IP address and subnet mask of the STEP 7 remote LAN. The remote gateway to which the Cisco RV120W will connect is located on that LAN. NOTE Click Save. -
Page 104: Configuring Ike Policies
Association and Key Management Protocol (ISAKMP) identifier for this router: • • • • Cisco RV120W Administration Guide Initiator—The router will initiate the connection to the remote end. Responder—The router will wait passively and respond to remote IKE requests. Both—The router will work in either Initiator or Responder mode. - Page 105 • • • • Specify the authentication algorithm for the VPN header: STEP 2 • • • • • Cisco RV120W Administration Guide Remote WAN (Internet) IP FQDN User FQDN DER ASN1 DN 3DES AES-128 AES-192 AES-256 SHA-1 SHA2-256 SHA2-384...
- Page 106 In the Reconnect after Failure Count field, enter the maximum number of DPD STEP 8 failures allowed before tearing down the connection. Cisco RV120W Administration Guide Ensure that the authentication algorithm is configured identically on both sides. Select Pre-Shared Key for a simple password based key that is shared with the IKE peer.
-
Page 107: Configuring Vpn Policies
Enter a unique name to identify the policy. STEP 3 Choose the Policy Type: STEP 4 Cisco RV120W Administration Guide None—Disables XAUTH. Edge Device—Authentication is done by one of the following: User Database—User accounts created in the router are used to authenticate users. - Page 108 Single, enter the single IP address in this field and leave the End IP Address field blank. Cisco RV120W Administration Guide Auto Policy—Some parameters for the VPN tunnel are generated automatically. This requires using the IKE (Internet Key Exchange) protocol to perform negotiations between the two VPN Endpoints.
- Page 109 If you chose Subnet as the type, enter the Subnet Mask of the network. STEP 4 Split DNS Split DNS allows the Cisco RV120W to find the DNS server of the remote router without going through the ISP (Internet). To enable split DNS: Check the Enable box.
- Page 110 • Integrity Algorithm—Select the algorithm used to verify the integrity of the data. • • Cisco RV120W Administration Guide Key-In—Enter the encryption key of the inbound policy. The length of the key depends on the algorithm chosen: DES—8 characters 3DES—24 characters AES-128—16 characters...
- Page 111 • • Cisco RV120W Administration Guide Seconds—Choose this option to measure the SA Lifetime in seconds. After the specified number of seconds passes, the Security Association is renegotiated. The default value is 3600 seconds. The minimum value is 300 seconds.
-
Page 112: Configuring Vpn Clients
IPsec VPN tunnel. Refer to the client software guide for detailed instructions on setup as well as the router’s online help. Cisco RV120W Administration Guide When configuring a lifetime in kilobytes (also known as lifebytes), be aware that two SAs are created for each policy. -
Page 113: Monitoring Vpn Tunnel Status
If a VPN policy state is “not connected”, it can be enabled from the List of VPN Policies in the VPN > IPsec > Advanced VPN Setup page. Cisco RV120W Administration Guide Choose VPN > IPsec > Advanced VPN Setup and click IPsec VPN Connection Status. -
Page 114: Configuring Vpn Users
In the Ending IP Address field, enter the ending IP address of the range of IPs to STEP 5 assign to connecting users. Cisco RV120W Administration Guide Description IKE or VPN policy associated with this SA. IP address of the remote VPN gateway or client. -
Page 115: Adding New Vpn Users
Configuring Virtual Private Networks (VPNs) and Security Configuring Advanced VPN Parameters The starting IP of the PPTP client IP range is used as the PPTP server IP of the Cisco NOTE RV120W and the remaining PPTP client IP address range is used to assign IP addresses to PPTP clients. -
Page 116: Configuring Security
RADIUS server support, and 802. 1 x port-based authentication. Using Certificates for Authentication The Cisco RV120W uses digital certificates for IPsec VPN authentication and SSL validation (for HTTPS and SSL VPN authentication). You can obtain a digital certificate from a well-known Certificate Authority (CA) such as VeriSign, or generate and sign your own certificate using functionality available on this gateway. -
Page 117: Generating New Certificates
Importing a Certificate from a File To import a certificate from a file (for example, if you have been given a certificate from a CA), the file must be on a computer connected to the Cisco RV120W: Cisco RV120W Administration Guide... -
Page 118: Exporting The Router's Current Certificate
Export for Client—Export the certificate to be downloaded on an endpoint that will connect to the Cisco RV120W as a VPN client. IP address—The IP address of the authenticating RADIUS server. Authentication Port—The RADIUS authentication server's port number used to send RADIUS traffic. -
Page 119: Configuring 802.1X Port-Based Authentication
It also prevents access to that port in cases where the authentication fails. It provides an authentication mechanism to devices trying to connect to a LAN. The Cisco RV120W acts as a supplicant in the 802. 1 x authentication system. - Page 120 Configuring Virtual Private Networks (VPNs) and Security Configuring Security Enter the username and password sent by the Cisco RV120W to the authenticator STEP 4 for authentication. The username and password are the credentials sent to the authenticating server (the device running 802. 1 X in an authenticator role; for example, a Cisco Catalyst switch).
-
Page 121: Chapter 6: Configuring Quality Of Service (Qos)
WAN QoS profiles let you manage the bandwidth of the traffic flowing from the secure network (LAN) to the insecure network (WAN). You can configure WAN QoS profiles to control the rate at which the RV120W transmits data. For example, limiting the outbound traffic helps you prevent the LAN users from consuming all of the bandwidth of the Internet link. - Page 122 Choose QoS > WAN QoS Profiles. STEP 1 In the WAN QoS Profile Table, click Add. STEP 2 Cisco RV120W Administration Guide Configuring Bandwidth Allocation Settings, 113. Enter a value between 61 (default) and 100. Enter a value between 31 (default) and 60.
-
Page 123: Configuring Profile Binding
From the Traffic Selector Match Type drop-down menu, choose the traffic selector STEP 4 to use to bind traffic to the profile. Cisco RV120W Administration Guide Enter the name of the profile. If the WAN QoS mode is set to Priority, choose the priority level from the drop-down menu. -
Page 124: Configuring Cos Settings
Click Save. STEP 6 Configuring CoS Settings You can map CoS priority settings to the traffic forwarding queue on the RV120W. To map CoS priority settings to the traffic forwarding queue: Choose QoS > CoS Settings > Cos Settings. STEP 1 In the CoS to Queue field, check Enable. -
Page 125: Mapping Cos Settings To Dscp Values
The default value is 63. Click Save. STEP 4 To restore the default CoS to DSCP mappings, click Restore Default and, when prompted, click OK. Then, click Save. Cisco RV120W Administration Guide Configuring CoS Settings, page 115 for more information. -
Page 126: Chapter 7: Administering Your Cisco Rv120W
Administering Your Cisco RV120W This chapter describes the administration features of the Cisco RV120W, including creating users, configuring network management, diagnostics and logging, date and time, and other settings. It contains the following sections: • • • • • •... -
Page 127: Configuring Password Rules
To configure password rules: Choose Administration > Password Rules. STEP 1 Check the Enable box. STEP 2 In the Individual Rule Settings field, enter the rules you want the Cisco RV120W to STEP 3 enforce for passwords: • •... -
Page 128: Configuring Web Access
Using the Management Interface Configuring Web Access You can enable access on the LAN interface of the Cisco RV120W. If a user connects a PC to the LAN port, web access is then allowed using secure HTTP. To enable web access on the LAN port: Choose Administration >... -
Page 129: Configuring User Accounts
To allow remote management of the Cisco RV120W by SNMP, under Remote SNMP, check Enable. Configuring User Accounts The Cisco RV120W supports two user accounts for administering and viewing settings: an administrative user (default user name: “admin”) and a “guest”... -
Page 130: Configuring Network Management
Click Save. STEP 3 Editing SNMPv3 Users SNMPv3 parameters can be configured for the two default Cisco RV120W user accounts (Admin and Guest). To configure: In the SNMPv3 User Table, check the box for the user to edit and click Edit. -
Page 131: Adding Snmp Traps
Administering Your Cisco RV120W Configuring Network Management If you chose AuthPriv, choose the type of privacy algorithm (DES or AES) and enter the privacy password. Click Save. STEP 4 Adding SNMP Traps The Traps List Table lists IP addresses of SNMP agents to which the router will send trap messages (notifications) and allows several operations on the SNMP agents. -
Page 132: Configuring Additional Snmp Information
Configuring the WAN Traffic Meter The WAN traffic meter displays statistics for traffic coming from the WAN (Internet) to the Cisco RV120W, and traffic going from the Cisco RV120W to the WAN. To configure the WAN Traffic Meter: Choose Administration > WAN Traffic Meter. - Page 133 Click Save. STEP 4 To configure what the Cisco RV120W does when the traffic limit is reached: Choose Administration > WAN Traffic Meter. STEP 1 Under When Limit Is Reached, select one of the following: STEP 2 •...
-
Page 134: Using Network Diagnostic Tools
Administering Your Cisco RV120W Using Network Diagnostic Tools (Optional) Check the box to send an email alert when the traffic limit has been STEP 3 reached and traffic is being blocked. Click Save. STEP 4 To viewing traffic statistics, choose Administration > WAN Traffic Meter. Under WAN (Internet) Traffic Statistics, information is displayed about WAN traffic to and from the Cisco RV120W. -
Page 135: Performing A Dns Lookup
Administering Your Cisco RV120W Capturing and Tracing Packets Performing a DNS Lookup A DNS lookup can be performed to retrieve the IP address of a Web, FTP, Mail or any other Server on the Internet. To perform a DNS lookup: Choose Diagnostics >... -
Page 136: Configuring Logging Policies
Administering Your Cisco RV120W Configuring Logging Configuring Logging Policies To configure general logging policies: Choose Administration > Logging > Logging Policies. STEP 1 The Logging Policy Table shows the types of logging that are configured on the STEP 2 system. To add a new type of logging, click Add. -
Page 137: Configuring Remote Logging
Administering Your Cisco RV120W Configuring Logging Under the type of system logs, select the type of system events to be logged. The STEP 3 following system events can be recorded: • • Under “other events logs,” select the type of event to be logged. The following... -
Page 138: Configuring Email Logging
Administering Your Cisco RV120W Configuring Logging Configuring Email Logging Choose Administration > Logging > Remote Logging Configuration. STEP 1 Select the check box to enable e-mail logs. Then enter the following: STEP 2 • • • • • • •... -
Page 139: Configuring The Discovery Settings
Cisco RV120W advertises itself to all devices connected to it on VLAN 1, and devices joining the network can connect to the Cisco RV120W. If you have other VLANs created on your network, you can enable Bonjour on those VLANs too. -
Page 140: Configuring Upnp
For example, UPnP is by default enabled on the default VLAN ID 1. That means that the Cisco RV120W advertises itself to plug and play devices connected to it on VLAN 1, and plug and play devices joining the network can connect to the Cisco RV120W. -
Page 141: Configuring Time Settings
Administering Your Cisco RV120W Configuring Time Settings Configuring Time Settings You can configure your time zone, whether or not to adjust for Daylight Savings Time, and with which Network Time Protocol (NTP) server to synchronize the date and time. The router then gets its date and time information from the NTP server. To configure NTP and time settings: Choose Administration >... - Page 142 Administering Your Cisco RV120W Backing Up and Restoring the System During a restore operation, do not try to go online, turn off the router, shut down the CAUTION PC, or do anything else to the router until the operation is complete. This should take about a minute.
-
Page 143: Upgrading Firmware
Administering Your Cisco RV120W Upgrading Firmware Upgrading Firmware During a firmware upgrade, do not try to go online, turn off the device, shut down CAUTION the PC, or interrupt the process in any way until the operation is complete. This process takes about a minute, including the reboot process. -
Page 144: Restoring The Factory Defaults
Administering Your Cisco RV120W Restoring the Factory Defaults Restoring the Factory Defaults During a restore operation, do not try to go online, turn off the router, shut down the CAUTION PC, or do anything else to the router until the operation is complete. This should take about a minute. -
Page 145: Chapter 8: Viewing The Cisco Rv120W Status
Viewing the Cisco RV120W Status This chapter describes how to view real-time statistics and other information about the Cisco RV120W. • • • • • • • • • • Viewing the Dashboard The Dashboard page provides you with a view of important router information. - Page 146 Viewing the Cisco RV120W Status Viewing the Dashboard The view of the back panel shows you which ports are used (colored in green) and allows you to click the port to obtain information about the connection. • • • The Dashboard page displays the following:...
- Page 147 Viewing the Cisco RV120W Status Viewing the Dashboard To view the logs, click details. For more information see To manage logs, click manage logging. For more information see Logging, page LAN (Local Network) Interface MAC Address IPv4 Address DHCP Server To view the LAN settings, click details.
-
Page 148: Viewing The System Summary
Viewing the Cisco RV120W Status Viewing the System Summary Site-to-Site Tunnels PPTP Users QuickVPN Users Viewing the System Summary The System Summary page displays a summary of the router’s settings. To view a summary of system settings: Choose Status > System Summary. - Page 149 Viewing the Cisco RV120W Status Viewing the System Summary LAN (Local Network) Information MAC Address IPv4 Address IPv6 Address DHCP Server DHCP Relay DHCPv6 Server Cisco RV120W Administration Guide The MAC address of the device. The IP address and subnet mask of the device.
- Page 150 Viewing the Cisco RV120W Status Viewing the System Summary WAN (Internet) Information (IPv4) MAC Address Connection Time Connection Type Connection State DHCP Server Lease Obtained Lease Duration IP Address Subnet Mask Gateway Primary DNS Server Secondary DNS Server NAT (IPv4 Only Mode)
-
Page 151: Viewing The Wireless Statistics
Viewing the Cisco RV120W Status Viewing the Wireless Statistics Wireless Information Operating Frequency Wireless Network Mode Channel Channel SSID MAC Address Security Encryption Authentication Viewing the Wireless Statistics The Wireless Statistics page shows a cumulative total of relevant wireless statistics for the radio on the device. -
Page 152: Ipsec Connection Status
Viewing the Cisco RV120W Status IPsec Connection Status The Wireless Statistics page displays this information: SSID Packets Bytes Errors Dropped Multicast Collisions The counters are reset when the device is restarted. NOTE IPsec Connection Status The IPsec Connection Status page displays the status of IPsec connections. -
Page 153: Viewing Vpn Client Connection Status
Viewing the Cisco RV120W Status Viewing VPN Client Connection Status You can change the status of a connection to either establish or disconnect the configured SAs (Security Associations). Policy Name Endpoint Kbytes Packets State Action Viewing VPN Client Connection Status The VPN Client Connection Status page displays the status of VPN connections. -
Page 154: Viewing Logs
End Time Duration Protocol Disconnect Viewing Logs The View Logs page allows you to view the Cisco RV120W logs. To view the logs: Choose Status > View Logs. STEP 1 Click Refresh Logs to display the latest log entries. STEP 2... -
Page 155: Viewing Available Lan Hosts
Viewing Available LAN Hosts Viewing Available LAN Hosts The Available LAN (Local Network) Hosts page displays information about the devices connected to the Cisco RV120W. To view a list of all available LAN hosts: Choose Status > Available Local Network Hosts. -
Page 156: Viewing Port Triggering Status
Viewing the Cisco RV120W Status Viewing Port Triggering Status Viewing Port Triggering Status To view the status of port triggering: Choose Status > Port Triggering Status. STEP 1 Click Refresh to display the latest port triggering information. STEP 2 The Port Triggering Status window provides information on the ports that have been opened per the port triggering configuration rules. -
Page 157: Viewing Port Statistics
Viewing the Cisco RV120W Status Viewing Port Statistics Viewing Port Statistics The Port Statistics page displays port statistics. To view port statistics: Choose Status > Port Statistics. STEP 1 In the Poll Interval field, enter the auto-refresh time interval in seconds. -
Page 158: Viewing Open Ports
Viewing the Cisco RV120W Status Viewing Open Ports Viewing Open Ports The View Open Ports page displays a listing of all open ports. To view open ports, choose Status > View Open Ports. This page displays this information about open ports:... -
Page 159: Appendix A: Using Cisco Quickvpn For Windows 7, 2000, Xp, Or Vista
Using Cisco QuickVPN for Windows 7, 2000, XP, or Vista Overview This appendix explains how to install and use the Cisco QuickVPN software that can be downloaded from www.cisco.com. QuickVPN works with computers running Windows 7, 2000, XP, or Vista. (Computers using other operating systems will have to use third-party VPN software.) -
Page 160: Installing The Cisco Quickvpn Software
Installing the Cisco QuickVPN Software Installing the Cisco QuickVPN Software Installing from the CD-ROM Insert the Cisco RV120W CD-ROM into your CD-ROM drive. After the Setup STEP 1 Wizard begins, click the Install QuickVPN link. The License Agreement window appears. -
Page 161: Using The Cisco Quickvpn Software
In the User Name and Password fields, enter the User Name and Password that were created in Address field, enter the IP address or domain name of the Cisco RV120W. In the Port For QuickVPN field, enter the port number that the QuickVPN client will use to communicate with the remote VPN router, or keep the default setting, Auto. - Page 162 Using Cisco QuickVPN for Windows 7, 2000, XP, or Vista Using the Cisco QuickVPN Software To terminate the VPN tunnel, click Disconnect. To change your password, click STEP 5 Change Password. For information, click Help. If you clicked Change Password and have permission to change your own STEP 6 password, you will see the Connect Virtual Private Connection window.
-
Page 163: Appendix B: Where To Go From Here
Where to Go From Here Cisco provides a wide range of resources to help you obtain the full benefits of the Cisco RV120W. Product Resources Support Cisco Small Business Support Community Cisco Small Business Support and Resources Phone Support Contacts...