Advertisement
Quick Links
Dimensional Drawings:
Installation:
(Wall Mounting Only)
1
Mounting Holes
Cover
retaining
screws
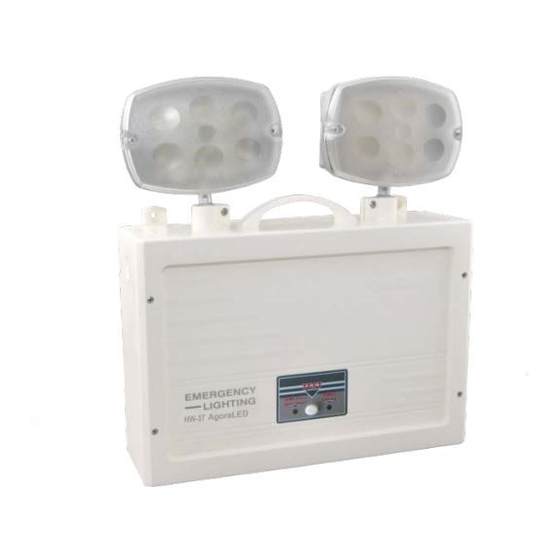
EMERGENCY
LIGHTING
Test
Test
LAMP FAULT
POWER
AGORALED
BATT FAULT
CHARGE
5
Step 1: Hold the device on the wall and mark the holes with a marker. The distance between the mounting holes is
234mm. Drill the holes. Use the supplied mounting accessories to mount the device. Remove the four cover
retaining screws.
Step 2: Install the cable grommet and pass the round cable. Connect the cables to the respective positions in the
terminal block L for phase and N for neutral. Always use in any case round mains cable, with external diameter
of 6-9mm (H05RN-F type 2x1mm or any other type, at least equal to it's mechanical and electrical
properties). ATTENTION!! The cable must not be deformed In any way.
Step 3: Install the battery cable connectors to the batteries taking care of the polarity, black cable (-) and red cable (+).
Step 4: In case you use a module connect it on the PCB.
Step 5: The user can select one of the 3 available minimum durations: 1 hour, 3 hours and 8 hours. The selection must
be done while the luminaire is disconnected from AC and battery supplies. The selection is achieved through
Switches 2 & 3 of DS1. Switch 1 and 4 are not used. Two additional labels are included in the package, one for 3
hours duration (180) and one for 8 hours duration (480). Depending on the selected duration, the installer must
replace the default 1 hour (60) label with one that has the required duration. Please take notice of the
orientation of the label.
Step 6: There is a terminal block for connection to the (optional) communication modules (elBus, DALI and pot. free), in
the lower left corner of the PCB. The terminals are marked C1 and C2.
Step 7: Make a hole in the right side of the luminaire, install the rubber gasket and make a hole in the center by using a
small screwdriver. Pass the round cables through the gasket and connect it on the terminals.
Step 8: Close the front cover and fasten it with the removed screws. (Tightening torque 1 N*m)
Honeywell Life Safety AS, Po. Box 3514, N-3007 Drammen, Norway
AgoraLED
AgoraLED IP42
234mm
EMERGENCY
Test
Test
LIGHTING
LAMP FAULT
POWER
BATT FAULT
CHARGE
AGORALED
302mm
AgoraLED IP42
2
3
Dip Switch Positions
1 2 3 4
1h
(default position)
2
94mm
L
N
1 2 3 4
1 2 3 4
3h
8h
AgoraLED IP65
234mm
EMERGENCY
Test
Test
LIGHTING
LAMP FAULT
POWER
BATT FAULT
CHARGE
AGORALED
307mm
AgoraLED IP65
2
4
6
7
6
C1C2
http://www.hls-nordic.com
GB
100mm
L
N
Advertisement

Summary of Contents for Honeywell AgoraLED
- Page 1 Pass the round cables through the gasket and connect it on the terminals. Step 8: Close the front cover and fasten it with the removed screws. (Tightening torque 1 N*m) Honeywell Life Safety AS, Po. Box 3514, N-3007 Drammen, Norway http://www.hls-nordic.com...
- Page 2 Do not dispose of with your normal household waste. Do not burn. The AgoraLED is a self-contained non-maintained emergency luminaire with selftest function. Fault Reset: Fault reset is performed by pressing the TEST button for more than 5 seconds. Manual Test (Test Button): Manual testing is only possible when both mains power supply and battery are connected.