Table of Contents
Advertisement
Advertisement
Table of Contents

Related Manuals for Paradigm Founder Series


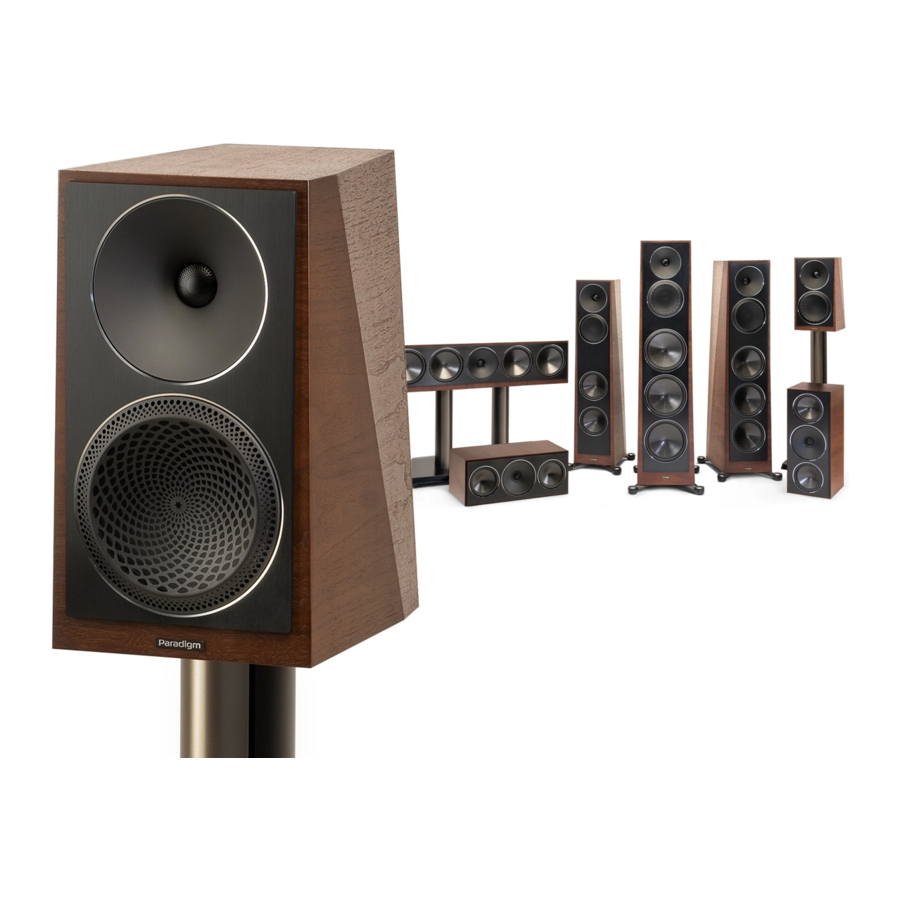
Summary of Contents for Paradigm Founder Series
- Page 1 O w n e r s M a n u a l...
- Page 2 PARADIGM, PARADIGM REFERENCE COLLECTION, Founder and all associated proprietary and patented designs and technologies are registered trademarks of Paradigm Electronics Inc. Copyright © Paradigm Electronics Inc. All rights reserved. All other trademarks are the property of their respective owner(s). Paradigm Electronics reserves the right to change specifications and/or features without notice as design improvements are incorporated.
-
Page 3: Table Of Contents
Paradigm’s Comprehensive R&D, leading-edge technology, use of the finest materials and sophisticated manufacturing and quality control techniques provide vastly superior performance for each component part and at every stage of design. Paradigm Founder ® speakers will provide you with unparalleled listening pleasure for many years to come. -
Page 4: Unpacking Instructions
UNPACKING INSTRUCTIONS (FLOORSTANDING SPEAKERS) IMPORTANT! FOLLOW THESE STEPS BEFORE PROCEEDING! 180¡ Step 1 OPTIONAL 180¡ Install carpet spikes if placing speaker on carpet. Step 2 Step 2 Step 2... -
Page 5: General Tips
PREVENTING SPEAKER DAMAGE Paradigm Founder speakers are efficient and can be driven to loud listening levels with moderate amplifier power. They are also able to handle the output of very powerful amplifiers. -
Page 6: There Is A Limit
The Right Amount of Power A power-range rating is given as a guide to indicate the approximate minimum and maximum power input of your Paradigm Founder speakers. Amplifiers that exceed your speaker’s power-range rating are recommended. Their greater power reserves provide better sound. -
Page 7: Stand Mounting (Optional)
STAND MOUNTING (optional) The Paradigm Founder 90C center channel speakers can be mounted to Paradigm’s J-18C stand if desired. Ask your Paradigm dealer for details. Stand Mounting a Center Channel Speaker (Founder 90C Shown) -
Page 8: Attaching Bumper Pads To Bookshelf/Center/Surround Speakers
This will isolate your speakers from the solid surface, improving overall sound quality. NOTE: As an alternative, you may choose to stand mount your Paradigm Founder 40B bookshelf speakers using Paradigm stands. Ask your Paradigm dealer for details. -
Page 9: Right Speakers
PLACEMENT: FRONT LEFT & RIGHT SPEAKERS Pardigm Founder front speakers are designed to allow flexible placement while providing a very large window of sound throughout your listening room. To ensure the best performance possible we strongly recommend that you observe the placement guidelines on the following pages …... -
Page 10: Accurate Timbre
For the most accurate and natural timbre, place front speakers so that their high- frequency drivers are approximately at ear level, as shown below. Placing bookshelf models on Paradigm speaker stands (sold separately) or bookshelves raises their high-frequency drivers to approximately ear level, thereby ensuring the best performance possible. -
Page 11: Balanced Bass
Balanced Bass Placing front speakers in corners will over-emphasize bass and reduce overall clarity. Avoid corner placement. Position front speakers 8 in (20 cm) or more from the wall behind the speaker and as much as possible from either side wall, as shown below. This will ensure better bass performance and optimal midrange clarity. -
Page 12: Optimal Imaging
PLACEMENT: FRONT LEFT & RIGHT SPEAKERS (continued) Optimal Imaging Measure the distance from your main listening area to the front speakers (“X”). For best imaging, place speakers from three-quarters of that distance up to that same distance from each other (3/4 of “X” to “X”), as shown. To further optimize imaging, toe speakers slightly inward so they point toward the listening position with their axes 8po (20 cm) crossing just behind it, as shown. -
Page 13: Placement: Center Speaker
PLACEMENT: CENTER SPEAKER Paradigm Founder Series center channel speakers are designed to cover a large, wide listening area, allowing listeners throughout the room to hear center-channel information with unprecedented clarity and intelligibility. Placing your center-channel speaker below (or above) the TV will ensure the best possible clarity and intelligibility. -
Page 14: Anthem Room Correction (Arc™)
ANTHEM ROOM CORRECTION (ARC™) – Founder 120H Only A True Scientific Solution to the Problems of the Room Anthem Room Correction Technology is a proprietary digital signal processing system that allows you to quickly and accurately optimize the performance of your Founder 120H to better suit the unique parameters of your room. -
Page 15: What's Included With Arc
ANTHEM ROOM CORRECTION (ARC) – Founder 120H Only (cont’d) WHAT’S INCLUDED WITH ARC: Your ARC Kit Includes: • Microphone and microphone clip • Telescoping stand and base • 2 USB cables (1 in speaker box) Before you begin • Ensure that the ARC software you are using, and the audio equipment you are using it with, are compatible. -
Page 16: Microphone Positioning & Connection
ANTHEM ROOM CORRECTION (ARC) – Founder 120H Only (cont’d) MICROPHONE POSITIONING & CONNECTION During all measurements, the microphone must point straight up. The microphone’s height is critical to proper measurement. The microphone should be positioned at ear-level when seated and should correspond with the height of the high- frequency drivers in the front speaker array. - Page 17 To pair 120H speakers: Connect both speakers to AC power Connect your laptop to the speaker you placed in the “Right” position using the provided USB cable Open ARC Genesis Click on “Pairing Tool” under “OTHER TOOLS” on the left side of the screen Click on the 120H speaker icon From the drop down menu set the “Type”...
-
Page 18: Testing Procedure
ANTHEM ROOM CORRECTION (ARC) – Founder 120H Only (cont’d) TESTING PROCEDURE We recommend you measure audio response at a minimum of FIVE listening positions. Up to TEN positions can be tested with ARC if your room is unusually large (more than 40’ x 40’) or unusually shaped—more is not necessarily better. -
Page 19: Basic Arc Measurements
ANTHEM ROOM CORRECTION (ARC) – Founder 120H Only (cont’d) BASIC ARC MEASUREMENT 1. With your microphone set in Position One, the “main measurement position,” use the USB to connect both the microphone and the ARC-ready equipment being measured to a USB input on your computer. 2. -
Page 20: Speaker Connection
SPEAKER CONNECTION IMPORTANT! Turn your amplifier(s) OFF before connecting your speakers. This will avoid damage which could result from accidental shorting of speaker cables. For optimum sound, the use of high quality speaker cable is essential. The chart below identifies the minimum gauge requirements for various lengths (See your Dealer for recommendations). -
Page 21: Standard Connection For All Speakers
DO NOT attempt to bi-wire or bi-amplify speakers unless you have removed the jumper bars. All Paradigm Founder speakers have two sets of input terminals connected externally with jumper bars. These speakers can be bi-wired or bi-amplified to achieve even better performance. -
Page 22: Bi-Wire Connection
SPEAKER CONNECTION (continued) Bi-Wire Connection Bi-wiring can improve clarity and openness with less grain and more solidity to the bass. Two speaker cables are required for each speaker that is bi-wired. REMOVE JUMPER BARS BEFORE BI-AMPING... -
Page 23: Bi-Amp Connection
Bi-Amp Connection IMPORTANT! When bi-amping, always use amplifiers with identical gain. If uniform amplifier gain is not maintained the speaker-to-speaker balance will be incorrect when vertically bi-amped, or the speaker system’s frequency balance will be incorrect when horizontally bi-amped. To prevent problems, use identical amplifiers (brand and model). -
Page 24: Horizontal Bi-Amplification
A/V Processor or A/V Receiver, it’s time for a little fine tuning. Since Paradigm Founder speakers are designed to provide exceptional high-end performance in a variety of room settings, fine tuning is simply a matter of making slight adjustments to their placement in the room, if necessary. -
Page 25: Basic Troubleshooting
If a problem occurs, you can try the troubleshooting suggestions listed below. If one of these doesn’t remedy the problem, or you are not sure how to proceed, please contact the Paradigm Customer Support team and we will be happy to help. Customer Support •... -
Page 26: Specifications
SPECIFICATIONS Founder 120H Founder 100F Design 5-driver, 3 way hybrid floostanding with active 5-driver, 3 way floorstanding, ported enclosure bass, ported enclosure 1” (25mm) AL-MAC™ Ceramic Dome with High-Frequency Driver 1” (25mm) AL-MAC™ Ceramic Dome with Oblate Spheroid Waveguide (OSW™) and Oblate Spheroid Waveguide (OSW™) and Perforated Phase-Aligning (PPA™) Tweeter Perforated Phase-Aligning (PPA™) Tweeter... - Page 27 Founder 80F Founder 90C Founder 70LCR 4-driver, 2.5 way floorstanding, ported enclosure 4-driver, 2 passive radiator, 4-driver, 3 way LCR, sealed enclosure 3 way center channel Coaxial 1” (25mm) AL-MAC™ Ceramic Dome Coaxial 1” (25mm) AL-MAC™ Ceramic Dome 1” (25mm) AL-MAC™ Ceramic Dome with with Oblate Spheroid Waveguide (OSW™) and with Oblate Spheroid Waveguide (OSW™) and Oblate Spheroid Waveguide (OSW™) and...
- Page 28 SPECIFICATIONS (continued) Founder 40B Design 2-driver, 2 way standmount, ported enclosure High-Frequency Driver 1” (25mm) AL-MAC™ Ceramic Dome with Oblate Spheroid Waveguide (OSW™) and Perforated Phase-Aligning (PPA™) Tweeter Lens, ferro-fluid damped / cooled Mid Frequency Driver Mid/Bass Frequency Drivers 6” (152mm) Ultra-High-Excursion AL-MAG™ Cone with Perforated Phase-Aligning (PPA™) Lens, Gen3 Active Ridge Technology (ART™) with Vertical Mounting System, Advanced SHOCK-MOUNT™...
-
Page 29: Limited Warranty
Electronics Inc. or Import Distributor (outside the U.S. and Canada) to arrange, bring in or ship prepaid, any defective unit. Visit our website, paradigm.com for more information. Paradigm Electronics Inc. reserves the right to improve the design of any product without assuming any obligation to modify any product previously manufactured. - Page 30 NOTES...