Table of Contents
Advertisement
Quick Links
KCA-HX7C
MOTORCYCLE BLUETOOTH CAMERA AND COMMUNICATION SYSTEM
INSTRUCTION MANUAL
•
Updated information (the latest Instruction Manual, system updates, new functions, etc.) is available from
<https://www.kenwood.com/cs/ce/>.
Take the time to read through this instruction manual.
Familiarity with installation and operation procedures will help you obtain the best performance from your new Communication System.
For your records
Record the serial number, found on the back of the unit, in the spaces designated on the warranty card, and in the space provided below.
Refer to the model and serial numbers whenever you call upon your KENWOOD dealer for information or service on the product.
Model KCA-HX7C Serial number
US Residence Only
© 2020 JVCKENWOOD Corporation
Register Online
Register your KENWOOD product at www.kenwood.com/usa/
Advertisement
Table of Contents

Related Manuals for Kenwood KCA-HX7C

Summary of Contents for Kenwood KCA-HX7C
- Page 1 Record the serial number, found on the back of the unit, in the spaces designated on the warranty card, and in the space provided below. Refer to the model and serial numbers whenever you call upon your KENWOOD dealer for information or service on the product.
- Page 2 ■ Copyrights • Sena™ is a trademark of Sena Technologies, Inc. or its subsidiaries in the USA and other countries. Advanced Noise Control™ Audio Multitasking™ Smart Audio Mix™ are trademarks of Sena Technologies, Inc. or its subsidiaries. These trademarks may not be used without the express permission of Sena. ®...
-
Page 3: Table Of Contents
CONTENTS PACKAGE CONTENTS PAIRING THE HEADSET WITH BLUETOOTH DEVICES 15 FM RADIO Mobile Phone Pairing - Mobile Phone, Bluetooth Stereo FM Radio On/Off ................... 24 INSTALLING THE HEADSET ON YOUR HELMET Device........................15 Preset Stations ....................24 Installing the Main Unit ................5 Second Mobile Phone Pairing - Second Mobile Phone Seek and Save .................... -
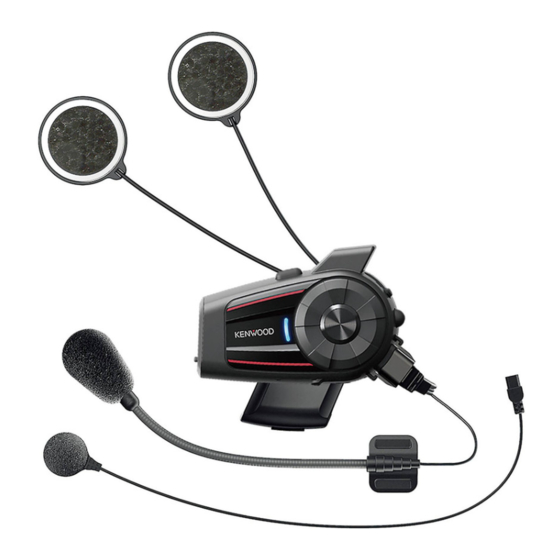
Page 4: Package Contents
PACKAGE CONTENTS Attachable Boom Microphone Attachable Boom Microphone Headset Main Unit Gear Clamp Unit Hook and Loop Fastener Microphone Sponges (2) for Attachable Boom Microphone Boom Microphone Hook and Loop Fastener Glued Surface Mounting Holder for Boom Microphone Plate Holder Speaker Wired Microphone Speakers... -
Page 5: Installing The Headset On Your Helmet
INSTALLING THE HEADSET ON YOUR HELMET Insert a microSD card into the card slot to use camera. Installing the Main Unit Ñ Using the Gear Clamp Unit Loosen the two screws on the back Attach the main unit to the clamp plate of the clamp unit with the unit until you hear a click. -
Page 6: Installing The Speakers
Ñ Installing the Speakers Using the Glued Surface Mounting Plate If you cannot install the clamp unit on the helmet, you can use the glued surface Attach the hook and loop fasteners mounting plate to attach the clamp unit to the surface of the helmet. for speakers to ear pockets inside Attach adhesive tape of the glued the helmet. -
Page 7: Installing The Microphone
Installing the Microphone NOTE Ñ • If the helmet has deep ear pockets, you can Using the Attachable Boom Microphone use the speaker pads to bring the speakers Foam closer to your ears. Speaker Hook Attach the hook and loop fastener Cover •... - Page 8 Adjust the head of the microphone NOTE so that the tab is facing away from • You can use the boom microphone holder after your mouth. attaching the hook and loop fastener for boom microphone holder on it to ensure secure installation. Align the arrows on the microphone and speaker cables and insert the microphone cable into the speaker...
-
Page 9: Adjusting The Angle
Adjusting the angle Align the arrows on the microphone and speaker cables and insert the You can adjust the angle for taking photos or recording videos. microphone cable into the speaker You can rotate the horizontal angle by 30º. Rotate the lever below the lens to set cable. -
Page 10: Getting Started
HX7C will use the electricity stored in the Powerbank but the battery will not charge. Phone Button – If you connect the KCA-HX7C to the Powerbank while the camera is off, you can use the KCA-HX7C while it charges. microSD Card Slot... -
Page 11: Checking The Battery Level
Wireless LAN feature. When the the headset is rebooted. camera and the Intercom Camera for KENWOOD are connected, the camera is synchronized with the smartphone’s date and time. • Download Android: Google Play Store >... -
Page 12: Camera Operation
– You do not use Wireless LAN on the product for 3 minutes. ([Auto Start Recording]). When video is not being recorded, tap the Camera – You do not use the Intercom Camera for KENWOOD for 3 minutes. button to activate the camera. -
Page 13: Video Recording
Video Recording Video Mode (Default: Normal Recording Mode) When the main unit is turned on, the camera turns on and video recording starts Ñ Timelapse Video Mode ([Auto Start Recording]). When video is not being recorded, tap the Camera button to activate the camera, then press and hold the Camera button for 1 Timelapse video records series of photos at timed intervals and makes it into a video. -
Page 14: Photo Taking
Photo Taking Video Tagging Video Tagging allows the camera to record video continuously, but save only the Ñ Single Shot Mode important events. To take a single photo, set the photo mode setting in the camera configuration to It creates video files of past, present, and future with each footage having an be single shot mode. -
Page 15: Format Sd Card
Format SD Card PAIRING THE HEADSET WITH BLUETOOTH DEVICES You can pair the headset with Bluetooth mobile phones, Bluetooth stereo devices Press and hold the Camera Button for 5 seconds until you hear the voice prompt, “Format SD card”. such as MP3, or GPS, and with other Bluetooth headsets. The pairing operation is required only once for each Bluetooth device. -
Page 16: Second Mobile Phone Pairing - Second Mobile Phone And Gps
If your mobile phone asks for a PIN, enter 0000. prompt, “Media selective pairing”. Search for Bluetooth devices on your smartphone. Select the KCA-HX7C in the list of devices detected on your phone. If your mobile phone asks for a PIN, enter 0000. -
Page 17: Intercom Pairing
Within 2 seconds, tap the Phone Button again and you will hear a voice prompt, “Phone selective pairing”. Search for Bluetooth devices on your smartphone. Select the KCA-HX7C in the list of devices detected on your phone. If your mobile phone asks for a PIN, enter 0000. -
Page 18: Mobile Phone, Gps
MOBILE PHONE, GPS Speed Dialing Mobile Phone Call Making and Answering Double tap the Phone Button and you will hear a voice prompt, “Speed dial”. To answer a call, tap the Phone Button or the Jog Dial to answer the call. Rotate the Jog Dial clockwise or counter clockwise to navigate between the menus. -
Page 19: Gps Navigation
GPS Navigation STEREO MUSIC Ñ Bluetooth Stereo Music GPS Pairing Press and hold the Jog Dial for 5 seconds until you will hear a voice To play or pause music, press and hold the Jog Dial for 1 second until you prompt saying “Intercom pairing”. -
Page 20: Music Sharing
Music Sharing INTERCOM You can start sharing music with an intercom friend using Bluetooth Two-way Intercom stereo music during a two-way intercom conversation. When you terminate music sharing, you can go back to the intercom conversation. To start or terminate Ñ... -
Page 21: Multi-Way Intercom
Ñ Multi-Way Intercom Starting Four-way Intercom With three intercom friends connected, a new participant (D) can make it a four- Multi-Way Intercom enables conference-call-style conversations with up to three way intercom conference by making an intercom call to either (B) or (C). intercom friends at the same time. -
Page 22: Three-Way Conference Phone Call With Intercom Participant
Ñ THREE-WAY CONFERENCE PHONE CALL WITH Ending Multi-Way Intercom INTERCOM PARTICIPANT You can completely terminate the conference intercom or just disconnect an intercom connection with one of your active intercom friends. You can have a three-way conference phone call by adding an intercom friend to Press and hold the Jog Dial for 3 seconds until you hear a beep to the mobile phone conversation. -
Page 23: Group Intercom
KENWOOD/Sena Bluetooth headsets. Non-KENWOOD/Sena Bluetooth headsets can be connected to the KENWOOD/Sena Bluetooth headset if they support Go through intercom pairing with up to three headsets you want to have the Bluetooth Hands-Free Profile (HFP). You can pair the headset with only one Group Intercom with. -
Page 24: Fm Radio
Button once to go upward to your next saved preset station. NOTE Seek and Save • Some non-KENWOOD/Sena headsets may not support multi-way universal intercom. Rotate while pressing the Jog Dial clockwise or counter clockwise. To save the current station, press and hold the Jog Dial for 1 second until you hear a voice prompt, “Preset (#)”. -
Page 25: Scan And Save
The temporary station preset feature automatically finds and saves the nearest 10 radio stations without changing your existing preset stations. 3) FM sharing is only supported between KENWOOD/Sena headsets that currently support this feature. Tap the Phone Button 3 times to automatically scan for 10 temporary preset stations. -
Page 26: Region Selection
FUNCTION PRIORITY You can select the proper FM frequency region from the Intercom Device The headset operates in the following order of priority: Manager for KENWOOD. With the region setting, you may optimize the seek (highest) Mobile phone function to avoid unnecessary frequency ranges. -
Page 27: Configuration Setting
Ñ CONFIGURATION SETTING Remote Control Pairing You can remotely control the headset using Sena Remote Control devices. Headset Configuration Setting Turn on the headset and the Remote Control device. To enter into configuration menu, press and hold the Jog Dial for 10 Execute Remote Control Pairing. -
Page 28: Software Configuration Setting
Enabling Audio Boost increases the overall maximum volume. Disabling Audio You can change the settings of the headset through the Intercom Device Boost reduces the overall maximum volume, but delivers more balanced sound. Manager for KENWOOD or the Intercom Utility for KENWOOD. Ñ VOX Phone (Default: Enable) Ñ... - Page 29 Ñ Ñ HD Voice (Default: Disable) Voice Prompts (Default: Enable) HD Voice allows you to communicate in high-definition during phone calls. This You can disable voice prompts by software configuration setting, but the feature increases the quality so that the audio will be crisp and clear during phone following voice prompts are always on.
- Page 30 Intercom Utility for same volume level. KENWOOD. HD Intercom, HD Voice and Audio Source Priority become disabled Only one background source can be heard at a time while listening to an audio temporarily when Audio Multitasking is enabled.
-
Page 31: Camera Configuration Setting
1) Audio Multitasking will be activated during two-way intercom You can change the settings of the camera through the Intercom Camera for conversations with a headset that also supports this feature. KENWOOD. 2) When Audio Multitasking is disabled, the background audio source will Ñ... - Page 32 Ñ Ñ Video Resolution (Default: 2160P/30fps) Smart Audio Mix™ (Always On) You can select the video resolution to be 2160P/30fps, 1440P/30fps, 1080P/60fps, Smart Audio Mix allows you to record everything you hear through your speakers as well as your voice during video recording. The function that governs Smart or 1080P/30fps.
-
Page 33: Firmware Upgrade
Intercom Device Manager for KENWOOD. When the headset is not working properly, you can easily reset the unit: Please visit KENWOOD website at www.kenwood.com/cs/ce/ to check the latest software downloads. Locate the pinhole reset button at the back of the headset main unit. -
Page 34: Factory Reset
Factory Reset Appendix ■ Camera section Specifications To restore the headset to factory default settings, press and hold the Phone Button for 10 seconds until the LED shows solid red. • Optical – Field of view: 125 degrees ■ Wireless LAN section Press the Jog Dial to confirm reset. - Page 35 ■ General • Operating Temperature: -10 – +50˚C (14 – 122°F) • Dimensions (W × H × D): – Main module: 95 × 59 × 31 mm (3.7 × 2.3 × 1.2 in) – Speaker driver unit: 40 mm – thickness 6.5 mm •...
- Page 36 Instruction Manual for Firmware v1.0...