
Related Manuals for Hanil Component R12


Summary of Contents for Hanil Component R12
- Page 1 Operation Manual Component R12 Large Capacity Centrifuge Product Model Name : Date of Purchase :...
- Page 2 Component R12 Research Use Only © 2018 Hanil Scientific Inc. If you have any questions, contact our Technical Support Center. +82-2-3452-8966 / techsupport@ihanil.com www.ihanil.com The appearance or specifications of the device is subject to partial change for improvement.
- Page 3 INDEX 1. General Considerations ----------------------------------------------------- 4 1.1 Safety -4 1.2 Transport & Storage - 5 1.3 Safety label on the Device - 5 1.4 Electric safety - 5 2. Product Description ---------------------------------------------------------- 6 2.1 Structure - 6 2.2 Delivery package - 6 2.3 Technical Specifications - 7 3.
-
Page 4: General Considerations
2. Check the voltage to be used, before connecting the device to the power source. 3. Only use rotors, parts, and accessories provided by Hanil Scientific Inc. Hanil Scientific Inc. is not responsible for damages of the device and accidents caused by using parts and accessories not recommended. -
Page 5: Transport And Storage
4. Do not place anything on the powercable. 5. If you have the following emergencies, shut off the power supply and unplug the powercord from outlet and contact your place of purchase or Hanil Scientific Inc. - Unusual noises or smell from the equipment. -
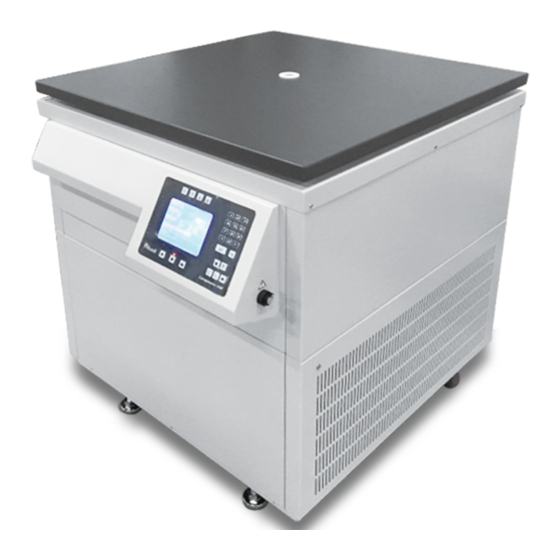
Page 6: Product Description
① Lid ② RPM measuring window ③ Control panel ④ Power switch key ⑤ Emergency Open Hole 2.2 Delivery package - Component R12 - Operating manual - T-wrench - Leveler tool - Rotors & Accessories on request 6 / 23... -
Page 7: Technical Specifications
2. Product Description 2.3 Technical Specifications Max. RPM 4,500 rpm (Swing-out rotor) Max. RCF 6,491 xg (Swing-out rotor) Time < 100 hr, continuous Max. Capacity 6 x 2,400 mL (Swing-out rotor) Temperature range -10℃ to 40℃ ACC/DEC steps 10/10 steps Program memory Rotor Identification Automatic... -
Page 8: Installation
3. Installation 3.1 Packing Inspection • Check packing conditions carefully, before unpacking. • Contact Hanil Scientific Inc. immediately if damages found. • Check the delivery for completeness. ▶ You can get contact details on the packing box or manual. 3.2 Installation 3.2.1 Selecting the Location... - Page 9 3. Installation 3.2 Installation 3.2.1 Leveling the Device · If the device is not installed horizontally, it may cause vibration, noise or malfunction. 1. Place the device on a hard and flate place. 2. Put the leveler tool on the device. 2.
-
Page 10: Power Connection
• Connect the device to voltage sources which correspond to the electrical requirements on the label attached to the device. • Only use a socket proviced Hanil Scientific Inc. 1. You can choose a embedded socket or a movable socket 2. - Page 11 3. Installation 3.5 Using the Rotor • Do not disassemble the rotor by user. This device dose not necessary to remove the rotor after use. Do not disassemble the rotor by the user. 11/23 Technical Support :+82-2-3452-8966 / techsupport@ihanil.com...
- Page 12 This device is only for blood bag centrifugation. · Only use accessories provided by Hanil Scientific Inc. 1. Load the blood bags into the adaptors with no folds at the top or corners. 2. There are two holes in the each adaptor. Load one blood bag into each hole.
-
Page 13: Operation
4. Operation 4.1 Control Panel ② ③ ④ ⑤ ① ② ③ ④ ⑤ ⑥ ⑯ ⑥ ① Pulse ⑦ View Settings ⑧ ⑯ ⑰ ⑮ ⑨ ⑩ ⑪ ⑫ ⑬ ⑭ ⑪ ⑫ ⑬ ⑭ ⑮ ⑯ Button Description ①... -
Page 14: Setting Speed
4. Operation 4.2 Setting Speed [Setting RPM] 1. Press the Speed button once. 2. Press the numeric buttons to set the desired RPM value. ▶ Up to 4,800 rpm 3. Press the Enter button. [Setting RCF] 1. Press the Speed button twice. 2. -
Page 15: Setting Run Time
4. Operation 4.3 Setting Run Time 1. Press the Time button. 2. Press the numeric buttons to set the desired run time. ▶ Up to <100hr ▶ Set the run time to 0 for continuous operation. During continuous operation, the centrifuge will continue running until you stop it manually. -
Page 16: Setting Acceleration/Deceleration
4. Operation 4.6 Setting Acceleration/Deceleration 1. Press the ACC or DEC button. 2. Press the numeric buttons to set the desired ACC or DEC rate. ▶ ACC rate: 0~9 / DEC rate: 0~9 ▶ The larger the acceleration rate, the faster the acceleration speed. The smaller the deceleration, the slower the deceleration speed. - Page 17 4. Operation 4.8 Start/Stop a Run [Start a run] 1. Check all parameters are correct. 2. Press the Start button. [Stop a run] 1. Press the Stop button. 4.9 Verifying the Setting value During operation you can verify the setting values by pressing the 'View Setting' button. 17/23 Technical Support :+82-2-3452-8966 / techsupport@ihanil.com...
-
Page 18: Maintenance
5. Maintenance 5.1 Care Instructions 1. Regularly inspect the rotor chamber for check the motor shaft is normal. 2. Regularly check the rotor and accessories to be sure there is no damage. 3. Rotate the motor shaft with your hand to make sure it turns smoothly. 4. - Page 19 5. Maintenance 5.3 Care Instructions for Refrigerated device [Open the lid after centrifugation] 1. Wipe up the moisture in the chamber with a soft cloth. 2. Leave the centrifuge lid open after centrifugation. [Remove the condensation water] 1. There is a drain hose at the bottom of the device. Regularly check and remove the condensation water from the drain hose.
-
Page 20: Troubleshooting
6. Troubleshooting 6.1 Possible Problems Problems Recommended Action - Check the power cord connection. Power failure - Check the power fuse of the device. Centrifugation - Check the lid is closed completely. cannot be started Lid cannot be - Press the ‘Lid open button’. opened - Check the power connection. -
Page 21: Error Messages
6. Troubleshooting 6.2 Error Messages Message Cause F RAM, SEEP ROM Occurs the data storage memory failure. Check! Contact Technical Support. Occurs the temperature is above the allowable limit. Over Temprature! Contact Technical Support. Occurs the lid sensor failure. Doorlock Error Contact Technical Support. - Page 22 6. Troubleshooting 6.3 Emergency Lid Open If the device lid cannot be opened, you can activte the emergency open manually. 1. Wait for rotor to stop before activating the emergency open. 2. Insert the T-wrench into the emergency open hole and press it until the lid is opened. Emergency Release Hole 22/23 www.ihanil.com...
-
Page 23: Rotors And Accessories
7. Rotors and Accessories WS2400-6 ∠90° Max. RPM : 4,800 Adaptor Adaptor Adaptor Size (W x D x H) Blood Bag Bucktet TRB500-2 TRB450-2 TRB250-2 B2400 : 494 x 435.6 x 125 mm (w/o windshield) Tube per Max. height Max. RPM Required Bore Bucket... - Page 24 16, Arayuk-ro, Gimpo, REP of Korea +82-2-3452-8966 technicalsupport@ihanil.com www.ihanil.com Doc. No. : OMP5PDEN1801...