
Summary of Contents for O3 ehanddryers Sterizen X4
-
Page 1: Table Of Contents
Install & Operation Manual Contents Introduction Technical Specification 3 X4 Dimensions 4 X5 Dimensions 5 Electrical Diagram Installation 6 Major Components 7 Before Installation 7 Mounting Commissioning User Instructions 9 Operation 9 Functions and Control Maintenance 10 Refilling the X4 X5 Unit 11 Replacing the Batteries 12 Silicone Hose and Outlet 12 Stainless Steel Care... -
Page 2: Introduction
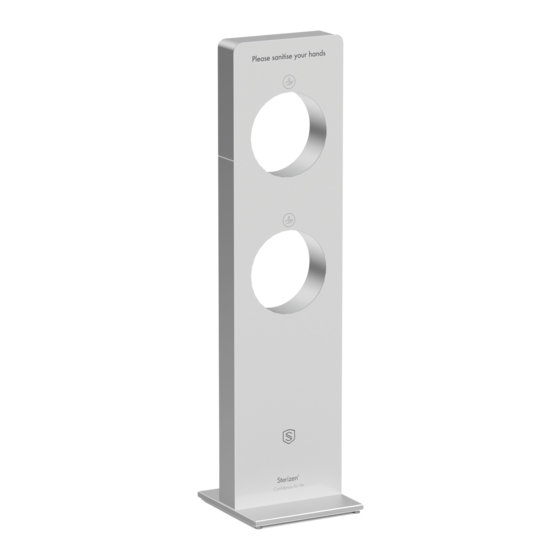
Introduction Models The X4/X5 model is a free standing hand sanitiser station. It is a self-contained machine with a robust stainless steel frame cabinet and an attractive acrylic front. This hand sanitiser unit is manufactured to the highest standards and has been designed to meet all the latest relevant safety specifications. -
Page 3: Technical Specification
Technical Specification X4 Dimensions 353mm 102mm 360mm ø 250mm 1387mm 1110mm Sterizen X4 & X5 Install & Operation Manual 500475 v051120... -
Page 4: X5 Dimensions
Technical Specification X5 Dimensions 353mm 102mm 360mm ø 250mm 1387mm 1110mm 710mm Sterizen X4 & X5 Install & Operation Manual 500475 v051120... -
Page 5: Electrical Diagram
Technical Specification Electrical Diagram WIRE COLOUR LEGEND Black Barell Jack 6V Pump 6V Pump 6V Battery 6V Battery Sterizen X4 & X5 Install & Operation Manual 500475 v051120... -
Page 6: Installation
Installation Major Components Note: Model shown is X5 ACRYLIC PANEL ADJUSTABLE FEET DISPENSE OUTLET SERVICE PANEL TOP APERTURE ACCESS PANEL LOCK LOWER APERTURE POWER JACK SOCKET Sterizen X4 & X5 Install & Operation Manual 500475 v051120... -
Page 7: Before Installation
Installation Before Installation Before installation allow adequate space to install the appliance. Rear access is required to refill the unit or change the batteries. Mounting Due to it being battery operated the X4/X5 is a free standing model designed to fit in any space. Where it requires to be mains powered ensure there is a nearby power socket. -
Page 8: Commissioning
Commissioning Remove the rear access cover Sit the containers into the Insert hoses into located at the rear of the unit base. Remove the lids and containers ensuring they are by unlocking the catch and peel back the safety cap. pushed to the bottom. -
Page 9: User Instructions
User Instructions Operation The X4/X5 is a touchless operation unit. To operate you simply place your hands through the centre of either the top or bottom aperture to dispense the hand sanitiser. A blue LED indicator will light up when in operation. Function and Controls Dispense Outlet Blue LED Indicator... -
Page 10: Maintenance
Maintenance Refilling the X4 X5 Unit The X4 X5 has been designed so it can be quickly and easily refilled. To do so please follow the below instructions. Remove the rear access cover located at the Remove silicone hoses and either replace the rear of the unit by unlocking the catch and sanitiser containers or top up as required. -
Page 11: Replacing The Batteries
Replacing the batteries Battery Operation 1. Remove the rear access cover located at the rear of the unit by unlocking the catch and then lifting up the cover. 2. Insert four C Type batteries into the spaces in the compartment. Take care to ensure all batteries are inserted with the correct polarity as shown inside the battery compartment. -
Page 12: Silicone Hose And Outlet
Silicone Hose and Outlet If left for a sustained period of time the hand sanitiser gel can start to congeal in the hoses and around the stainless steel outlet. Regular cleaning of these components will help improve performance. To do this simply disconnect the hoses and clean through with warm water. - Page 13 PROBLEM CLEANING AGENT COMMENTS Soap or mild detergent and water. (Such as Fairy Sponge, rinse with clean water, Routine cleaning Liquid) wipe dry if necessary Soap or warm water or organic solvent (e.g. Usher/ Rinse with clean water, wipe dry if Fingerprints Walker Thinners No PF8017, acetone, alcohol).
-
Page 14: Fault Finding
Fault Finding Problem/Report Possible Cause Suggested Action Check and refill sanitiser Sanitiser container empty container. Check probes connected/ Pump not working Leads attached. Check power supply to pump. Check batteries and replace if No sanitiser dispenses No electricity/power supply necessary. Check power cord is connected and live. -
Page 15: Spares
Spares 700614 700840 700859 700820 700693 700885 700729 700652 700842 Sterizen X4 & X5 Install & Operation Manual 500475 v051120... - Page 16 Parts List Sterizen Description Part No 700614 6V Pump with Connector Joints 700693 Stainless Steel Outlet 700820 Outlet Locking Nut 700859 Control Board with Sensor and LED 700840 PCB Mounting Supports 700885 Emka Lock and Cam 700729 Rear Access Door 700842 Adjustable Feet x 4 700652...