Table of Contents
Advertisement
Quick Links
Advertisement
Table of Contents

Related Manuals for Acer n20


Summary of Contents for Acer n20
- Page 1 Manual for Acer n20 Handheld...
- Page 2 Record the serial number, purchase date, and place of purchase information in the space provided below. The serial number is recorded on the label affixed to your Acer n20. All correspondence concerning your unit should include the serial number and purchase information.
-
Page 3: About This Manual
About this Manual Welcome to the Acer n20 Handheld Manual. This Manual is designed to help you get up and running quickly with your new Acer n20—a Windows 2002 handheld. It describes all you need to know about how to use your handheld as well as the application programs that come with it. - Page 4 A b o u t t h i s M a n u a l...
-
Page 5: First Things First
We hope you enjoy using your Acer n20 as much as we enjoyed creating it for you. Use your Acer n20 to effectively manage information related to both business and personal tasks. -
Page 6: Package Contents
• USB cradle • Battery pack • AC adapter Optional accessories To create more variety and expand the capabilities of your Acer n20, you can purchase the following optional accessories. • Expansion sleeve • Extra battery pack • Plug adapter •... -
Page 7: Resetting Your Acer N20
• Using the tip of your stylus, lightly press the reset button inside the hole on the rear panel of your handheld. F i r s t t h i n g s f i r s t Taking care of your Acer n20... -
Page 8: Performing A Hard Reset
F i r s t t h i n g s f i r s t Taking care of your Acer n20 Performing a hard reset A hard reset will erase all records and entries stored in your handheld. Never perform a hard reset unless a soft reset does not correct your problem. -
Page 9: Locking Your Acer N20
Locking your Acer n20 Your handheld is not just a financial investment but a wealthy source of personal information, some of which may be confidential so it is only logical to protect it from any unauthorized access. The Security setting gives you the option of assigning a lock password that will be required to access your handheld after a set period of inactivity. - Page 10 F i r s t t h i n g s f i r s t Locking your Acer n20...
-
Page 11: Table Of Contents
Design and ergonomics ......2 Acer n20 tour ......3 Front view . - Page 12 To use Block Recognizer ..... . . 20 To use Transcriber ......21 Writing on the screen .
- Page 13 Removing a Memory Stick ..... . .92 Acer Versatile Connector ......93 Expansion sleeve .
- Page 14 To create an Ethernet connection to an ISP....Connecting to a network ..... . . To create a modem connection to a network .
-
Page 15: Getting Started
• Feature highlights of your Acer n20 • Acer n20 system tour • Step-by-step procedures on how to prepare your handheld for use • Basic concepts in using your Acer n20 Features summary Performance • Intel PXA250 Application Processor with Intel XScale technology •... -
Page 16: Expansion
– Standard USB host connector Battery pack • Removable and rechargeable Lithium polymer battery – Acer n20 - 1000 mAH capacity battery pack – Acer n20w - 2000 mAH capacity battery pack • Operation time for normal usage – Acer n20 - 8 hours –... -
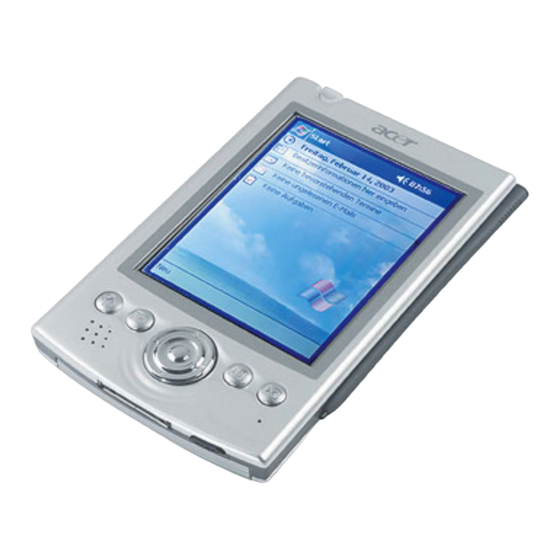
Page 17: Acer N20 Tour
Acer n20 tour Front view Component Description Power button/ Press to turn on your handheld (LED lights up green) if it is LED indicator off and returns to the last screen that was displayed and off if it is on. -
Page 18: Using The Backlight
1 G e t t i n g s t a r t e d Acer n20 tour NOTE: Refer to "Personal" on page 122 for instructions on how to reassign the hardware buttons to other applications installed on your handheld. -
Page 19: Left View
Slide to lock all buttons from being accidentally pressed when handheld is placed in pocket or in a bag. 1 G e t t i n g s t a r t e d Acer n20 tour Pocket PC’s Record program. ®... -
Page 20: Top View
1 G e t t i n g s t a r t e d Acer n20 tour Top view Component Description Memory Stick Accepts a Memory Stick, allowing you to add more memory, slot install add-on applications or use audio or text files stored in it for use with internal applications. -
Page 21: Bottom View
Bottom view Preparing to use your Acer n20 Perform first the following easy setup tasks to begin using your handheld: • Install the Microsoft • Install the battery pack • Connect the cradle • Charge your handheld • Set up your handheld •... -
Page 22: Installing The Battery Pack
ActiveSync. • Do not copy the ActiveSync files to your computer’s hard disk. You must use the Acer n20 Handheld Companion CD to place the files in their proper locations and to decompress the files. To install the Microsoft Exit any open programs, including those that run at startup, and disable any virus- scanning software. - Page 23 Slide the battery release switch to the Unlock position (a), then pull out the battery pack from its bay (b). 1 G e t t i n g s t a r t e d Preparing to use your Acer n20...
-
Page 24: Connecting The Cradle
1 G e t t i n g s t a r t e d Preparing to use your Acer n20 IMPORTANT: Do not remove the battery pack for more than 30 minutes, unless you intend to use the expansion sleeve, otherwise you risk losing all data on the internal memory of your handheld. -
Page 25: Charging Your Acer N20
1 G e t t i n g s t a r t e d Preparing to use your Acer n20 Charging your Acer n20 For initial use, you need to charge your handheld for three hours. After that, you can charge it for a few minutes each day to recharge the battery to full capacity. -
Page 26: Setting Up Your Acer N20
1 G e t t i n g s t a r t e d Preparing to use your Acer n20 LED status during charging: • Charging: Flashing green • Charging complete: Steady green If the battery level becomes low in the course of normal use, a status icon appears on the handheld screen indicating low or very low battery status (refer to "Status icons"... -
Page 27: Performing The First Synchronisation Process
Plug the cradle’s USB connector into a USB port on your computer. The 'New Partnership' setup wizard will automatically start on your computer screen. 1 G e t t i n g s t a r t e d Preparing to use your Acer n20... -
Page 28: Command Interface
To do so, on your handheld, tap then tap ActiveSync. NOTE: If you have a wireless LAN card, you can synchronise remotely from your handheld. For Acer n20w models, you can use the built-in IEEE 802.11b WLAN adapter. Command interface Hardware buttons and the stylus Your handheld has hardware buttons that control actions and scroll functions, and a stylus for selecting items and entering information. -
Page 29: Today Screen
• Tap. Touch the screen once with the stylus to open items and select options. • Drag. Hold the stylus on the screen and drag across the screen to select text and images. Drag in a list to select multiple items. •... -
Page 30: Navigation Bar And Command Bar
1 G e t t i n g s t a r t e d Command interface Status icon If more notification icons need to be displayed than there is room to display them, the Notification icon, Navigation bar and command bar The navigation bar is located at the top of the screen. -
Page 31: Pop-Up Menus
Use the command bar at the bottom of the screen to perform tasks in programs. The command bar includes menu names, buttons, and the Input Panel button. • To create a new item in the current program, tap New. • To see the name of a button, tap and hold the stylus on the button. Drag the stylus off the button so that the command is not carried out. -
Page 32: Notifications
1 G e t t i n g s t a r t e d Command interface • Tap anywhere outside the menu to close the menu without performing an action. Notifications Your handheld reminds you in a variety of ways when you have something to do. For example, if you've set up an appointment in Calendar, a task with a due date in Tasks, or an alarm in Clock, you'll be notified in any of the following ways: •... -
Page 33: Entering Data In Your Acer N20
Letter Recognizer, Block Recognizer, or Transcriber. In either case, the characters appear as typed text on the screen. NOTE: Transcriber is available only for the English and European Acer n20 models. To show or hide the input panel Tap the Input Panel button. -
Page 34: To Type With The Soft Keyboard
2 E n t e r i n g d a t a i n y o u r A c e r n 2 0 Using the input panel inserted into your text at the insertion point. The more you use your handheld, the more words it learns to anticipate. -
Page 35: To Use Transcriber
With Transcriber you can write anywhere on the screen using the stylus just as you would on paper. NOTE: Transcriber is available only for the English and European Acer n20 models. Unlike Letter Recognizer and Block Recognizer, you can write a sentence or more of information. -
Page 36: To Write On The Screen
2 E n t e r i n g d a t a i n y o u r A c e r n 2 0 Writing on the screen To write on the screen • Tap the Pen button to switch to writing mode. This action displays lines on the screen to help you write. - Page 37 tap Recognize on the pop-up menu). If a word is not recognized, it is left as writing. Select the text you want to convert and tap Recognize on the pop-up menu. If the conversion is incorrect, you can select different words from a list of alternates or return to the original writing.
-
Page 38: Drawing On The Screen
2 E n t e r i n g d a t a i n y o u r A c e r n 2 0 Drawing on the screen Tips for getting good recognition • Write neatly. • Write on the lines. Write the cross of the "t" and apostrophes below the top line so that they are not confused with the word above. -
Page 39: To Select A Drawing
Subsequent strokes in or touching the drawing box become part of the drawing. Drawings that do not cross three ruled lines will be treated as writing. TIP: You may want to change the zoom level so that you can more easily work on or view your drawing. -
Page 40: Recording A Message
2 E n t e r i n g d a t a i n y o u r A c e r n 2 0 Recording a message Recording a message In any program where you can write or draw on the screen, you can also quickly capture thoughts, reminders, and phone numbers by recording a message. -
Page 41: Using My Text
Using My Text When using Inbox or MSN Messenger, use My Text to quickly insert preset or frequently used messages into the text entry area. To insert a My Text message Tap My Text on the screen’s command bar. Tap a message. NOTE: You can add text after inserting a My Text message before sending it. - Page 42 2 E n t e r i n g d a t a i n y o u r A c e r n 2 0 Using My Text...
-
Page 43: Managing Applications And Information
The following table contains a partial list of programs that are available on your handheld. Refer to the Acer n20 Handheld Companion CD for additional programs that you can install into your handheld. - Page 44 3 M a n a g i n g a p p l i c a t i o n s a n d i n f o r m a t i o n Switching between applications Icon Program Usage ActiveSync Synchronise information between your handheld and...
-
Page 45: Finding And Organising Information
Finding and organising information Use the Find function and the File Explorer window to search for specific files and manage your files easily. To use Find The Find function helps you quickly locate specific files. On the Enter the text you want to find, then select a data type. TIP: To quickly find information that is taking up storage space on your handheld, select Larger than 64 KB in Type. - Page 46 3 M a n a g i n g a p p l i c a t i o n s a n d i n f o r m a t i o n Finding and organising information Tap to change folders. Select the sort order for the list.
-
Page 47: Managing Microsoft Pocket Outlook Applications
4 M a n a g i n g M i c r o s o f t ® P o c k e t O u t l o o k a p p l i c a t i o n s Pocket Outlook applications This chapter will discuss the basic applications included in the Microsoft Outlook program installed in your handheld. -
Page 48: Scheduling An Appointment
4 M a n a g i n g M i c r o s o f t ® P o c k e t O u t l o o k a p p l i c a t i o n s Calendar NOTE: You can customise the Calendar display, such as changing the first day of the week, by tapping Options on the Tools menu. - Page 49 4 M a n a g i n g M i c r o s o f t ® P o c k e t O u t l o o k a p p l i c a t i o n s Tap to return to the calendar (the appointment is saved automatically).
-
Page 50: Creating A Meeting Request
4 M a n a g i n g M i c r o s o f t ® P o c k e t O u t l o o k a p p l i c a t i o n s Contacts Creating a meeting request You can use Calendar to set up meetings with users of Outlook or Pocket Outlook. -
Page 51: Creating A Contact
4 M a n a g i n g M i c r o s o f t ® P o c k e t O u t l o o k a p p l i c a t i o n s NOTE: To change the way information is displayed in the list, tap Tools and then Options. -
Page 52: Finding A Contact
4 M a n a g i n g M i c r o s o f t ® P o c k e t O u t l o o k a p p l i c a t i o n s Contacts To assign the contact to a category, scroll to and tap Categories and select a category from the list. -
Page 53: Tasks
4 M a n a g i n g M i c r o s o f t ® P o c k e t O u t l o o k a p p l i c a t i o n s Tasks Use Tasks to keep track of what you have to do and prioritise them based on their importance and urgency. -
Page 54: Creating A Task
4 M a n a g i n g M i c r o s o f t ® P o c k e t O u t l o o k a p p l i c a t i o n s Tasks NOTE: To change the way information is displayed in the list, tap Tools and then Options. - Page 55 4 M a n a g i n g M i c r o s o f t ® P o c k e t O u t l o o k a p p l i c a t i o n s After completing the details, tap OK.
-
Page 56: Notes
Create the note by writing, drawing, typing, or recording. NOTE: For more information about using the input panel, writing and drawing on the screen, and creating recordings, see "2 Entering data in your Acer n20" on page 19. then, Notes. -
Page 57: Inbox
4 M a n a g i n g M i c r o s o f t ® P o c k e t O u t l o o k a p p l i c a t i o n s Inbox Use Inbox to send and receive email messages by doing either of the following: •... -
Page 58: Synchronising Email Messages
4 M a n a g i n g M i c r o s o f t ® P o c k e t O u t l o o k a p p l i c a t i o n s Inbox Synchronising email messages Email messages can be synchronised as part of the general synchronisation process. -
Page 59: Using The Message List
4 M a n a g i n g M i c r o s o f t ® P o c k e t O u t l o o k a p p l i c a t i o n s messages that have been deleted on the email server are removed from the handheld’s Inbox folder. -
Page 60: Composing A Message
4 M a n a g i n g M i c r o s o f t ® P o c k e t O u t l o o k a p p l i c a t i o n s Inbox When you connect to your email server, by default, you'll receive messages from the last five days only, the first 100 lines of each new message, and file attachments of less... -
Page 61: Managing Email Messages And Folders
4 M a n a g i n g M i c r o s o f t ® P o c k e t O u t l o o k a p p l i c a t i o n s Compose your message. -
Page 62: Folder Behavior With A Direct Connection To An Email Server
4 M a n a g i n g M i c r o s o f t ® P o c k e t O u t l o o k a p p l i c a t i o n s Inbox Folder behavior with a direct connection to an email server The behavior of the folders you create depends on whether you are using ActiveSync,... -
Page 63: Managing Microsoft Pocket Pc 2002 Companion Programs
® Messenger ® Windows Media™ Player for Pocket PC ® Reader for Pocket PC ® Reader is available only for the English and European Acer n20 models. menu. , Programs, Pocket Word, and then New. Pocket Word Pocket ® ®... -
Page 64: Entering Information
5 M a n a g i n g M i c r o s o f t ® P o c k e t P C 2 0 0 2 c o m p a n i o n p r o g r a m s Pocket Word To use the Pocket Word file list Pocket Word contains a list of the files stored on your handheld. -
Page 65: Writing Mode
5 M a n a g i n g M i c r o s o f t ® P o c k e t P C 2 0 0 2 c o m p a n i o n p r o g r a m s •... -
Page 66: Drawing Mode
5 M a n a g i n g M i c r o s o f t ® P o c k e t P C 2 0 0 2 c o m p a n i o n p r o g r a m s Pocket Word If you cross three ruled lines in a single stylus stroke, the writing becomes a drawing, and can be edited and manipulated as described in the following section. -
Page 67: Pocket Excel
5 M a n a g i n g M i c r o s o f t ® P o c k e t P C 2 0 0 2 c o m p a n i o n p r o g r a m s Recording mode In recording mode, embed a recording into your document. -
Page 68: Creating A New Workbook
5 M a n a g i n g M i c r o s o f t ® P o c k e t P C 2 0 0 2 c o m p a n i o n p r o g r a m s Pocket Excel Creating a new workbook •... -
Page 69: Protecting Your Workbooks
5 M a n a g i n g M i c r o s o f t ® P o c k e t P C 2 0 0 2 c o m p a n i o n p r o g r a m s Protecting your workbooks If your workbook contains sensitive information, you can protect it with a password. -
Page 70: Setting Up An Account
5 M a n a g i n g M i c r o s o f t ® P o c k e t P C 2 0 0 2 c o m p a n i o n p r o g r a m s MSN®... -
Page 71: Chatting With Contacts
5 M a n a g i n g M i c r o s o f t ® P o c k e t P C 2 0 0 2 c o m p a n i o n p r o g r a m s •... -
Page 72: Microsoft Windows Media Player For Pocket Pc
5 M a n a g i n g M i c r o s o f t ® P o c k e t P C 2 0 0 2 c o m p a n i o n p r o g r a m s Microsoft®... -
Page 73: Microsoft Reader For Pocket Pc
® Reader for Pocket PC to read eBooks on your handheld. You can also ® Reader is available only for the English and European Acer n20 models. Indicates the progress of the current track. Tap to adjust volume. -
Page 74: Getting Books On Your Acer N20
Some sample books and a dictionary are included in the MSReader folder. This folder is located in the Extras folder on the Acer n20 Handheld Companion CD. Use ActiveSync to download the files from your computer to your handheld as described in the Read Me file in the MSReader folder. -
Page 75: Using The Reader Features
5 M a n a g i n g M i c r o s o f t ® P o c k e t P C 2 0 0 2 c o m p a n i o n p r o g r a m s •... -
Page 76: Removing A Book
5 M a n a g i n g M i c r o s o f t ® P o c k e t P C 2 0 0 2 c o m p a n i o n p r o g r a m s Microsoft®... -
Page 77: Using Third-Party Applications
Acrobat Reader for Pocket PC PocketTV Enterprise Edition 1 Application available only for the English and European Acer n20 models. RecentDo Using RecentDo, you can conveniently scan a list of the most recently accessed programs, documents and websites. Documents that have been edited and saved will be listed in RecentDo as well as documents opened by Microsoft Media Player or PocketTV;... -
Page 78: Backup/Restore
6 U s i n g t h i r d - p a r t y a p p l i c a t i o n s Backup/Restore NOTE: Each category can contain a maximum of five items at a time. Backup/Restore Backup/Restore enables you to back up data files and applications in your handheld’s internal memory to a storage card and to restore backup data to your handheld. - Page 79 To launch Backup/Restore: Insert a storage card into the appropriate slot. For instructions on how to insert a Memory Stick, refer to page 91. If you will be using either a CompactFlash card or a PC Card, attach first your handheld to the expansion sleeve (optional accessory, sold separately).
-
Page 80: Backup Function
6 U s i n g t h i r d - p a r t y a p p l i c a t i o n s Backup/Restore Backup function The Backup function has two operating modes—Normal Backup and Advanced Backup. - Page 81 NOTE: 'AutoBackup' is the default filename of a backup file generated using the Advanced mode. To perform data backup Close all running programs except for Backup/Restore. In the Backup tab, choose whether to accept the default filename (backup) or type a new one by tapping the keyboard icon on the bottom of the screen.
- Page 82 6 U s i n g t h i r d - p a r t y a p p l i c a t i o n s Backup/Restore Tap Retry to revert to the Backup tab, then either delete files from the selected storage card to increase its free space or select a new storage card with a larger free space enough to accommodate the size of the intended backup data.
- Page 83 6 U s i n g t h i r d - p a r t y a p p l i c a t i o n s Backup/Restore Tap Yes to replace existing file, or tap No, then either define a new filename or select another storage card.
-
Page 84: Restore Function
6 U s i n g t h i r d - p a r t y a p p l i c a t i o n s Backup/Restore Tap Reset to restart your handheld then, launch Backup/Restore again. When the backup process is completed, a message box appears. - Page 85 Select a source storage card (default: Memory Stick) from the 'Restore from' radio buttons. A list of files contained in the selected storage card is displayed on the lower half of the screen. The filename, file size and creation of each backup file are shown. Tap a filename to select the file you wish to restore.
- Page 86 6 U s i n g t h i r d - p a r t y a p p l i c a t i o n s Backup/Restore • Backup option - mode used to generate the .dbk file •...
- Page 87 Tap Reset to restart your handheld, then relaunch Backup/Restore. If a locked file is encountered during restore, a warning message will pop up. Do any of the following: • Close the locked file then tap Retry to continue the restore process. •...
-
Page 88: Deleting A File From A Storage Card
6 U s i n g t h i r d - p a r t y a p p l i c a t i o n s Backup/Restore During the restore process, a progress screen will appear displaying restore status. When the restore process is completed, a message box appears. -
Page 89: Ia Album Le
From the pop-up menu, tap Delete. A message confirming deletion will appear. Tap OK. IA Album LE IA Album LE (Lite Edition) is a convenient image viewing tool for file management, browsing and viewing. 6 U s i n g t h i r d - p a r t y a p p l i c a t i o n s IA Album LE... - Page 90 6 U s i n g t h i r d - p a r t y a p p l i c a t i o n s IA Album LE Key features include: • Built-in Screen Capture function with option to enable a capture sound. •...
-
Page 91: Ia Album Le Menus
– Convert an existing file to a different format (JPEG, GIF, or Bitmap) and resolution. – Save a captured screen image as a Bitmap, GIF, or JPEG file (desired resolution between 60 and 300 dpi). • Specify a Home Folder and then quick-jump to that folder or any other folder you have accessed during the current IA ScreenShot session. - Page 92 6 U s i n g t h i r d - p a r t y a p p l i c a t i o n s IA Album LE The File menu provides a convenient way to switch folders, create or delete folders, delete images, select all images in a folder, and quit the IA Album LE program.
-
Page 93: View Menu
View menu The View menu allows you to choose view modes, display your images in various ways such as zoom/rotate, and view data concerning the attributes of the images. Thumbnail View Switch to Thumbnail view by selecting Thumbnail View from the View menu, or by tapping its icon on the toolbar. - Page 94 6 U s i n g t h i r d - p a r t y a p p l i c a t i o n s IA Album LE • Place your stylus within the edge at the far left or far right of the screen and then drag the stylus over the images to perform multiple selection useful in mass-editing such as Delete.
- Page 95 6 U s i n g t h i r d - p a r t y a p p l i c a t i o n s IA Album LE Actual Size This command (and the Actual Size icon on the toolbar) is only available in Select view. When you select this command, the current image will be displayed in its actual size;...
- Page 96 6 U s i n g t h i r d - p a r t y a p p l i c a t i o n s IA Album LE Thumbnail View or Select View) and then select Crop... from the Tools menu (or the Crop icon on the Toolbar).
- Page 97 Choose whether or not you want to trigger a sound each time you perform a screen capture. If so, check the Enable Capture Sound check box. If you want to specify a different folder in which to save the screen-capture file, tap the Change...
-
Page 98: Acrobat Reader For Pocket Pc
6 U s i n g t h i r d - p a r t y a p p l i c a t i o n s Acrobat Reader for Pocket PC in the event that an image contains a colour that is not supported by your handheld screen. -
Page 99: Command Bar
Command bar The Command bar contains the usual media player commands including: • Stop • Play • Pause • Step • Fast-forward • Volume control • Mute • Repeat (loop) • Open file Seek/Progress bar Allows you to control display pace and shows the playback progress. 6 U s i n g t h i r d - p a r t y a p p l i c a t i o n s PocketTV Enterprise Edition •... -
Page 100: Status Bar
6 U s i n g t h i r d - p a r t y a p p l i c a t i o n s PocketTV Enterprise Edition Status bar Shows time information (estimated time elapsed, estimated total play time), fps indicator (actual frames-per-second) and bit-rate indicator. -
Page 101: Tools Menu
Tools menu Includes the following commands: • Open Select a file to open. There are two possible ways to open a file depending on whether the option Options > Files > Open With tGetFile is selected or not. If selected, you can open a file located anywhere, otherwise it uses the standard Microsoft dialog which only shows the files located in '\My Documents\' and in one level of subfolders. - Page 102 6 U s i n g t h i r d - p a r t y a p p l i c a t i o n s PocketTV Enterprise Edition Options menu command Some menu commands under Options also have their own set of sub-commands. •...
- Page 103 6 U s i n g t h i r d - p a r t y a p p l i c a t i o n s PocketTV Enterprise Edition • Files Play at Open - file is in automatic playback mode when opened.
- Page 104 6 U s i n g t h i r d - p a r t y a p p l i c a t i o n s PocketTV Enterprise Edition...
-
Page 105: Using Expansion Features
The slim and lightweight design of your Acer n20 belies the impressive expansion features that it is capable of. These expansion features includes the following: • Integrated Memory Stick slot • Acer Versatile Connector • Expansion sleeve (optional) These expansion features allow you to: •... -
Page 106: Removing A Memory Stick
7 U s i n g e x p a n s i o n f e a t u r e s Memory Stick Insert the Memory Stick into the Memory Stick slot. Push the card into the slot using your finger until you feel the card lock and hear an audible system sound;... -
Page 107: Acer Versatile Connector
Acer s10 Handheld series including the Travel Charger and the USB Sync Charge Cable. Refer to "Front panel" on page 2 for the location of the Acer Versatile Connector. Expansion sleeve The expansion sleeve is an optional accessory designed for users who demand more features and functions. -
Page 108: Attaching Your Acer N20 To The Expansion Sleeve
7 U s i n g e x p a n s i o n f e a t u r e s Expansion sleeve Attaching your Acer n20 to the expansion sleeve Detach the removable battery pack from your handheld (a). -
Page 109: Using The Expansion Sleeve
Using the expansion sleeve Both the CompactFlash and PC Card slots are flexible expansion features that allow you to use a wide range of peripheral devices with your handheld. These may include: • Hard drives • Memory cards • VGA (Video Graphics Array) cards •... -
Page 110: Inserting A Pc Card
7 U s i n g e x p a n s i o n f e a t u r e s Expansion sleeve Push the card into the slot using your finger until you feel the card lock. Removing a CompactFlash card Hold your handheld securely. -
Page 111: Removing A Pc Card
Removing a PC Card Hold your handheld securely. Press the slot eject button to pop out the card (a); then gently remove it from the slot (b). 7 U s i n g e x p a n s i o n f e a t u r e s Expansion sleeve... - Page 112 7 U s i n g e x p a n s i o n f e a t u r e s Expansion sleeve...
-
Page 113: Exchanging And Updating Data Using Activesync
NOTE: If you have a wireless LAN card, you can synchronise remotely from your handheld. For the Acer n20w model, you can use the built-in IEEE 802.11b WLAN adapter. For information on using ActiveSync, see ActiveSync Help on the your computer. - Page 114 8 E x c h a n g i n g a n d u p d a t i n g d a t a u s i n g A c t i v e S y n c ® To open ActiveSync on your handheld •...
-
Page 115: Getting Connected
IR-enabled device. • Use the built-in IEEE 802.11b WLAN adapter to connect to an existing IEEE 802.11b wireless network (applicable only to the Acer n20w handheld model). • Connect to your Internet service provider (ISP). Once connected, you can send... -
Page 116: Receiving Information
Wireless communication Applicable only to the Acer n20w model, this feature uses a built-in IEEE 802.11b WLAN adapter to connect to an existing IEEE 802.11b wireless network. This feature provides you with an Internet experience that is completely mobile to meet your fast paced lifestyle, and with a high-speed transmission rate of up to 11 Mbps you’re sure... -
Page 117: Activating The Wireless Feature
Activating the wireless feature , Settings. Tap the System tab, then the Wireless LAN Utility icon. Configuring the wireless settings To view and modify the IP address and server-related settings: , Settings. Tap the Connections tab, then the Networks Adapter icon. Select IEEE 802.11b WLAN Adapter from the list, then tap the Properties button. -
Page 118: Name Servers Page
9 G e t t i n g c o n n e c t e d Wireless communication Name Servers page Use this page to view and edit the DNS, Alt DNS, WINS and Alt WINS settings. • DNS (Domain Name System) This is a database system that translates IP addresses to domain names. - Page 119 Link page Use this page to view the SSID, Channel, TxRate, BSSID, IP Address, Subnet Mask and Gateway settings. • SSID (Service Set Identifier) This is a unique case-sensitive name of up to 32 characters shared among all devices sharing a common wireless network. The name value is set in Scan page with the default value being 'ANY'.
-
Page 120: Configuration Page
9 G e t t i n g c o n n e c t e d Wireless communication Configuration page Use this page to set the Mode, SSID, Channel and Country settings, and to view the Link Quality indicator. •... -
Page 121: Advanced Page
• Link Quality. This icon indicates the clarity of your handheld’s connection to the Access Point. Advanced page Use this page to view and set the WEP, Transmission Rate, and Power Saving Mode settings. • WEP (Wired Equivalent Privacy) Select the WEP mode, key ID and key. Mode options: –... - Page 122 9 G e t t i n g c o n n e c t e d Wireless communication – 64 bits (HEX) - requires 10 hexadecimal numbers with an upper limit of 10 – 128 bits (HEX) - requires 26 hexadecimal values with an upper limit of 26 NOTE: For HEX keys, when you enter an out-of-range character, you will be prompted to enter the correct character.
- Page 123 • BSSID/SSID A wireless network is identified by its BSSID and SSID. Double-tap an item in the BSSID column to select the AP/801.11 Ad Hoc network you want to connect to. The Link page of the selected network will be displayed. When operating under the 801.11 Ad Hoc mode, the SSID must be the same among stations so that computers can communicate properly within the LAN.
-
Page 124: Connecting To The Internet
9 G e t t i n g c o n n e c t e d Connecting to the Internet Connecting to the Internet You can connect to your ISP, and use the connection to send and receive email messages and view Web or WAP pages. -
Page 125: To Create An Ethernet Connection To An Isp
To create an Ethernet connection to an ISP You do not need to create a new connection on your handheld. Instead, you must purchase and configure an Ethernet card that is compatible with your handheld. Obtain the following information from your ISP: •... -
Page 126: To Create A Modem Connection To A Network
9 G e t t i n g c o n n e c t e d Starting a connection To create a modem connection to a network Get the following information from your network administrator: • Dial-up access telephone number •... -
Page 127: Connecting Directly To An Email Server
• When connected via dial-up or VPN, tap the Connection icon navigation bar, and then tap End. • When connected via a network (Ethernet) card, remove the card from your handheld. Connecting directly to an email server You can set up a connection to an email server so that you can send and receive email messages by using a modem or network connection and Inbox on your handheld. - Page 128 9 G e t t i n g c o n n e c t e d Getting help on connecting...
-
Page 129: Using Microsoft Pocket Internet Explorer
Pocket Internet Explorer Use Microsoft ways: • During synchronisation with your computer, download your favorite links and mobile favorites that are stored in the Mobile Favorites subfolder of Internet Explorer on your computer. • Connect to an Internet service provider (ISP) or network and browse the Web. To do this, you'll need to create the connection first, as described in "9 Getting connected"... -
Page 130: Mobile Favorites
1 0 U s i n g M i c r o s o f t ® P o c k e t I n t e r n e t E x p l o r e r Mobile Favorites folder Unless you mark the favorite link as a mobile favorite, only the link will be downloaded to your handheld, and you will need to connect to your ISP or network to view the content. -
Page 131: Avantgo Channels
• Limit the number of downloaded linked pages. AvantGo channels AvantGo is a free interactive service that gives you access to personalised content and thousands of popular Web sites. You subscribe to AvantGo channels directly from your handheld, then, you synchronise your handheld and computer, or connect to the Internet to download the content. -
Page 132: Using Pocket Internet Explorer
1 0 U s i n g M i c r o s o f t ® P o c k e t I n t e r n e t E x p l o r e r Using Pocket Internet Explorer To add or remove channels •... -
Page 133: To View Mobile Favorites And Channels
1 0 U s i n g M i c r o s o f t ® P o c k e t I n t e r n e t E x p l o r e r To view mobile favorites and channels Tap the Favorites button to display your list of favorites. - Page 134 1 0 U s i n g M i c r o s o f t ® P o c k e t I n t e r n e t E x p l o r e r Using Pocket Internet Explorer...
-
Page 135: Customising Your Handheld
handheld You can customise your handheld based on your personal requirements and preferences as well as depending on your usual work modes. Customise your handheld by doing either of the following: • Adjust the handheld settings • Add or remove programs Adjusting handheld settings You can adjust the settings of your handheld to suit the way you work. -
Page 136: Personal
1 1 C u s t o m i s i n g y o u r h a n d h e l d Adjusting handheld settings Personal Buttons Assign your favorite programs to any of the Quick buttons. - Page 137 1 1 C u s t o m i s i n g y o u r h a n d h e l d Adjusting handheld settings Input Select an input method, options for word completion and other related settings. Menus Customise what appears on the menu, and enable a pop-up menu from the New...
-
Page 138: Owner Information
1 1 C u s t o m i s i n g y o u r h a n d h e l d Adjusting handheld settings Owner Information Enter personal information and customise text display when handheld is turned on. Password Set a password to prevent unauthorized access to your handheld. - Page 139 1 1 C u s t o m i s i n g y o u r h a n d h e l d Adjusting handheld settings Sounds & Notification Select the types of action you want to hear sounds for and define how you want to be notified about different events.
-
Page 140: System
1 1 C u s t o m i s i n g y o u r h a n d h e l d Adjusting handheld settings System About Displays your handheld’s version and copyright information; includes an option to define a device ID. - Page 141 1 1 C u s t o m i s i n g y o u r h a n d h e l d Adjusting handheld settings Backlight Define settings for backlight control. Clock Change the time or set alarms.
- Page 142 1 1 C u s t o m i s i n g y o u r h a n d h e l d Adjusting handheld settings Memory Adjust allocation of storage and main memory. Microphone Enable or disable the AGC (Automatic Gain Control) function—volume control when making an audio recording.
- Page 143 1 1 C u s t o m i s i n g y o u r h a n d h e l d Adjusting handheld settings Power Define settings to minimise power consumption.
-
Page 144: Regional Settings
1 1 C u s t o m i s i n g y o u r h a n d h e l d Adjusting handheld settings Regional Settings Set default number and time display formats and other related options. -
Page 145: Remove Programs
1 1 C u s t o m i s i n g y o u r h a n d h e l d Adjusting handheld settings Remove Programs Remove programs from storage memory. Screen Align screen and enable the ClearType feature. -
Page 146: Connections
1 1 C u s t o m i s i n g y o u r h a n d h e l d Adjusting handheld settings Connections AvantGo Connect Set server settings and related options for AvantGo. - Page 147 1 1 C u s t o m i s i n g y o u r h a n d h e l d Adjusting handheld settings Beam Define settings for the beam function. Connections Adjust settings for connecting to the Internet or to a local network.
-
Page 148: Adding And Removing Programs
1 1 C u s t o m i s i n g y o u r h a n d h e l d Adding and removing programs Network Adapters Select your handheld’s network adapter and set its properties. Adding and removing programs Programs bundled with your handheld at the factory are stored in ROM (read-only memory). -
Page 149: To Add A Program Directly From The Internet
Download the program to your computer (or insert the CD or disk that contains the program into your computer). You may see a single *.xip, *.exe, or *.zip file, a Setup.exe file, or several versions of files for different device types and processors. Be sure to select the program designed for a Pocket PC and your handheld’s processor type. -
Page 150: Removing Programs
1 1 C u s t o m i s i n g y o u r h a n d h e l d Adding a program to the Start menu Removing programs On the System tab, tap Remove Programs. Tap the program you wish to remove. - Page 151 To add a Start menu program using File Explorer on your handheld , Programs, File Explorer, and locate the program (tap the folder list, labeled My Documents by default, and then My Device to see a list of all folders on your handheld).
- Page 152 1 1 C u s t o m i s i n g y o u r h a n d h e l d Adding a program to the Start menu...
- Page 153 LED status through the Acer Versatile Connector connecting cradle installing battery installing Microsoft ActiveSync software initial synchronisation...
- Page 154 IA Album LE menus Inbox input panel Internet Letter Recognizer manage applications application list finding information opening organising information switching Memory Stick Microsoft Pocket Internet Explorer AvantGo signup Mobile Favorites create mobile favorite favorite links using view mobile favorites Microsoft Pocket Outlook Calendar create meeting request open...
- Page 155 menus File Tools screen capture preferences View select view PocketTV Command bar Fullscreen/Landscape switch Menu Options Seek bar Status bar Transcriber Windows Media Player for Pocket PC...