NETGEAR GS110EMX Installation Manual
8-port gigabit ethernet smart managed plus switch with 2-port 10g/multi-gig uplinks
Hide thumbs
Also See for GS110EMX:
- User manual (77 pages) ,
- Installation (2 pages) ,
- User manual (69 pages)
Advertisement
Quick Links
Installation Guide
8-Port Gigabit Ethernet Smart Managed Plus
Switch with 2-Port 10G/Multi-Gig Uplinks
GS110EMX
Package Contents
•
Switch model GS110EMX
•
Power adapter (varies by region)
•
Rack-mount kit
•
Wall-mount screws for wall installation
•
Rubber feet for desktop installation
•
Installation guide
Ethernet cables not included.
1. Register With the NETGEAR Insight App
Use the NETGEAR Insight app to register your switch, activate your warranty, and
access support.
1. On your iOS or Android mobile device or tablet, visit the app store, search
for NETGEAR Insight, and download the latest version of the app.
2. Open the NETGEAR Insight app.
3. If you did not set up a NETGEAR account, tap Create NETGEAR Account and
follow the onscreen instructions.
4. Enter the email address and password for your account and tap LOG IN.
If your mobile device is connected with WiFi to the same network as the
switch, the switch displays in the list of Insight Manageable Devices.
5. Either tap the switch in the list, or tap + in the upper right corner.
If you tapped +, enter the serial number on the bottom of the switch, or scan
the serial number bar code with the camera on your mobile device or tablet.
Then tap Go.
6. Follow the onscreen instructions to add your switch to a network location.
The switch is registered and added to your account.
2. Connect the Switch
Switch
Desktop
IP camera
ReadyNAS
Gaming console
Laptop
Desktop
Sample Connections
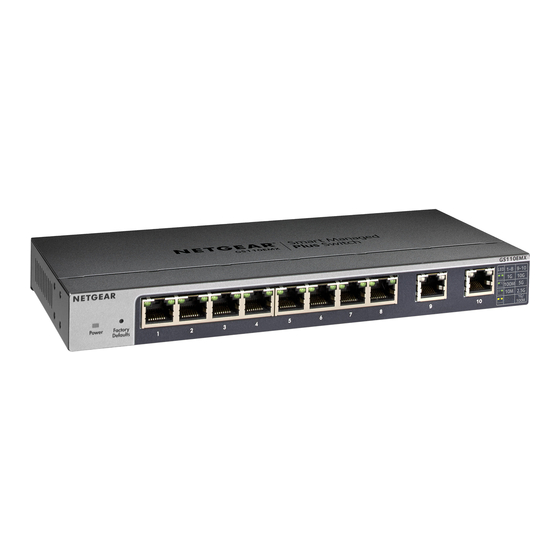
1. Connect devices to the RJ-45 network ports on the switch front panel.
Ports 1 through 8 support 1G, 100M, and 10M. Ports 9 and 10 support 10G,
5G, 2.5G, 1G, and 100M.
2. Connect one RJ-45 port on the switch to a network. In a high-speed network,
use port 9 or 10.
Cables and Speeds
The following table describes the network cables that you can use for the switch
connections and the speeds that these cables can support, up to 100 meters
(328 feet).
Speed
100 Mbps
1 Gbps, 2.5 Gbps, or 5 Gbps
10 Gbps
Note:
For speeds of 10 Gbps, if the cable length is shorter than 55 meters
(180 feet), you can use a Category 6 (Cat 6) cable.
3. Discover the IP Address
An IP address is required to configure your switch. The switch gets an IP
address from a DHCP server (such as your router) by default. If your switch is not
connected to a DHCP server, use the default IP address: 192.168.0.239.
1. Connect your mobile device to the same WiFi network as the switch.
Internet
2. Make sure that the network connects to the Internet.
3. Launch the NETGEAR Insight app from your mobile device.
Router
4. Log in to your account.
The current IP address of the switch displays.
Smart TV
Cable Type
Category 5 (Cat 5) or higher rated
Category 5e (Cat 5e) or higher rated
Category 6A (Cat 6A) or higher rated
Continued on the other side.
Advertisement

Related Manuals for NETGEAR GS110EMX


Summary of Contents for NETGEAR GS110EMX
- Page 1 8-Port Gigabit Ethernet Smart Managed Plus (328 feet). 2. Open the NETGEAR Insight app. Switch with 2-Port 10G/Multi-Gig Uplinks 3. If you did not set up a NETGEAR account, tap Create NETGEAR Account and Speed Cable Type follow the onscreen instructions.
- Page 2 We recommend Attach the Switch to a Wall Note: If your computer is a Mac, use the NETGEAR Switch Discovery Tool, as that you use only official NETGEAR support resources. described in the following section.