Advertisement
Quick Links
NOTICE
• SHARP strongly recommends that separate
permanent written records be kept of all
important data. Data may be lost or altered in
virtually any electronic memory product under
certain circumstances. Therefore, SHARP
assumes no responsibility for data lost or
otherwise rendered unusable whether as a
result of improper use, repairs, defects, battery
replacement, use after the specified battery life
has expired, or any other cause.
In Europe:
This equipment complies with the requirements of
Directive 89/336/EEC as amended by 93/68/EEC.
Dieses Gerät entspricht den Anforderungen der EG-
Richtlinie 89/336/EWG mit Änderung 93/68/EWG.
Ce matériel répond aux exigences contenues dans la
directive 89/336/CEE modifiée par la directive 93/68/
CEE.
Dit apparaat voldoet aan de eisen van de richtlijn 89/336/
EEG, gewijzigd door 93/68/EEG.
Dette udstyr overholder kravene i direktiv nr. 89/336/EEC
med tillæg nr. 93/68/EEC.
Quest' apparecchio è conforme ai requisiti della direttiva
89/336/EEC come emendata dalla direttiva 93/68/EEC.
Note
• This model may not be available in some
countries.
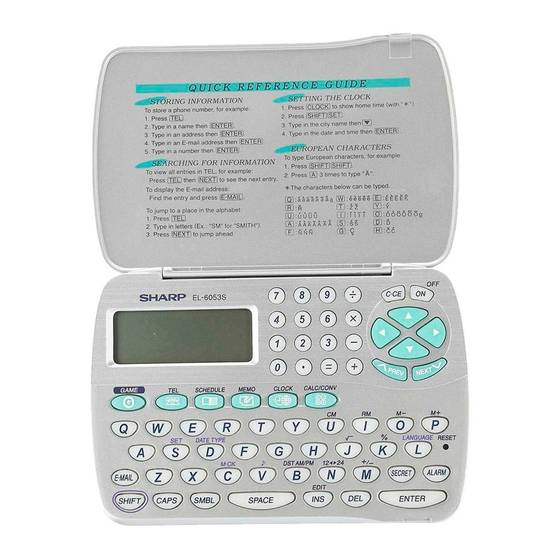
q Power ON/OFF key
w Cursor keys
e Search keys
r RESET switch
t Mode keys
The following notations are used for
key operations.
CM
➝
U
➝
SHIFT
➝
V
➝
Using the Organizer for the First Time
Be sure to perform the following operations
before using the Organizer for the first time.
1. Remove the isolating film that is affixed to the
battery holder on the back of the unit.
2. Press the RESET switch with a ball-point pen
or similar object.
"RESET?" is displayed.
3. Press
SHIFT ENTER
Organizer.
After "RESET!" is displayed, Home clock is
displayed. (See "Clock Mode".) You have
deleted all the memory contents now.
Changing the Guidance Language
Guidance messages can be displayed in 7
languages – English, Dutch, Portuguese, Italian,
German, French, and Spanish. After initializing the
Organizer, the default setting is English.
• Alphanumeric letters, symbols, and "+ – × ÷ ."
can be entered into the dot display area (the 1st
line).
• Numbers and some characters (only space, –,
and F and P in Telephone mode) can be entered
into the number display area (the 2nd and the
3rd lines).
• Basically letters are entered in capital letters
("CAPS" is turned on). To enter small letters,
press
to turn "CAPS" off.
CAPS
Entering symbols and letters with an accent
mark
• To enter a symbol, press
the desired symbol appears:
( )~': / \_&<>ß!? ¡¿
@#$£¥
• To enter a letter with an accent mark, press
to turn "SHIFT LOCK" on, and
SHIFT
SHIFT
press the appropriate key repeatedly. (Refer to
the "QUICK REFERENCE GUIDE" inside the
cover.)
• To turn "SHIFT LOCK" off, press
Home clock
Home city (with "
")
LON
Date
2002– 1– 1
Time
A12–00–00
Each time you press
CLOCK
between Home and World clocks. (For World
clock, "
" is not displayed.)
1. Before setting the clock
• The default setting for the date is "YYYY/MM/
DD" (year-month-day). To change the setting to
"MM/DD/YYYY" (month-day-year) or "DD/MM/
YYYY" (day-month-year):
1. Press
once or twice to display
CLOCK
Home clock (with "
2. Press
SHIFT DATE TYPE
3. Press
or
PREV
NEXT
desired type.
4. Press
to store the new setting.
ENTER
• To change the 12-hour clock to the 24-hour
clock, press
("A" or "P" is cleared).
12
24
Each time you press
12
switches.
• In the period of daylight saving time/summer
time, press
in advance ("#" is displayed).
DST
2. Setting the clock
1. Press
once or twice to display Home
CLOCK
clock (with "
").
2. Press
to start setting.
SHIFT SET
The cursor starts to flash on the city name.
EL-6053S English Front sheet
Downloaded from:
http://www.usersmanualguide.com/
ELECTRONIC ORGANIZER
EL-6053S
OPERATION MANUAL
• SHARP assumes no responsibility, directly or
indirectly, for financial losses or claims from
third persons resulting from the use of this
product and any of its functions, such as stolen
credit card numbers, loss or alteration of stored
data, etc.
• The information provided in this manual is
subject to change without notice.
Η εγκατάσταση αυτή ανταποκρίνεται στις απαιτήσεις
των οδηγιών της Ευρωπαïκής Ενωσης 89/336/ΕΟΚ,
πως ο κανονισµ ς αυτ ς συµπληρώθηκε απ την
οδηγία 93/68/ΕΟΚ.
Este equipamento obedece às exigências da directiva 89/
336/CEE na sua versão corrigida pela directiva 93/68/
CEE.
Este aparato satisface las exigencias de la Directiva 89/
336/CEE modificada por medio de la 93/68/CEE.
Denna utrustning uppfyller kraven enligt riktlinjen 89/336/
EEC så som kompletteras av 93/68/EEC.
Dette produktet oppfyller betingelsene i direktivet 89/336/
EEC i endringen 93/68/EEC.
Tämä laite täyttää direktiivin 89/336/EEC vaatimukset,
jota on muutettu direktiivillä 93/68/EEC.
Part Names
• Purple colored functions are operated by
pressing
("SHIFT" is turned on) and the
SHIFT
appropriate keys.
• In this manual, only the display symbols
necessary for explanation of this product are
shown.
: Clear memory
(in Calculator mode)
: Letter "U"
: Turn the touch
tone on and off
: Letter "V"
NOTES
• If the Organizer is subjected to strong,
extraneous electrical noises or shocks during
use, an abnormal condition may occur in which
OFF
no keys (including
ON
the RESET switch and press
delete all the memory contents.
to initialize the
• To minimize battery consumption, the Organizer
is designed to automatically turn off when no
key has been pressed for approximately 7
minutes.
• The key touch tone is turned on and off by
pressing
. When the tone is turned
SHIFT
on, " " is turned on.
To change the language, press
followed by
or
PREV
desired language, then press
Entering Characters
Making corrections
Move the cursor to the character to be corrected.
Enter the correct character to replace the previous
one.
Cursor
The cursor (_) indicates the position for entering a
character. Move the cursor with the cursor keys
(
).
Inserting characters
Each time
is pressed, a space is inserted at
INS
the cursor position to allow you to enter a
character.
repeatedly until
SMBL
Deleting characters
Press
to delete the character at the cursor
DEL
position.
Press
to clear all the characters that you
C•CE
have entered and not stored yet.
again.
SHIFT
Clock Mode
3. Press
or
PREV
NEXT
desired time zone. (Refer to the list of cities
Day of the week
described below.)
• Enter the city name, if needed (6 characters
TUE
or under). Only one changed name for Home
clock can be stored.
4. Press
to move the cursor to the year.
5. Enter the year (4 digits), the month, and the
, the clock switches
day (2 digits each).
• The built-in calendar extends from January
1st, 1901, to December 31st, 2098.
6. Press
to select "A" (morning) or "P"
AM/PM
(afternoon) for the 12-hour clock.
7. Enter the time (hours and minutes).
Note: P12-00: noon, A12-00: midnight
8. Press
. The clock starts from "00"
ENTER
seconds.
Notes
• To enter a single-digit date or time, enter "0"
").
and the digit (e.g. "02").
.
• If you enter an invalid date or time, "ERROR!"
to select the
appears briefly. Enter the correct date and time
and press
.
ENTER
Zone Display
City
No.
, the clock
24
0
TNG
TONGA
1
WLG WELLINGTON
2
NOU NOUMEA
3
SYD
SYDNEY
3.3
ADL
ADELAIDE
4
TYO
TOKYO
5
HKG
HONG KONG
6
BKK
BANGKOK
6.3
RGN YANGON
7
DAC
DHAKA
7.3
DEL
NEW DELHI
8
KHI
KARACHI
8.3
KBL
KABUL
9
DXB
DUBAI
9.3
THR
TEHRAN
3. Using World clock
1. Press
CLOCK
clock (without "
2. Press
PREV
desired city.
4. Changing the cities between Home
and World clocks
You can change the home city for a city in another
time zone without adjusting the stored correct
time.
1. Press
CLOCK
clock (without "
2. Press
PREV
desired city to be set as the new home city.
3. Press
SHIFT SET
between Home and World clocks.
• The previous home city is now set as the
world city (without "
4. Press
CLOCK
• The selected city in step 2 is set as the home
city (with "
5. Press
CLOCK
press
PREV
world city, if needed.
5. Setting daylight saving time (DST:
summer time)
1. Press
CLOCK
or World clock.
2. Press
.
DST
"#" is displayed. The time is set 1 hour ahead.
To clear DST, press
is set 1 hour behind.
Notes
• DST can be set independently in either Home or
World clock.
• When DST is set for one world city, it is used
for all cities displayed in World clock.
Telephone mode is composed of two directions of
storage memory. Pressing
"1" and "2" on the display.
Use these files for convenience, e.g. business
and private files.
A telephone entry consists of name, address,
E-mail address, and number fields.
Storing telephone entries
1. Press
once or
TEL
twice to display the
Telephone mode
screen.
2. Enter the name, e.g. SMITH
and press
ENTER
3. Enter the address, e.g. 18
ROAD, and press
SPACE
4. Enter the E-mail
address, e.g.
SROB
SMBL
(to enter "
")
@
SHARPSEC.COM, and press
• The E-mail address is automatically entered
in small letters.
Schedule mode is used for storing schedule
details (36 characters or under), date and time
(year, month, day, hour, and minute).
In the 1st line the same characters are allowable
as in Telephone mode.
) will respond. Press
to
SHIFT ENTER
1. Storing schedule entries
1. Press
SCHEDULE
display the Schedule
mode screen.
2. Enter the details and
press
ENTER
3. Enter the date and time.
• The types of date and time are the same as
the types set for the clock.
• To enter a single-digit date or time, enter "0"
and the digit (e.g. "O2").
SHIFT LANGUAGE
to select the
NEXT
.
ENTER
Notes or other pieces of information that are not
appropriate for Telephone or Schedule mode can
be entered for convenience.
In the 1st line the same characters are allowable
as in Telephone mode. In the 2nd and the 3rd
lines you can enter numbers, –, and space. (36
characters or under can be entered in each line.)
Storing memo entries
1. Press
MEMO
display the Memo
mode screen.
• When the memory is full, "MEMORY FULL!"
appears briefly, and the entry cannot be stored.
• When the symbol " " or " " is turned on,
more information exists. Press
switch the display.
Checking details of entries in Telephone mode
• To display each field on the 1st line, follow the
symbol " " or " " and press
symbol above the 1st line shows each field.)
Recalling entries – Telephone, Schedule, Memo –
to select the
First press the desired mode key.
: Recalls entries in forward order
NEXT
: Recalls entries in reverse order
PREV
Sequential search
Press
or
NEXT
Direct search
• Enter the first characters (8 characters or
under) of the person's name, schedule details,
or memo item, and press
. Then press
PREV
continue performing a direct search.
Editing or deleting entries – Telephone, Schedule, Memo –
Editing
1. Recall the entry to be edited.
2. Press
. The cursor starts to flash.
EDIT
• In Telephone mode press
times to display each field (the address field
and so on).
3. Press
,
,
Zone Display
City
the position to be edited.
No.
4. Enter, insert, or delete characters (refer to
10
MOW MOSCOW
"Entering Characters").
11
CAI
CAIRO
12
PAR
PARIS
• To cancel editing, press
13
LON
LONDON
14
AZ0
AZORES ISLANDS
15
-2H
2hrs behind LON
16
RIO
RIO DE JANEIRO
17
CCS
CARACAS
18
NYC
NEW YORK
19
CHI
CHICAGO
20
DEN
DENVER
21
LAX
LOS ANGELES
22
ANC
ANCHORAGE
23
HNL
HONOLULU
24
MID
MIDWAY
6. Setting alarms
once or twice to display World
The Organizer has 3 kinds of alarm:
").
1. Daily alarm ........ beeps every day at the alarm
or
to select the
NEXT
2. Hourly alarm ...... beeps every hour when
3. Schedule alarm .. beeps at the time for all the
once or twice to display World
").
Press any key to stop the alarm beeping.
or
and select the
NEXT
Setting/Changing the daily alarm time
1. Press
CLOCK
to change the cities
clock (with "
2. Press
ALARM
display the daily
").
alarm screen.
to check the home city.
(The display differs
between the 12-hour and 24-hour clock.)
").
3. Press
SHIFT SET
to recheck the world city, and
4. Enter the time.
or
to select the new
NEXT
5. Press
ENTER
• The daily alarm time is set.
Turning the alarms on and off
An alarm sounds only when the respective symbol
(
,
, or
once or twice to display Home
Display Home clock (press
and press
ALARM
screen.
Each time you press
to clear "#". The time
DST
screen is displayed, the combination of symbols
switches.
Note
• Alarms sound even when the Organizer is
turned off.
Telephone Mode
5. Enter the phone
toggles between
number, and then
TEL
the fax number if
needed, e.g.
012-3456-7890
F
SPACE
press
ENTER
• "STORED!" appears briefly, then the Telephone
mode screen is displayed. The telephone entry
is now stored.
NAME?
Field
The 1st line:
ROBERT,
SPACE
Name, address,
.
E-mail address
EAST
SPACE
The 2nd and the
.
ENTER
3rd lines:
Phone number
sec.com _
har
p
Notes
• The symbol "NAME", "ADDRESS", or "E-mail"
is turned on while entering in each field.
.
ENTER
• To skip entry of an address, E-mail address, or
number, press
MAIL?", or "NUMBER?" is displayed. However,
entering a person's name cannot be skipped.
Schedule Mode
4. Press
ENTER
Notes
• Schedules for the following dates can be stored:
January 1901 to December 2098.
• If an attempt is made to store an entry without a
date or time, or with an invalid date or time,
"ERROR!" appears briefly. Enter the correct
date and time and press
to
SCHEDULE?
2. Alarm for Schedule mode
When the schedule alarm ("
.
is set for all the schedule entries. Beeping sounds
for 1 minute when the time for a schedule entry is
reached. Press any key to stop the alarm. The
schedule alarm cannot be set for an individual
entry.
Memo Mode
2. Enter the memo item
and numbers.
E.g. UNION
BANK
01
272-0011223
3. Press
ENTER
to
MEMO?
Notes for storing and recalling entries
• Pressing
E-MAIL
on the 1st line directly.
• Press and hold
or
to
1st line. Press
scroll. Press
or
. (The
Sorting order
• Telephone and memo entries are stored by the
first character of the person's name or memo
item in the following order (case sensitive):
in each mode.
PREV
• Schedule entries are stored by date and time.
Note
or
NEXT
• When there is no (further or relevant) entry to
or
to
NEXT
PREV
be recalled, "NOT FOUND!" appears briefly, and
the display returns to the mode screen.
5. Press
ENTER
appears briefly) to finish editing and to store
the entry.
several
ENTER
Deleting
1. Recall the entry to be deleted.
2. Press
DEL
, or
to move the cursor to
• "DELETE?" is displayed.
• To cancel the deletion operation, press
.
C•CE
3. Press
ENTER
.
C•CE
PRINTED IN CHINA/IMPRIMÉ EN CHINE
02BTO (TINSE0526EHZZ)
time (for 1 minute), when
"
" is turned on.
minutes reach "00", when
"
" is turned on.
schedule entries (for 1
minute), when "
" is
turned on. (Refer to
"Schedule Mode".)
once or twice to display Home
").
to
ALARM
A12–00
.
.
) is turned on.
once or twice)
CLOCK
to display the daily alarm
while the daily alarm
ALARM
NUMBER?
2–3456–7890
3456–7891 _
3456-7891, and
SPACE
SPACE
.
Number of
Allowable
characters
characters
36 characters
Alphabetic letters,
or under
numbers, symbols,
"+ – × ÷ .", space
Numbers, space, –,
F (Fax), P (Pager)
when "ADDRESS?", "E-
ENTER
to store in the memory.
.
ENTER
") is turned on, it
UNION BANK
01
SPACE
272–0011223 _
ENTER
to store in the memory.
displays the E-mail address
to start the auto scroll on the
again to stop or restart the
to quit the auto scroll.
C•CE
several times (until "STORED!"
.
to delete the entry.
Advertisement

Related Manuals for Sharp EL-6053S


Summary of Contents for Sharp EL-6053S
- Page 1 “Schedule Mode”.) NOTICE clock (without “ ”). • SHARP strongly recommends that separate • SHARP assumes no responsibility, directly or Press any key to stop the alarm beeping. 2. Press and select the permanent written records be kept of all...
- Page 2 • Clean only with a soft, dry cloth. (–24+2)÷4=–5.5 –5.5 C•CE several force to it. • Use only a SHARP approved service facility. CALC/CONV 34+57=91 times to display the Calculator mode screen • Do not subject the Organizer to extreme 45+57=102 102.
- Page 3 This file has been downloaded from: www.UsersManualGuide.com User Manual and User Guide for many equipments like mobile phones, photo cameras, monther board, monitors, software, tv, dvd, and othes.. Manual users, user manuals, user guide manual, owners manual, instruction manual, manual owner, manual owner's, manual guide, manual operation, operating manual, user's manual, operating instructions, manual operators, manual operator, manual product, documentation manual, user maintenance, brochure, user reference, pdf manual Downloaded from:...