Table of Contents
Advertisement
Available languages
Available languages
DIGITAL ADVANTAGE
PLANCHA
Customer
Care
USA 1-800-231-9786
Accessories/Parts (USA)
1-800-738-0245
For online customer service
and to register your product, go to
www.prodprotect.com/applica
When using your iron for the first time, you may
notice water residue inside the unit. This is normal.
Cuando use su plancha por primera vez, notará que
hay agua adentro de la plancha. Esto es normal.
DIGITAL ADVANTAGE
Line:
IRON
®
Servicio
México 01-800 714-2503
Accesorios/Partes (EE.UU)
1-800-738-0245
Para servicio al cliente y para
registrar su garantía, visite
www.prodprotect.com/applica
MODEL/MODELO
❍ D2030
❍ D2530
®
para el cliente:
Advertisement
Table of Contents

Related Manuals for Black & Decker DIGITAL ADVANTAGE D2530


Summary of Contents for Black & Decker DIGITAL ADVANTAGE D2530
- Page 1 IRON DIGITAL ADVANTAGE ® PLANCHA DIGITAL ADVANTAGE ® Servicio para el cliente: Customer Care Line: México 01-800 714-2503 USA 1-800-231-9786 Accesorios/Partes (EE.UU) Accessories/Parts (USA) 1-800-738-0245 1-800-738-0245 Para servicio al cliente y para For online customer service registrar su garantía, visite and to register your product, go to www.prodprotect.com/applica www.prodprotect.com/applica When using your iron for the first time, you may MODEL/MODELO notice water residue inside the unit.
-
Page 2: Important Safeguards
Please Read and Save this Use and Care Book. IMPORTANT SAFEGUARDS When using your iron, basic safety precautions should always be followed, including the following: ❍ READ ALL INSTRUCTIONS BEFORE USING ❍ Use iron only for its intended use. ❍ To protect against a risk of electric shock, do not immerse the iron in water or other liquids. ❍ The iron should always be turned to the minimum (min) setting before plugging or unplugging from outlet. Never yank cord to disconnect from the outlet; instead grasp plug and pull to disconnect. ❍ Do not allow cord to touch hot surfaces. Let iron cool completely before putting away. Loop cord loosely around iron when storing. ❍ Always disconnect iron from electrical outlet when filling with water or emptying, and when not in use. ❍ Do not operate iron with a damaged cord, or if the iron has been dropped or damaged. To avoid the risk of electric shock, do not disassemble the iron; take it to a qualified service person for examination and repair, or call the appropriate toll-free number on the cover of this manual. Incorrect reassembly can cause a risk of electric shock when the iron is used. -
Page 3: Special Instructions
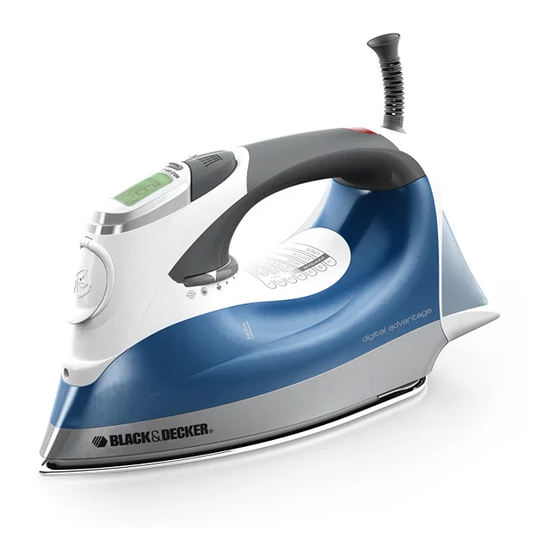
SPECIAL INSTRUCTIONS ❍ To avoid a circuit overload, do not operate another high-wattage appliance on the same circuit. ❍ If an extension cord is absolutely necessary, a cord rate at 15-ampere cord should be used. Cords rated for less amperage may overheat. Care should be taken to arrange the cord so that it cannot be pulled or tripped over. SAVE THESE INSTRUCTIONS. This product is for household use only. POLARIZED PLUG This appliance has a polarized plug (one blade is wider than the other). To reduce the risk of electric shock, this plug is intended to fit into a polarized outlet only one way. If the plug does not fit fully into the outlet, reverse the plug. If it still does not fit, contact a qualified electrician. Do not attempt to modify the plug in any way. TAMPER-RESISTANT SCREW Warning: This appliance is equipped with a tamper-resistant screw to prevent removal of the outer cover. To reduce the risk of fire or electric shock, do not attempt to remove the outer cover. - Page 4 Product may vary slightly from what is illustrated. 1. Spray nozzle 2. Water-fill opening 3. Digital display 4. Power / temperature setting button 5. Steam button 6. Spray button 7. Power indicator light 8.
-
Page 5: How To Use
How to Use This appliance is intended for household use only. GETTING STARTED • Remove any labels, stickers or tags attached to the body or soleplate of the iron. Important: For warranty verification, do not remove the line cord sticker. • Please go to www.prodprotect.com/applica to register your warranty. Note: Use ordinary tap water for ironing. Do not use water processed through a home softening system. Important: For optimum performance, let the iron stand for 90 seconds before beginning to iron. FILLING WATER TANK 1. Tilt the iron and using a clean measuring cup, pour water into water-fill opening until the water reaches the MAX mark on the water tank. Refill as needed. -
Page 6: Surge Of Steam
SURGE OF STEAM Horizontal Tip: Use to remove stubborn creases. 1. With the water tank filled to the MAX mark, set temperature setting and variable steam to the appropriate settings for your fabric. See fabric guide on the iron and read garment's label to help you determine fabric type. 2. For best performance, press the steam button at 5-second intervals. 3. When finished ironing, turn the variable steam dial to the steam off setting and unplug the iron. Important: Always stand the iron on its heel rest when powered on but not in use. Vertical Tip: Use for removing wrinkles from hanging clothes and drapes. 1. With the water tank filled to the MAX mark, set temperature setting and variable steam to the appropriate settings for your fabric. See fabric guide on the iron and read garment's label to help you determine fabric type. 2. Hang the garment to be steamed on a clothes hanger. (Curtains or drapes can be steamed once they are hung.) 3. Hold the iron close to, but not touching, the fabric. - Page 7 Care and Cleaning This product contains no user serviceable parts. Refer service to qualified service personnel. CLEANING 1. Make sure iron is unplugged and has cooled completely. Wipe the soleplate and outer surfaces with a soft cloth dampened with water and mild household detergent. Never use abrasives, heavy-duty cleansers, vinegar or scouring pads that may scratch or discolor the iron. 2. After cleaning, steam iron over an old cloth to remove any residue from the steam vents. AUTO CLEAN® SYSTEM To keep the steam vents free of any buildup, follow these instructions when the word “CLEAN” appears in the digital display: 1. Fill the water tank well below the MAX line. Plug in the iron. 2. Press the temperature setting button to 6 and stand the iron on its heel rest. Allow it to heat about 3 minutes. 3. Unplug the iron and hold over a sink with the soleplate facing down. 4. Move and hold the variable steam dial in the CLEAN position. Be careful, as hot water and steam will come out of the steam vents. 5. Continue to hold the variable steam dial to CLEAN until all the water has emptied. If necessary, rock iron side-to-side and front-to-back. 6. When finished, move the variable steam dial to steam off , stand the iron on its heel rest and plug it in. Heat for about 2 minutes to dry out any remaining water. STORING 1. Unplug the iron and let it cool completely. 2. Check that the variable steam dial is set to steam off 3. Store iron on its heel rest. Storing iron on its soleplate can cause leaks or damage.
-
Page 8: Need Help
NEED HELP? For service, repair or any questions regarding your appliance, call the appropriate 800 number on the cover of this book. Please DO NOT return the product to the place of purchase. Also, please DO NOT mail product back to manufacturer, nor bring it to a service center. You may also want to consult the website listed on the cover of this manual. TWO-YEAR LIMITED WARRANTY (Applies only in the United States and Canada) What does it cover? • Any defect in material or workmanship provided; however, Applica’s liability will not exceed the purchase price of product. For how long? • Two years from the date of original purchase with proof of such purchase. What will we do to help you? • Provide you with a reasonably similar replacement product that is either new or factory refurbished. -
Page 9: Instrucciones Importantes De Seguridad
Por favor lea este instructivo antes de usar el producto. INSTRUCCIONES IMPORTANTES DE SEGURIDAD Cuando se usan aparatos eléctricos, siempre se deben respetar las siguientes medidas básicas de seguridad: ❍ POR FAVOR LEA TODAS LAS INSTRUCCIONES ANTES DE USAR. ❍ A fin de protegerse contra el riesgo de un choque eléctrico, no sumerja la plancha en agua ni en ningún otro líquido. ❍ La plancha siempre debe estar en la posición de calor mínimo antes de enchufar o desconectarla del tomacorriente. Nunca tire del cable para desconectar la plancha del tomacorriente; sujete el enchufe y hale con cuidado. ❍ No permita que el aparato entre en contacto con superficies calientes. Espere que la plancha se enfríe por completo antes de guardarla. Para guardar, enrolle el cable holgadamente en torno a la plancha. ❍ No permita que el cable cuelgue del borde de la mesa o del mostrador ni que entre en contacto con las superficies calientes. -
Page 10: Instrucciones Especiales
❍ El enchufe debe ser retirado de la toma de corriente antes de que el depósito de agua esté lleno de agua. ❍ La plancha debe ser utilizada y apoyada sobre una superficie estable. ❍ Al depositar la plancha en su soporte, asegúrese de que la superficie sobre la que se colocará el soporte es estable. ❍ El hierro no debe ser utilizado si se ha caído, si hay signos visibles de daños o si tiene fugas. INSTRUCCIONES ESPECIALES ❍ Para reducir la posibilidad de una sobrecarga eléctrica, no opere otro aparato de alto consumo en el mismo circuito. ❍ Si es indispensable el uso de un cable de extensión, se debe usar uno con régimen nominal de 15 amperios. Los cables de menor amperaje se pueden sobrecalentar. Se debe tener cuidado de acomodar el cable de manera que no interfiera para que nadie se tropiece ni lo pueda halar. CONSERVE ESTAS INSTRUCCIONES. Este aparato eléctrico es para uso doméstico solamente. ENCHUFE POLARIZADO Este aparato cuenta con un enchufe polarizado (un contacto es más ancho que el otro). A fin de reducir el riesgo de un choque eléctrico, este enchufe encaja en un tomacorriente polarizada en un solo sentido. Si el enchufe no entra en el tomacorriente, inviértalo y si aun así no encaja, consulte con un electricista. Por favor no trate de alterar esta medida de seguridad. TORNILLO DE SEGURIDAD Advertencia: Este aparato cuenta con un tornillo de seguridad para evitar la remoción de la cubierta exterior del mismo. - Page 11 Este producto puede variar ligeramente del que aparece ilustrado. 1. Rociador 2. Orificio de llenado de agua 3. Pantalla digital 4. Botón de funcionamiento / ajuste de temperatura 5. Botón de vapor 6.
-
Page 12: Antes De Usar
Como usar Este producto es para uso doméstico solamente. ANTES DE USAR • Retire cualquier etiqueta y/o calcomanías adheridas al cuerpo o la suela de la plancha. Importante: Para verificación de la garantía, por favor retire la etiqueta del cable eléctrico. • Por favor vaya a www.prodprotect.com/applica para registrar su garantía. Nota: Use agua corriente para planchar. No use agua procesada por medio de un sistema suavizador casero. Importante: Para el desempeño óptimo, deje la plancha descansar durante 90 segundos antes de comenzar a planchar. PARA LLENAR EL TANQUE DE AGUA 1. Incline la plancha y use una taza de medir limpia para verter agua dentro del orificio de llenado hasta alcanzar el nivel MAX del tanque de agua. Rellene según sea... - Page 13 PARA PLANCHAR CON VAPOR 1. Para planchar con vapor, asegúrese de que el tanque de agua esté lleno hasta el nivel MAX. 2. Dé vuelta al selector de vapor variable hasta ajustarlo al nivel de vapor apropiado para su tejido (C). Nota: Consulte la guía de tejidos de la plancha y lea la etiqueta de la pieza que va a planchar para que le ayuden a determinar la temperatura que debe usar. 3. Para logra un desempeño óptimo al aplicar vapor, deje que la plancha descanse hasta alcanzar el nivel de temperatura seleccionado. 4. Cuando termine de planchar, déle vuelta al selector de vapor variable hasta ubicarlo en la posición de apagado EMISIÓN DE VAPOR Horizontal Consejo: Use para eliminar arrugas difíciles. 1. Con el tanque de agua lleno hasta el nivel MAX, ajuste el nivel de temperatura y de vapor apropiados para su tejido. Consulte la guía de tejidos de la plancha y lea la etiqueta de la pieza que va a planchar para que le ayuden a determinar la temperatura que debe usar. 2. Para mejor desempeño, presione el botón de vapor en intervalos de 5 segundos. 3. Cuando termine de planchar, ubique el selector de vapor variable en la posición apagado y desenchufe la plancha. Importante: Siempre deje que la plancha descanse sobre el talón de descanso cuando esté...
- Page 14 APAGADO AUTOMATICO EN 10 MINUTOS La función de apagado automático de su plancha funciona de la siguiente forma: • Una vez que la plancha alcanza la temperatura adecuada, se apagará luego de 10 minutos de inactividad. Antes de apagarse, la plancha emitirá un sonido y las palabras “AUTO OFF” aparecerán de forma intermitente en la pantalla digital. • Una vez que la plancha de apague, la pantalla digital se oscurecerá aunque las palabras “AUTO OFF” continúen apareciendo en la pantalla. • Enseguida que usted levante la plancha, ésta emitirá un sonido y comenzará a calentar de nuevo hasta alcanzar la temperatura seleccionada. Espere a que la plancha se recaliente por completo antes de volver a usarla. • Para apagar la plancha manualmente, oprima el botón de funcionamiento / ajuste de temperatura durante 2 segundos; esto lo puede hacer a cualquier nivel temperatura. PARA VACIAR EL TANQUE DE AGUA (OPCIONAL) Nota: No es necesario vaciar el tanque de agua luego de cada uso. 1. Desenchufe la plancha y permita que se refresque. 2. Para vaciar el agua, sostenga la plancha con la punta hacia abajo sobre un lavamanos. El agua se saldrá por el orificio de llenado. Cuidado y limpieza Este producto no contiene partes que el consumidor pueda reparar. En caso de requerir mantenimiento, envíela al personal de servicio calificado. LIMPIEZA 1. Asegúrese de que la plancha esté desenchufada y se haya refrescado por completo.
-
Page 15: Necesita Ayuda
¿NECESITA AYUDA? Para servicio, reparaciones o preguntas relacionadas al producto, por favor llame al número del centro de servicio que se indica para el país donde usted compró su producto. NO devuélva el producto al fabricante. Llame o lleve el producto a un centro de servicio autorizado. DOS AÑOS DE GARANTÍA LIMITADA (Aplica solamente en Estados Unidos y Canada) ¿Qué cubre la garantía? • La garantía cubre cualquier defecto de materiales o de mano de obra que no haya sido generado por el uso incorrecto del producto. ¿Por cuánto tiempo es válida la garantía? • Por dos años a partir de la fecha original de compra mientras que tenga una prueba de la compra. ¿Cómo se obtiene el servicio necesario? • Conserve el recibo original como comprobante de la fecha de compra, comuníquese con el centro de servicio de su país y haga efectiva su garantía si cumple lo indicado en el manual de instrucciones. - Page 16 Póliza de Garantía (Válida sólo para México) Duración Applica Manufacturing, S. de R. L. de C.V. garantiza este producto por 2 años a partir de la fecha original de compra. ¿Qué cubre esta garantía? Esta garantía cubre cualquier defecto que presenten las piezas, componentes y la mano de obra contenidas en este producto. Requisitos para hacer válida la garantía Para reclamar su garantía deberá presentar al Centro de Servicio Autorizado la póliza sellada por el establecimiento en donde adquirió el producto. Si no la tiene, podrá presentar el comprobante de compra original. ¿Donde hago válida la garantía? Llame sin costo al teléfono 01 800 714 2503, para ubicar el Centro de Servicio Autorizado más cercano a su domicilio en donde usted podrá encontrar partes, componentes, consumibles y accesorios. Procedimiento para hacer válida la garantía Acuda al Centro de Servicio Autorizado con el producto con la póliza de garantía sellada o el comprobante de compra original, ahí se reemplazará cualquier pieza o componente defectuoso sin cargo alguno para el usuario final. Esta Garantía incluye los gastos de transportación que se deriven de su cumplimiento.
- Page 17 Por favor llame al número correspondiente que aparece en la lista a continuación para solicitar que se haga efectiva la garantía y donde Ud. puede solicitar servicio, reparaciones o partes en el país donde el producto fué comprado. También puede consultarnos en el e-mail servicio@applicamail com.mx Argentina México SERVICIO TECNICO CENTRAL Articulo 123 # 95 Local 109 y 112 ATTENDANCE Col. Centro, Cuauhtemoc, Avda. Monroe N° 3351 México, D.F. Buenos Aires – Argentina Tel. 01 800 714 2503 Fonos: 0810 – 999 - 8999 Nicaragua 011 - 4545 - 4700 ServiTotal 011 – 4545 – 5574 De semáforo de portezuelo supervision@attendance.com.ar 500 metros al sur. Chile Managua, Nicaragua, MASTER SERVICE SERVICENTER Tel. (505) 248-7001 Nueva Los Leones N° 0252 Panamá Providencia Servicios Técnicos CAPRI Santiago – Chile Tumbamuerto Boulevard Fono Servicio: (562) – 232 77 22 El Dorado Panamá servicente@servicenter.cl 500 metros al sur. Colombia Tel. 3020-480-800 sin costo PLINARES (507) 2360-236 / 159 Avenida Quito # 88A-09 Perú...
- Page 18 Sello del Distribuidor: Comercializado por: Fecha de compra: Applica Manufacturing, S. de R. L. de C.V. Presidente Mazarik No. 111, 1er Piso Modelo: Col. Chapultepec Morales, Mexico D.F Deleg. Miguel Hidalgo CP 11570 MEXICO Servicio y Reparación aArt. 123 No. 95 Col. Centro, C.P. 06050 Deleg. Cuauhtemoc Servicio al Consumidor, Venta de Refacciones y Accesorios 01 800 714 2503 Código de fecha / Date Code 1 500 W 120 V~ 60 Hz...
- Page 19 Importado por / Imported by: RAYOVAC ARGETINA S.R.L. Humboldt 2495 Piso# 3 C1425FUG) C.A.B.A. C.U.I.T No. 30-70706168-1 Importado por / Imported by: APPLICA MANUFACTURING, S. DE R. L. DE C. V. KM 14.5 Carretera Puente de Vigas Col. Lechería Tultitlán Estado de México CP 54940, México Teléfono: (55) 5831-7070 Del interior marque sin costo 01 (800) 714 2503...
- Page 20 © 2010 - 2011 Applica Consumer Products, Inc. Printed on recycled paper. Impreso en papel reciclado. R1 2010/11-22-52E/S...