Table of Contents
Advertisement
Quick Links
Advertisement
Table of Contents

Related Manuals for Epson B12B808411

Summary of Contents for Epson B12B808411
- Page 1 Network Interface Panel User’s Guide NPD4747-03 EN...
-
Page 2: Table Of Contents
Configuring EPSON Scan....16 Configuring Epson Scan 2....17 Scanning Over a Network. -
Page 3: Copyright And Trademarks
Neither is any liability assumed for damages resulting from the use of the information contained herein. Neither Seiko Epson Corporation nor its affiliates shall be liable to the purchaser of this product or third parties for damages, losses, costs, or expenses incurred by the purchaser or third parties as a result of: accident, misuse, or abuse of this product or unauthorized modifications, repairs, or alterations to this product. -
Page 4: Safety Instructions
Network Interface Panel User's Guide Safety Instructions Safety Instructions Important Safety Instructions Read all these instructions and save them for later reference. Follow all warnings and instructions marked on the Network Interface Panel. ❏ Do not spill liquid onto the Network Interface Panel. ❏... -
Page 5: Getting To Know Your Network Interface Panel
Network Interface Panel User's Guide Getting to Know Your Network Interface Panel Getting to Know Your Network Interface Panel Package Contents Network Interface Panel This product. Screws (2 pieces) Fixes the Network Interface Panel to the scanner. Covers (4 pieces) Spare covers for the screw holes. -
Page 6: Using The Cable Clips
Network Interface Panel User's Guide Getting to Know Your Network Interface Panel Using the Cable Clips Attach the cable clips to the scanner. Note: Attach so that the opening of the cable clip is facing out. Use the cable clips to fix the network cable to the scanner. -
Page 7: Panel Parts
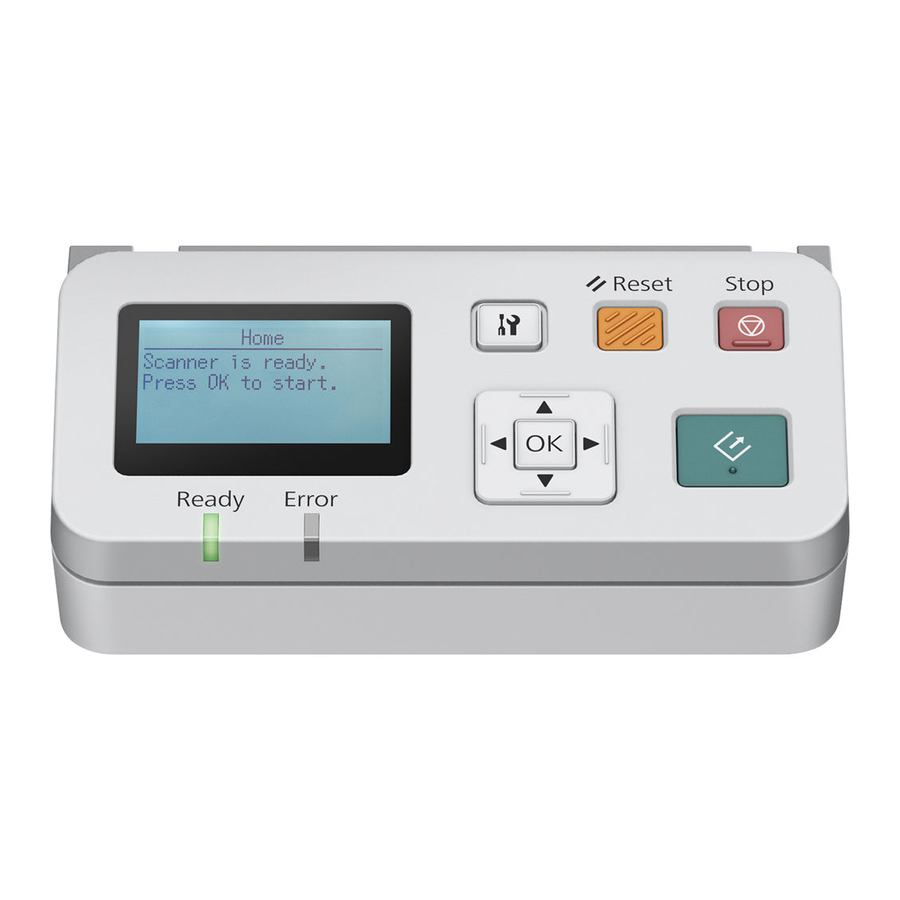
Network Interface Panel User's Guide Getting to Know Your Network Interface Panel Panel parts Front view Right side view F setting button Make product and network settings, or perform maintenance. & Reset button Resets the panel to the initial screen. y Stop button Cancels scanning. -
Page 8: Setting Up The Network Interface Panel
Network Interface Panel User's Guide Setting Up the Network Interface Panel Setting Up the Network Interface Panel Connecting the Network Interface Panel to a Network Turn off the product and disconnect the USB cable. Remove the covers with the pin, and then remove the screws with the allen key. Caution: Be careful when setting up as the pin and the allen key are sharp and may cause injury. - Page 9 Network Interface Panel User's Guide Setting Up the Network Interface Panel Remove the panel supplied with your scanner. Note: ❏ Keep the panel in a safe place. ❏ You cannot use the scanner unless you replace the panel you removed in step 3, or attach the Network Interface Panel.
- Page 10 Network Interface Panel User's Guide Setting Up the Network Interface Panel Install the Network Interface Panel. Tighten the screws, and then replace the covers.
-
Page 11: Configuring Scanning Software On Your Computer
Network Interface Panel User's Guide Setting Up the Network Interface Panel Note: Use the same covers and screws that you removed in step 2. Connect a network cable to the Network Interface Panel. Note: ❏ You must use a Category 5 shielded twisted-pair cable to connect the Network Interface Panel to prevent malfunction. -
Page 12: Connecting To An Ipv4 Network Manually
Network Interface Panel User's Guide Setting Up the Network Interface Panel When the home screen ("Scanner is ready") is displayed, press the F setting button. Select Network with the u up and d down buttons, and then press the Z button. Select IPv4 with the u up and d down buttons, and then press the Z button. - Page 13 Network Interface Panel User's Guide Setting Up the Network Interface Panel When the home screen ("Scanner is ready") is displayed, press the F setting button. Select Network with the u up and d down buttons, and then press the Z button. Select IPv4 with the u up and d down buttons, and then press the Z button.
-
Page 14: Connecting To An Ipv6 Network
Network Interface Panel User's Guide Setting Up the Network Interface Panel Connecting to an IPv6 Network Turn on your scanner. When the home screen ("Scanner is ready") is displayed, press the F setting button. Select Network with the u up and d down buttons, and then press the Z button. Select IPv6 - On with the u up and d down buttons, and then press the Z button. -
Page 15: Operating Environment
❏ EpsonNet Config for Macintosh is a Macintosh-based configuration utility for administrators that allows you to configure the network interface for TCP/IP, AppleTalk, and IPP. Download this software from: http://www.epson.com/ Operating Environment You can use Web-based EpsonNet Config on computers with the following Web browsers. -
Page 16: Scanning An Image
Note: Either EPSON Scan or Epson Scan 2 is come with your scanner as the scanner driver. See the user’s guide of the scanner for more details. Before you start, obtain the following information: ❏... -
Page 17: Configuring Epson Scan 2
Enter the application name in the search charm, and then select the displayed icon. Windows 7/Windows Vista/Windows XP: Click the start button, and then select All Programs or Programs > EPSON > EPSON Scan > EPSON Scan Settings Mac OS X: Select Go >... -
Page 18: Scanning Over A Network
User's Guide Scanning an Image Windows 7/Windows Vista/Windows XP: Click the start button, and then select All Programs or Programs > EPSON > Epson Scan 2 > Epson Scan 2 Utility Mac OS X: Select Go > Applications > EPSON Software > Epson Scan 2 Utility Select Settings from the Scanner drop-down list on the Epson Scan 2 Utility screen. -
Page 19: For Windows
User's Guide Scanning an Image Note for Windows: You need to install the latest Document Capture Pro before scanning. Go to the Epson home page to download the latest Document Capture Pro. http://www.epson.com If the latest software is already installed on your computer, you do not need to update the software. - Page 20 Network Interface Panel User's Guide Scanning an Image Turn on your scanner and the client computer. Place your original(s) on the document glass or in the Automatic Document Feeder (ADF). Press the Z button on the panel. The scanner searches for an available computer. Select the computer you want to send the data to, and then press the Z button.
-
Page 21: About The Control Panel
Network Interface Panel User's Guide About the Control Panel About the Control Panel Menu List Environment menu Item Description Network You can check network settings such as the MAC address and IP address. Maintenance You can check the number of scanned sheets. If the scanner being used has an Automatic Document Feeder installed, you can check or reset the number of scanned sheets for the Roller Assembly Kit, Pickup Roller, Separation Pad, and Separation Roller. -
Page 22: Timeout Menu
Network Interface Panel User's Guide About the Control Panel Item Description IPv4 Select whether the IP address is set automatically or manually. If Manual is selected, you can set the value for IP address, IP subnet mask, and IP default gateway. Link Speed Specifies the transmission speed of the network interface. -
Page 23: Troubleshooting
Network Interface Panel User's Guide Troubleshooting Troubleshooting Problems Indicated by Messages on the LCD Panel or Status Lights You can check the status of the scanner and the Network Interface Panel from messages on the LCD panel and the status lights. Clear the error according to the message displayed. -
Page 24: The Lcd Screen Is Not Displayed Even When The Scanner Is On
❏ Check that the network cable is working correctly by connecting it to other products. “Connecting the Network Interface Panel to a Network” on page 8 ❏ Check that EPSON Scan Settings or Epson Scan 2 Utility have been set correctly. U See the user’s guide of the scanner for more details. -
Page 25: Web-Based Epsonnet Config Cannot Be Started Or Be Made Settings
U See the Document Capture Pro help for more details. “Scanning from the Panel” on page 19 ❏ Check that Epson Event Manager (Document Capture Pro) is not being blocked by a Firewall. U See the user’s guide of the scanner for more details. -
Page 26: Technical Specifications
Scanner driver does not support the UNIX File System (UFS) for Mac OS X. You must install scanner driver on a disk or in a partition that does not use UFS. Network Interface Panel Specifications Note: Specifications are subject to change without notice. General Product code B12B808411 DSPNNW1 Display LCD (Liquid Crystal Display) Mechanical Dimensions Height: 68 mm (2.6 inches) Width: 161 mm (6.3 inches) -
Page 27: Electrical
1.5 A Note: Power consumption varies depending on operating conditions and whether an option is installed. For European users, see the following Website for details on power consumption. http://www.epson.eu/energy-consumption Environmental Temperature Operating: 5 to 35 ˚C (41 to 95 ˚F) Storage: -25 to 60 ˚C (-13 to 140 ˚F) - Page 28 Network Interface Panel User's Guide Technical Specifications European model (for Russian users): Australian model: AS/NZS CISPR22 Class B...