
Related Manuals for Dell Vostro 3471


Summary of Contents for Dell Vostro 3471
- Page 1 Dell Vostro 3471 Setup and specification guide Regulatory Model: D13S Regulatory Type: D13S003...
-
Page 2: Table Of Contents
Contents 1 Set up your computer........................5 2 Chassis overview........................10 System front view................................10 System back view................................. 11 3 Technical specifications......................12 Physical specifications................................. 12 System information................................12 Processor specifications..............................13 Operating system................................. 13 Memory specifications.................................13 Ports and connectors................................13 Communications...................................14 Video...................................... - Page 3 5 Software........................... 27 Operating system................................27 Downloading drivers................................27 Intel chipset drivers............................... 27 Serial IO driver................................28 USB drivers..................................29 Network drivers................................29 Realtek Audio................................. 29 Serial ATA drivers................................30 6 Getting help..........................31 Contacting Dell..................................31 Contents...
- Page 4 A WARNING indicates a potential for property damage, personal injury, or death. © 2019 -2020 Dell Inc. or its subsidiaries. All rights reserved. Dell, EMC, and other trademarks are trademarks of Dell Inc. or its subsidiaries. Other trademarks may be trademarks of their respective owners.
-
Page 5: Set Up Your Computer
Set up your computer 1. Connect the keyboard and mouse. 2. Connect to your network using a cable. Set up your computer... - Page 6 3. Connect the display. 4. Connect the power cable. Set up your computer...
- Page 7 5. Press the power button. Set up your computer...
- Page 8 6. Follow the instructions on the screen to finish Windows setup: a) Connect to a network. b) Sign-in to your Microsoft account or create a new account. Set up your computer...
- Page 9 7. Locate Dell apps. Table 1. Locate Dell apps Register your computer Dell Help & Support SupportAssist — Check and update your computer Set up your computer...
-
Page 10: Chassis Overview
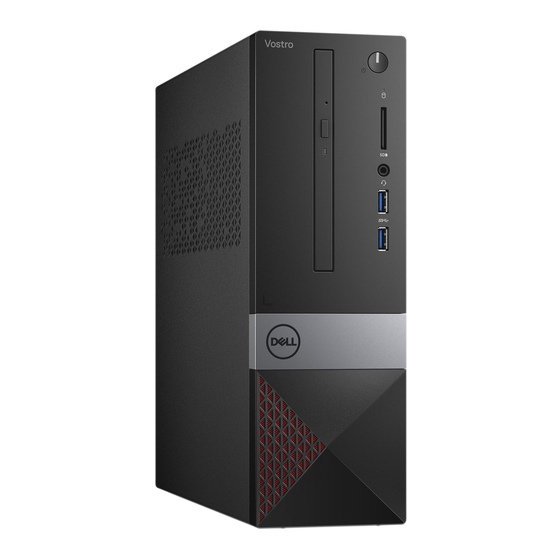
Chassis overview System front view 1. Power button/power status LED 2. Hard drive activity light 3. Memory card reader 4. Universal audio/microphone connector 5. USB 3.1 Gen 1 ports (2) 6. Optical drive Chassis overview... -
Page 11: System Back View
System back view 1. Line-in port 2. Line-out port 3. Microphone port 4. VGA port 5. HDMI port 6. USB 2.0 ports (4) 7. Service tag 8. Expansion card slots 9. Power connector port 10. Power diagnostics light 11. Kensington security slot 12. -
Page 12: Technical Specifications
Technical specifications NOTE: Offerings may vary by region. The following specifications are only those required by law to ship with your computer. For more information about the configuration of your computer, go to Help and Support in your Windows operating system and select the option to view information about your computer. Topics: •... -
Page 13: Processor Specifications
Processor specifications NOTE: Processor numbers are not a measure of performance. Processor availability is subject to change and may vary by region/country. Operating system Operating systems supported: • Windows 10 Home (64-bit) • Windows 10 Professional (64-bit) • Ubuntu • Windows 10 national academy Memory specifications Table 4. -
Page 14: Communications
Description Values Audio One headset (headphone and microphone combo) port, and one Line-in/Line-out/mic Jack Video One HDMI 1.4b port and one VGA port Media card reader One SD-card slot Docking port Not supported Power adapter port Security Express card Not supported Smart card reader Not supported Legacy ports... -
Page 15: Video
Description Values Wireless standards WiFi 802.11b/g/n Encryption • 64-bit/128-bit WEP • AES-CCMP • TKIP Bluetooth Bluetooth 4.0 Video Table 9. Discrete graphics specification Discrete graphics Controller External display support Memory size Memory Type NVIDIA GT730LP 1*HDMI/1*DVI-D/1*VGA 2 GB GDDR5 Table 10. Integrated graphics specifications Integrated graphics Controller External display support... -
Page 16: Power Supply Specifications
Storage type Interface type Capacity Two 2.5-inch hard drives SATA AHCI, up to 6 Gbps One M.2 2230/2280 solid-state drive SATA AHCI, up to 6 Gbps One 9.5 mm slimline DVD-RW drive SATA AHCI, up to 1.5 Gbps Power supply specifications Table 13. -
Page 17: System Setup
If you wait too long and the operating system logo appears, wait until you see the desktop. Then, shut down or restart your computer and try again. NOTE: After the Dell logo appears, you can also press F12 and then select BIOS setup. Navigation Keys The following table displays the system setup navigation keys. -
Page 18: System Setup Options
System setup options NOTE: Depending on the and its installed devices, the items listed in this section may or may not appear. General screen options This section lists the primary hardware features of your computer. Option Description System • System Information: Displays BIOS Version, Service Tag, Asset Tag, Ownership Tag, Ownership Date, Information Manufacture Date, and the Express Service Code. -
Page 19: Video Screen Options
Option Description • Disabled • AHCI • RAID On(default) Drives Allows you to configure the SATA drives on board. All drives are enabled by default. The options are: • SATA-0 • SATA-1 • SATA-2 • SATA-3 SMART Reporting This field controls whether hard drive errors for integrated drives are reported during system startup. This technology is part of the SMART (Self-Monitoring Analysis and Reporting Technology) specification. -
Page 20: Security Screen Options
Security screen options Option Description Admin Password Allows you to set, change, or delete the administrator (admin) password. NOTE: You must set the admin password before you set the system or hard drive password. Deleting the admin password automatically deletes the system password and the hard drive password. -
Page 21: Secure Boot Screen Options
Option Description Master Password The option Enable Master Password Lockout is not selected by default. Lockout SIMM Security Allows you to enable or disable the additional UEFI SIMM Security Mitigation protections. Mitigation Default Setting: SIMM Security Mitigation is not selected. Secure Boot screen options Option Description... -
Page 22: Performance Screen Options
Performance screen options Option Description Multi Core This field specifies whether the process has one or all cores enabled. The performance of some applications Support improve with the additional cores. This option is enabled by default. Allows you to enable or disable multi-core support for the processor. -
Page 23: Post Behavior Screen Options
Option Description Wake on LAN/ Allows you to enable or disable the feature that powers on the computer from the Off state when triggered by a WLAN LAN signal. • Disabled: This option is enabled by default. • LAN Only •... -
Page 24: Wireless Screen Options
Wireless screen options Option Description Wireless Device Allows you to enable or disable internal wireless devices. Enable • WLAN/WiGig (default) • Bluetooth (default) Advanced configuration options Option Description ASPM Allows you to set the ASPM level. • Auto (default) • Disabled •... -
Page 25: Updating The Bios In Windows
If BitLocker is enabled, it must be suspended prior to updating the system BIOS, and then re-enabled after the BIOS update is completed. 1. Restart the computer. 2. Go to Dell.com/support. • Enter the Service Tag or Express Service Code and click Submit. -
Page 26: Deleting Or Changing An Existing System Setup Password
• The password can contain the numbers 0 through 9. • Only lower case letters are valid, upper case letters are not allowed. • Only the following special characters are allowed: space, (”), (+), (,), (-), (.), (/), (;), ([), (\), (]), (`). 3. -
Page 27: Software
Windows 10 national academy Downloading drivers 1. Turn on the . 2. Go to Dell.com/support. 3. Click Product Support, enter the Service Tag of your , and then click Submit. NOTE: If you do not have the Service Tag, use the auto detect feature or manually browse for your model. -
Page 28: Serial Io Driver
Serial IO driver Verify if the drivers for Touchpad, IR camera, and keyboard and are installed. Software... -
Page 29: Usb Drivers
Figure 1. Serial IO driver USB drivers Verify if the USB drivers are already installed in the computer. Network drivers Install the WLAN and Bluetooth drivers from the Dell support site. Table 18. Network drivers Before installation After installation Realtek Audio Verify if audio drivers are already installed in the computer. -
Page 30: Serial Ata Drivers
Serial ATA drivers Install the latest Intel Rapid Storage driver for best performance. Using the default Windows storage drivers is not recommended. Verify if the default serial ATA drivers are installed in the computer. Software... -
Page 31: Getting Help
Dell product catalog. Dell provides several online and telephone-based support and service options. Availability varies by country and product, and some services may not be available in your area. To contact Dell for sales, technical support, or customer service issues: 1.