Dell PowerEdge C5125 Getting Started With Your System
Hide thumbs
Also See for PowerEdge C5125:
- Getting started with your system (185 pages) ,
- Hardware owner's manual (100 pages) ,
- Getting started manual (77 pages)

Related Manuals for Dell PowerEdge C5125


Summary of Contents for Dell PowerEdge C5125
- Page 1 Dell PowerEdge C5125 Getting Started With Your System 系统使用入门 Memulai Dengan Sistem Anda はじめに 시스템 시작 안내서...
- Page 3 Dell PowerEdge C5125 Getting Started With Your System Regulatory Model: B04S...
-
Page 4: Notes, Cautions, And Warnings
Other trademarks and trade names may be used in this publication to refer to either the entities claiming the marks and names or their products. Dell Inc. disclaims any proprietary interest in trademarks and trade names other than its own. -
Page 5: Installation And Configuration
CAUTION: Restricted Access Location This server is intended for installation only in restricted access locations as defined in Cl. 1.2.7.3 of IEC 60950-1: 2001 where both these conditions apply: • Access can only be gained by service persons or by users who have been instructed about the reasons for the restrictions applied to the location and about any precautions that shall be taken. - Page 6 1 Pull on the latch release buttons on the end piece midpoints to open the rail latches. 2 Align the end pieces of the rails on the vertical rack flanges to seat the pegs in the bottom hole of the first U and the top hole of the second U. Engage the back end of the rail until the latch locks in place.
- Page 7 3 Insert the cage nut on the rack. 4 Repeat steps 1 to 4 to position and seat the front end piece on the vertical flange. NOTE: To remove the rails, pull on the latch release button on the end piece midpoint and unseat each rail.
-
Page 8: Installing The System
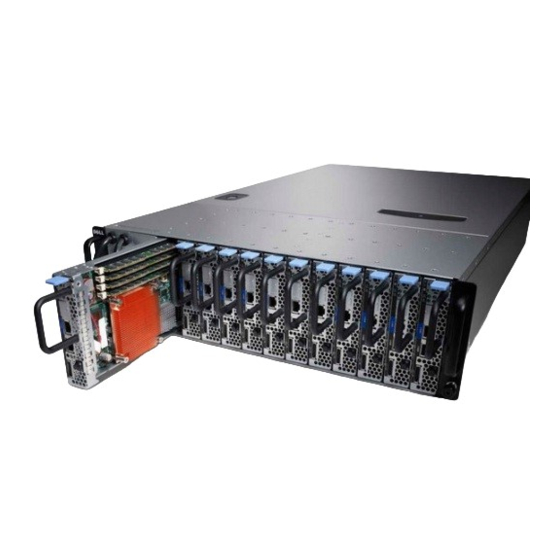
Installing the System Empty the System Chassis 1 Unplug the power cable from the power supply unit. 2 Pull out the power supply unit handle. Installation and Configuration... - Page 9 3 Press down on the release latch 4 Pull the power supply unit out of the system . 5 Press the release latch down and pull the sled out of the system . Installation and Configuration...
- Page 10 Install the System Into the Rack WARNING: Whenever you need to lift the system, get others to assist you. To avoid injury, do not attempt to lift the system by yourself. 1 Slide the system into the rack. 2 If present, remove the chassis stabilizer shipping bracket (optional) from the rack.
- Page 11 Populate the System 1 Push the power supply unit into the system until flush with the case and the release latch locks. 2 Close the power supply unit handle. Installation and Configuration...
- Page 12 3 Plug the chassis power cable into the power supply unit. NOTE: The correct configuration of the integral chassis AC power cables to the PSU sockets is as shown in the following illustration. PSU1 PSU2 PSU1 PSU2 Installation and Configuration...
-
Page 13: Connecting The Keyboard, Mouse, And Monitor
4 Install the sleds. Push the sled into the system until flush with the case and the release latch locks. Connecting the Keyboard, Mouse, and Monitor The connector on the front of your system has an icon indicating which cable to plug in. -
Page 14: Connecting The Power Cables
Connecting the Power Cables 1 On the back of the system, connect the mains power cable to the system’s power socket. AC Port 2 AC Port 1 2 Plug the other end of the power cables into a grounded electrical outlet or a separate power source such as an uninterrupted power supply or a power distribution unit. - Page 15 Turning On the System When connected to a power source the system automatically powers on. See the Using the Baseboard Management Controller Guide at support.dell.com/manuals. Complete the Operating System Setup To install an operating system for the first time, see the installation and configuration documentation for your operating system.
-
Page 16: Other Information You May Need
La información que se proporciona a continuación aparece en el dispositivo descrito en este documento, en cumplimiento de los requisitos de la Norma Oficial Mexicana (NOM): Importador Dell Inc. de México, S.A. de C.V. Paseo de la Reforma 2620 – 11° Piso Col. Lomas Altas 11950 México, D.F. -
Page 17: Technical Specifications
Technical Specifications Processor (Per System Board) AMD Phenom II 910e, 2.6 GHz, 4 core Processor type AMD Athlon II 610E, 2.4 GHz, 4 core AMD Athlon II 260U, 1.6 GHz, 2 core Expansion Bus (Per System Board) PCI-E x1 connector for sideband signal Bus type 1, SR5650(GPP3): PCI-E Internal PCIe Bus... - Page 18 Video AST2050 Video type 128 MB DDR2 SDRAM Video memory Power AC power supply (per power supply) Wattage 1400 W Voltage 200-240 VAC, 50/60 Hz, 9.6 A max Heat dissipation 47.65 BTU/hr max Maximum inrush current 55 A max Physical Sled system dimension (with 3.5"...
- Page 19 12 sled configuration: 19.3 kg (42.55 lbs.) Environmental NOTE: For additional information about environmental measurements for specific system configurations, see the dell.com/environmental_datasheets. Temperature Operating 10° to 35°C (50°F to 95°F) with a maximum temperature gradation of 10°C (per hour) Airflow at maximum fan speed...
- Page 20 Environmental (continued) Maximum vibration Operating 0.26 Grms at 5–350 Hz Storage 1.87 Grms at 10–500 Hz for 15 min Maximum shock Operating One shock pulse in the positive z axis (one pulse on each side of the system) of 31 G for 2.6 ms in the operational orientation Storage Six consecutively executed shock pulses in...
- Page 21 Dell PowerEdge C5125 系统 使用入门 管制型号: B04S...
- Page 22 注、小心和警告 注: 小心: 警告: ____________________ 本出版物中的信息如有更改,恕不另行通知。 © 2011 Dell Inc. 版权所有,翻印必究。 未经 Dell Inc. 书面许可,严禁以任何形式复制这些材料。 ™ ™ ® 本文中使用的商标: Dell 、 DELL 徽标和 PowerEdge 是 Dell Inc. 的商标。 AMD 、 ™ ™ ® 和 AMD Athlon 是 Advanced Micro Devices, Inc. 的商标。 Microsoft 和...
- Page 23 小心: IEC 60950-1: 2001 Cl. 1.2.7.3 • • 安装和配置 警告: 打开系统包装 安装免工具拆装导轨解决方案 警告: 警告: 警告: 小心: 小心:...
- Page 24 注: Back Front...
- Page 25 注:...
- Page 26 安装系统 清空系统机箱...
- Page 28 将系统安装到机架中 警告: 注: 注:...
- Page 29 安装系统...
- Page 30 注: PSU1 PSU2 PSU1 PSU2...
- Page 31 连接键盘、鼠标和显示器...
- Page 32 连接电源电缆 AC Port 2 AC Port 1 (UPS) 注: PSU1 PSU2 开启系统 support.dell.com/manuals 《使用底板管理控制器指南》。...
- Page 33 • Microsoft Windows HPC 2008 Release 2 • Microsoft HyperV • Red Hat Enterprise Linux 6.0 64 • SUSE Linux Enterprise Server 11 SP1 64 • Citrix XenServer Enterprise Edition 5.6 注: support.dell.com 可能需要的其它信息 警告: 《硬件用户手册》 support.dell.com/manuals 《使用底板管理控制器指南》。 support.dell.com/manuals 注:...
- Page 34 技术规格 AMD Phenom II 910e 2.6 GHz 4 AMD Athlon II 610E 2.4 GHz 4 AMD Athlon II 260U 1.6 GHz 2 PCI-E x1 PCIe 1 SR5650(GPP3) PCI-E x2,x1,x1,x1,x1,x4 3 SP5100 PCI 32/33 UDDR3-1333 DDR3 800/1066/1333 2 GB 16 GB SATAII 4 •...
- Page 35 AST2050 128 MB DDR2 SDRAM 1400 W 功率 电压 200-240 VAC 50/60 Hz 9.6 A 散热 47.65 BTU/ 最大涌入电流 55 A 3.5" HDD 标准底座大小: 613.3 x 124 x 42.45 VLP 底座大小: 613.3 x 124 x 27.7 主板 硬盘驱动器 (3.5") 硬盘驱动器板 (3.5") 2.5"...
- Page 36 厚度 29.5 重量(已加载:最大重量) 45 千克( 99.21 磅) 51.22 千克( 112.92 磅) 重量(空置) 18.3 千克( 40.34 磅) 19.3 千克( 42.55 磅) 注: dell.com/environmental_datasheets 运行时 35 C 50 F 95 F 10 C 峰值温度且最大风扇速率 (CFM) 140 CFM 8 时的气流 285 CFM 12 标称温度且标称风扇速率...
- Page 37 运行时 350 Hz 0.26 Grms 存储时 10 - 500 Hz 1.87 Grms 运行时 31 G 存储时 71 G 22 G 运行时 3,048 10,000 注: 存储时 10,600 35,000 级别 ISA-S71.04-1985...
-
Page 39: Memulai Dengan Sistem Anda
Dell PowerEdge C5125 Memulai dengan Sistem Anda Model Sesuai Regulasi B04S... -
Page 40: Catatan, Perhatian, Dan Peringatan
____________________ Informasi dalam publikasi ini dapat berubah tanpa pemberitahuan. © 2011 Dell Inc. Hak cipta dilindungi undang-undang. Dilarang keras memperbanyak materi ini dengan cara apa pun tanpa izin tertulis dari Dell Inc. ™ ™ Merek dagang yang digunakan di dalam teks ini: Dell... -
Page 41: Instalasi Dan Konfigurasi
PERHATIAN: Lokasi Akses Terbatas Server ini dimaksudkan untuk instalasi di lokasi-lokasi akses terbatas saja sebagaimana didefinisikan di dalam Cl.1.2.7.3 dari IEC 60950-1: 2001 di mana kedua syarat berikut ini berlaku: • Akses hanya dapat diperoleh oleh petugas servis atau pengguna yang telah diberitahu mengenai alasan-alasan pembatasan yang diterapkan pada lokasi tersebut dan tentang tindakan pencegahan yang harus dilakukan. - Page 42 1 Tarik tombol-tombol pelepas pengunci yang ada di tengah bagian ujung untuk membuka pengunci-pengunci rel. 2 Sejajarkan bagian-bagian ujung dari rel pada flensa rak vertikal untuk mendudukkan pasak-pasak pada lubang bawah U pertama dan pada lubang atas U kedua. Sambungkan ujung belakang rel-rel sampai pengunci mengunci pada tempatnya.
- Page 43 3 Pasang mur sangkar pada rak. 4 Ulangi langkah 1 sampai 4 untuk memposisikan dan mendudukkan bagian ujung depan pada flensa vertikal. CATATAN: Untuk melepaskan rel-rel, tarik tombol pelepas pengunci yang ada di tengah bagian ujung dan lepaskan setiap rel dari dudukannya. Instalasi dan Konfigurasi...
-
Page 44: Memasang Sistem
Memasang Sistem Kosongkan Casis Sistem 1 Lepaskan kabel daya dari unit pencatu daya. 2 Tarik keluar tangkai unti pencatu daya. Instalasi dan Konfigurasi... - Page 45 3 Tekan pada pengunci pelepas (release latch) 4 Tarik unit pencatu daya ke luar sistem . 5 Tekan pengunci pelepas (release latch) dan tarik sled keluar sistem . Instalasi dan Konfigurasi...
- Page 46 Pasang Sistem pada Rak. PERINGATAN: Bilamana Anda ingin mengangkat sistem, mintalah orang lain untuk membantu Anda. Untuk mencegah cedera, jangan mencoba mengangkat sistem sendirian. 1 Geser sistem ke dalam rak. 2 Kalau ada, lepaskan braket pengiriman penstabil casis (chassis stabilizer shipping bracket) (opsional) dari rak.
- Page 47 Populasikan Sistem 1 Dorong unit pencatu daya ke dalam sistem sampai rata dengan kas (case) dan lepaskan penguncinya. 2 Tutup tangkai unit pencatu daya. Instalasi dan Konfigurasi...
- Page 48 3 Pasang kabel daya casis pada unti pencatu daya. CATATAN: Konfigurasi yang benar dari kabel daya AC casis integral ke soket unit pencatu daya (PSU) diperlihatkan dalam ilustrasi berikut ini. PSU1 PSU2 PSU1 PSU2 Instalasi dan Konfigurasi...
-
Page 49: Menghubungkan Keyboard, Mouse, Dan Monitor
4 Pasang sled-sled. Dorong unit pencatu daya ke dalam sistem sampai rata dengan kas (case) dan lepaskan penguncinya. Menghubungkan Keyboard, Mouse, dan Monitor Konektor pada bagian depan sistem Anda memiliki ikon yang menunjukkan kabel mana yang harus dipasang. Hubungkan keyboard, mouse, dan monitor (opsional). -
Page 50: Menghubungkan Kabel Daya
AC Port 1 memberikan daya ke PSU1, ACP Port 2 memberikan daya ke PSU2. Lihat Populasikan Sistem langkah 3 untuk informasi lebih lanjut. Menyalakan Sistem Ketika terhubung ke sumber tenaga listrik, sistem akan hidup secara otomatis. Lihat Using the Baseboard Management Controller Guide di support.dell.com/manuals. Instalasi dan Konfigurasi... -
Page 51: Menyelesaikan Pengaturan Sistem Operasi
• Citrix XenServer Enterprise Edition 5.6 CATATAN: Untuk informasi terbaru mengenai sistem pengoperasian yang didukung, kunjungi support.dell.com. Informasi Lain yang Mungkin Anda Perlukan PERINGATAN: Lihat informasi keselamatan dan peraturan yang disertakan dengan sistem Anda. Informasi garansi mungkin disertakan dalam dokumen ini atau sebagai dokumen yang terpisah. -
Page 52: Spesifikasi Teknis
Spesifikasi Teknis Prosesor (Per Papan Sistem) Phenom II 910e, 2.6 GHz, 4 core Tipe prosesor Athlon II 610E, 2.4 GHz, 4 core Athlon II 260U, 1.6 GHz, 2 core Bus Expansi (Per Papan Sistem) Konektor PCI-E x1 untuk sinyal Tipe bus sideband 1, SR5650(GPP3): PCI-E Internal PCIe Bus... - Page 53 Video AST2050 Tipe video 128 MB DDR2 SDRAM Memori video Daya Catu daya AC (per catu daya) Watt Daya 1400 W Tegangan 200–240 VAC, 50/60 Hz, maks. 9.6 A Pelepasan panas maks. 47,65 BTU/jam Lonjakan arus maksimum maks. 55 A Fisik Dimensi sistem sled (dengan 3,5"...
- Page 54 12 sled: 19,3 kg (42,55 pon) Lingkungan CATATAN: Untuk informasi tambahan mengenai tolok ukur lingkungan untuk konfigurasi sistem tertentu, lihat www.dell.com/environmental_datasheets. Suhu Pengoperasian 10° hingga 35°C (50°F hingga 95°F) dengan gradasi suhu maksimum 10°C per jam Aliran udara pada kecepatan kipas...
- Page 55 Lingkungan (bersambung) Kelembapan Relatif Pengoperasian 20% sampai 80% (tanpa pengondensasian) dengan gradasi kelembapan maksimum sebesar 10% per jam Penyimpanan 5% hingga 95% (nonkondensasi) Getaran maksimum Pengoperasian 0,26 Grms pada 5–350 Hz Penyimpanan 1,87 Grms pada frekuensi 10 Hz–500 Hz selama 15 menit Guncangan maksimum Pengoperasian Satu pulsa guncangan pada sumbu z positif...
- Page 56 Spesifikasi Teknis...
- Page 57 Dell PowerEdge C5125 はじめに 認可モデル:B04S...
- Page 58 メモ: 注意: 警告: ____________________ 本書の内容は予告なく変更されることがあります。 © 2011 すべての著作権は Dell Inc. にあります。 Dell Inc. の書面による許可のない複製は、いかなる形態においても厳重に禁じられてい ます。 本書に使用されている商標:Dell™、DELL ロゴ、および PowerEdge™ は Dell Inc. の商標 ® です。AMD 、AMD Phenom™ および AMD Athlon™ は Advanced Micro Devices, Inc. ® ® の商標です。Microsoft および Windows は米国その他の国における Microsoft ®...
- Page 59 注意: IEC 60950-1: 2001 Cl.1.2.7.3 • • 取り付けと設定 警告: システムの開梱 ツールレスレールソリューションの取り付け 警告: 警告: 警告: 注意: 注意:...
- Page 60 メモ: Back Front...
- Page 61 メモ:...
- Page 62 システムの取り付け 電源ユニットとスレッドの取り外し...
- Page 64 ラックへのシステムの取り付け 警告: メモ: メモ:...
- Page 65 電源ユニットとスレッドの取り付け...
- Page 66 メモ: PSU1 PSU2 PSU1 PSU2...
- Page 67 キーボード、マウス、モニターの接続...
- Page 68 電源ケーブルの接続 AC Port 2 AC Port 1 メモ: PSU1 PSU2 システムの電源投入 support.dell.com/manuals Using the Baseboard Management Controller Guide...
- Page 69 Microsoft Windows HPC 2008 Release 2 • Microsoft HyperV • Red Hat Enterprise Linux 6.0 64 • SUSE Linux Enterprise Server 11 SP1 64 • Citrix XenServer Enterprise Edition 5.6 メモ: support.dell.com その他の情報 警告: システムに付属のマニュアルで安全および認可機関に関する情報 を参照してください。保証情報は、このマニュアルに含まれている場合 と、別の文書として付属する場合があります。 support.dell.com/manuals support.dell.com/manuals Using the Baseboard Management Controller Guide...
- Page 70 仕様 プロセッサ(各システム基板につき) AMD Phenom II 910e 2.6 GHz AMD Athlon II 610E 2.4 GHz AMD Athlon II 260U 1.6 GHz 拡張バス(各システム基板につき) PCI-E x1 PCIe 1 SR5650(GPP3): PCI-E x2 x1 x1 x1 x1 x4 3 SP5100: PCI 32/33 メモリ(各システム基板につき) UDDR3-1333 DDR3 800/1066/1333 2 GB 16 GB ドライブ(各システム基板につき)...
- Page 71 コネクタ(各システム基板につき) シリアル(内蔵) USB(Y ケーブル経由) ビデオ(Y ケーブル経由) KVM-over-IP ポート ビデオ AST2050 128 MB DDR2 SDRAM 電源 ワット数 1400 W 電圧 240 VAC 50/60 Hz 9.6 A 熱消費 47.65 BTU / 最大突入電流 55 A サイズと重量 3.5 HDD 標準スレッドサイズ: 613.3 mm x 124 mm x 42.45 mm 8 VLP スレッドサイズ:...
- Page 72 サイズと重量(続き) 2.5 HDD 標準スレッドサイズ: 613.3 mm x 124 mm x 42.45 mm 8 VLP スレッドサイズ: 613.3 mm x 124 mm x 27.7 mm 12 メインボード ハードドライブ(2.5 インチ) ハードドライブボード(3.5 イン チ) シャーシ 縦幅 13 cm 横幅 44.7 cm 奥行き 75 cm 重量(フル構成)...
- Page 73 環境 メモ: dell.com/environmental_datasheets 動作時 ピーク温度における最大ファン速 140 CFM 8 度での風量(CFM: Cubic Feet 285 CFM 12 per Minute) 通常温度における最小ファン速度 40 CFM 8 での風量(CFM) 60 CFM 12 保管時 動作時 保管時 動作時 350 Hz 0.26 Grms 保管時 500 Hz 1.87 Grms 動作時 31 G 保管時...
- Page 74 環境(続き) 動作時 3,048 m メモ: 900 m 300 m 保管時 10, 600 m クラス ISA-S71.04-1985...
- Page 75 Dell PowerEdge C5125 시스템 시작하기 규정 모델 : B04S...
-
Page 76: 주 , 주의 및 경고
VMware 본 발행물에서 특정 회사의 상표 및 회사 이름 또는 제품을 지칭하기 위해 기타 상표 및 상호 를 사용할 수도 있습니다. Dell Inc.는 자사가 소유하고 있는 것 이외에 기타 모든 상표 및 상호 에 대한 어떠한 소유권도 없습니다. 규정 모델 B04S 2011 년... -
Page 77: 설치 및 구성
주의 : IEC 60950-1: 2001 Cl. 1.2.7.3 해당 지역에 적용되는 제한 사유 및 취해야 할 모든 예방 조치에 관해 지 • 도를 받은 서비스 기술자 또는 사용자만 액세스할 수 있습니다. 접근은 도구, 잠금 및 키 또는 다른 보안 수단을 사용하여 이루어지며, •... - Page 78 주 : Back Front...
- Page 79 주 :...
- Page 80 시스템 설치 시스템 섀시 비우기...
- Page 82 랙에 시스템 설치 경고 : 주 : 주 :...
- Page 83 시스템 채우기...
- Page 84 주 : PSU1 PSU2 PSU1 PSU2...
-
Page 85: 키보드 , 마우스 및 모니터 연결
키보드 , 마우스 및 모니터 연결... - Page 86 전원 케이블 연결 AC Port 2 AC Port 1 주 : PSU1 , ACP PSU2 시스템 켜기 . BMC(Baseboard Management Controller) 사용 설명서(support.dell.com/manuals)를 참조하십시오.
-
Page 87: 운영 체제 설치 완료
Red Hat Enterprise Linux 6.0(64비트) • SUSE Linux Enterprise Server 11 SP1(64비트) • Citrix XenServer Enterprise Edition 5.6 주 : support.dell.com 기타 필요한 정보 경고 : 하드웨어 소 유자 설명서 support.dell.com/manuals BMC(Baseboard Management Controller) 사용 설명서 (support.dell.com/manuals)를 참조하십시오. 주 :... - Page 88 기술 사양 AMD Phenom II 910e, 2.6GHz, 4 AMD Athlon II 610E, 2.4GHz, 4 AMD Athlon II 260U, 1.6GHz, 2 PCI-E x1 1, SR5650(GPP3): PCI-E PCIe x2,x1,x1,x1,x1,x4 3, SP5100: PCI 32/33 UDDR3-1333 Unbuffered DDR3 4 800/1066/1333 16GB SATAII(4 • 3.5 HDD 2 : 2TB) •...
- Page 89 AST2050 128MB DDR2 SDRAM 1400W 200-240VAC, 50/60 Hz, 9.6A 47.65 BTU/hr (3.5 HDD) 613.3mm x 124mm x 42.45mm(8 613.3mm x 124mm x 27.7mm(12 (3.5 (3.5 (2.5 HDD) 613.3mm x 124mm x 42.45mm(8 613.3mm x 124mm x 27.7mm(12 (2.5 (3.5...
- Page 90 13cm(5.1 44.7cm(17.6 75cm(29.5 45kg(99.21lbs) 51.22kg(112.92lbs) 18.3kg(40.34lbs) 19.3kg(42.55lbs) 주: dell.com/environmental_datasheets ~ 35 C(50 F ~ 95 F), 10 C 140CFM(8 (CFM) 285CFM(12 40CFM(8 (CFM) 60CFM(12 –40 ~ 65 C(–40 F ~ 149 F), 20 C 20%~80%( 5 ~ 95%(...
- Page 91 5 ~ 350Hz 0.26Grms 10 ~ 500Hz 1.87Grms 2.6ms (+) z (+/-) x, y, z +/- x, y, z -16 ~ 3,048m(-50 ~ 10,000ft.) 주: -16 ~ 10,600m(-50 ~ 35,000ft.) ISA-S71.04-1985...