Chapters
Table of Contents

Summary of Contents for Smeg KITFD050
- Page 1 MANIA02 MANUALE D’ISTRUZIONI - INSTRUCTION MANUAL BEDIENUNGS UND WARTUNGSANLEITUNG - MANUEL D’UTILISATION MODELS: KITFD050 KITFD050UK KITFD075 KITFD075UK KITFD100 KITFD100UK...
-
Page 2: Table Of Contents
Egregio Cliente Lei ha acquistato un prodotto SMEG e sentitamente la ringraziamo per la preferenza accordataci. La tradizione e la serietà della nostra Azienda garantiscono la qualità tecnico-estetica della scelta da Lei fatta; infatti tutti i nostri prodotti sono realizzati con materiali di prima qualità e con criteri costruttivi tali da soddisfare anche la clientela più... -
Page 3: Segnaletica
Il presente Manuale delle istruzioni per l’uso si riferisce all’apparecchio elettrico denominato dissipatore per rifiuti alimentari (più comunemente noto come tritarifiuti ) della serie: KITFD050 - KITFD075 - KITFD100. Il dissipatore per rifiuti alimentari è un apparecchio elettrico, progettato e realizzato esclusivamente per uso domestico , non può... -
Page 4: Dati Del Produttore
, secondo le normative vigenti e le regole di buona tecnica. La SMEG Spa declina ogni responsabilità derivante da una cattiva installazione , regolazione e manutenzione dell’apparecchio. - Page 5 ATTENZIONE Nell’utilizzo degli apparecchi elettrici (dissipatore per rifiuti alimentari - tritarifiuti) occorre sempre tenere presente le modalità consentite di utilizzo ed osservare alcune norme di sicurezza in particolare: a. Questo apparecchio non è destinato ad essere utilizzato da persone (inclusi i bambini) le cui caratteri- stiche fisiche, sensoriali o mentali o mancanza di esperienza e conoscenza impediscono loro di utilizzare l’apparecchio in sicurezza senza supervisione o istruzioni.
-
Page 6: Funzione Dell'apparecchiatura
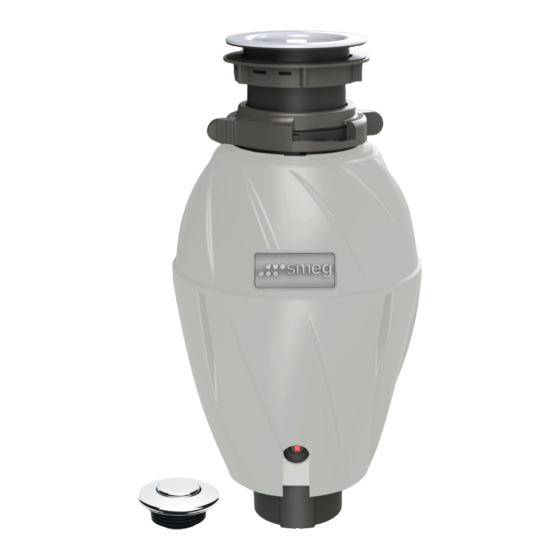
FUNZIONE DELL’APPARECCHIATURA DESTINAZIONE ED AMBIENTE DI LAVORO Il dissipatore per rifiuti alimentari è un’apparecchiatura costruita per essere inserita ed utilizzata in ambiente domestico, precisamente in cucina, collegato allo scarico del lavello. E’ previsto l’uso solo con acque pulite. DESCRIZIONE DELLA APPARECCHIATURA Il dissipatore per rifiuti alimentari si compone di un involucro in materiale plastico isolante termoformato all’interno del quale sono alloggiati : • La girante metallica tritarifiuti. -
Page 7: Requisiti Tecnici
REQUISITI TECNICI CARATTERISTICHE TECNICHE TENSIONE Peso POTENZA ASSORBIMENTO MODELLO giri/min (Kg) WATT (Ampere) KITFD050 2800 220 - 240 KITFD075 KITFD100 DIMENSIONI PER L’INSTALLAZIONE MISURE IN MILLIMETRI MODELLO KITFD050 KITFD075 KITFD100... -
Page 8: Installazione
INSTALLAZIONE Ai fini della sicurezza è importante che i piazzamenti vengano realizzati da personale qualificato. Accertarsi che il foro su cui sarà installato il dissipatore di rifiuti alimentari,posto sul fondo del lavello, sia delle opportune dimensioni : PILETTA TONDA (STANDARD) PILETTA QUADRATA (OPZIONALE) Per il montaggio del dissipatore rispettare la sequenza di inserimento dei particolari presenti nel kit di instal- lazione come riportato in figura... -
Page 9: Allacciamento Elettrico
Dopo aver montato correttamente i particolari superiori (1,2,3,4 ,6,7,8,9) posizionare il corpo del dissipa- tore e serrare la ghiera di aggancio facendola ruotare completamente fino a raggiungere il finecorsa mec- canico della posizione LOCK indicata in figura : Posizionare il corpo del dissipatore per rifiuti alimentari in modo che il dispositivo di riarmo elettrico sia rivolto verso l’esterno e sempre facilmente raggiungibile. -
Page 10: Installazione Pulsante Pneumatico
INSTALLAZIONE PULSANTE PNEUMATICO Per l’installazione del pulsante pneumatico di START - STOP del dissipatore di rifiuti alimentari attenersi allo schema di collegamento indicato in figura : 1. Pulsante pneumatico 2. Guarnizione 3. Piano di attacco (bordo/piano lavello) 4. Ghiera di fissaggio 5. -
Page 11: Allacciamento Lavastoviglie
ALLACCIAMENTO LAVASTOVIGLIE Prima di collegare le tubazioni per lo scarico della lavastoviglie, utilizzando un cacciavite ed un martello, rimuovere il diaframma presente nel corpo del dissipatore, come indicato in figura, e rimuovere eventuali residui di parti plastiche dall’interno della camera di triturazione. Eliminazione diaframma ALLACCIAMENTO AGLI SCARICHI FOGNARI Collegare la tubazione indicata in figura all’impianto di evacuazione fognaria del locale. -
Page 12: Messa In Funzione
MESSA IN FUNZIONE ATTENZIONE Prima di mettere in funzione il dissipatore per rifiuti alimentari è necessario : assicurarsi che tutte le masse elettriche siano collegate al conduttore di prote- zione PE. accertarsi che tutte le fasi di piazzamento, installazione ed allacciamenti siano stati eseguiti a regola d’arte seguendo le indicazioni riportate nel presente ma- nuale. -
Page 13: Pulizia Del Tritarifiuti
PULIZIA DEL DISSIPATORE Utilizzando il dissipatore per rifiuti alimentari è possibile che si accumulino delle particelle di grasso o cibo nella camera di triturazione o nel guarnizione superiore di protezione provocando cattivi odori. E’ possibile asportare tali residui e pulire l’apparecchio procedendo come segue : a. -
Page 14: Rischi Residui
RISCHI RESIDUI I rischi residui rilevati, associati alla attrezzatura sono minimizzati dalla caratteristiche costruttive, tuttavia possono verificarsi le seguenti situazioni derivate dall’uso scorretto del prodotto : N° RISCHIO RESIDUO Versamenti di liquidi a pavimento che possono rendere la superficie di calpestio sdrucciolevole. -
Page 15: Trasporto E Movimentazione
GARANZIA Il dissipatore per alimenti è coperto da garanzia del Costruttore per il seguente periodo dalla data di acquisto. • KITFD050: 2 ANNI • KITFD075: 2 ANNI • KITFD100: 2 ANNI All’interno di tale periodo saranno sostituiti i pezzi ed i dispositivi risultati guasti o difettosi all’analisi di verifi-... - Page 16 Dear Client, You have purchased an SMEG product and we would sincerely like to thank you for your choice. The tradition and reliability of our Company guarantees the technical and aesthetic quality of the choice that you have made; all our products are made from the finest quality materials and assembly standards to satisfy even the most demanding customer.
-
Page 17: Symbols
This user instruction manual refers to the electrical equipment called food waste disposer (more commonly known as a waste disposal) in the range: KITFD050 - KITFD075 - KITFD100. The food waste disposer is an electrical device, designed and built exclusively for domestic use. It cannot be used in environments with particular conditions such as a corrosive or explosive atmosphere (powders, vapours or gas). -
Page 18: Manufacturer's Information
Before carrying out any maintenance operation, turn off the power and close the water supply to the device. In the case of substitution of parts and/or accessories, only original SMEG Spa spare parts should be used. Do not open the casings and external coverings of electrical devices. - Page 19 ATTENTION In using electrical appliances (food waste disposers - waste disposals) you must always bear in mind the permitted modes of use and you must observe some safety standards in particular: a. This appliance is not intended for use by persons (including children) with reduced physical, sensory or mental capabilities, or lack of experience and knowledge, unless they have been given supervision or in- struction concerning use of the appliance by a person responsible for their safety.
-
Page 20: Functions
FUNCTIONS INTENDED USE AND OPERATING ENVIRONMENT The food waste disposer is an appliance built to be inserted and used in the household, specifically in the kitchen, connected to the sink drain. Only use with clean water is foreseen. DESCRIPTION OF THE APPLIANCE The food waste disposer is made up of a plastic heat-shaped plastic housing inside of which the following are housed: • The metallic waste disposal impeller... -
Page 21: Technical Requirements And Performance
TECHNICAL REQUIREMENTS AND PERFORMANCE TECHNICAL REQUIREMENTS VOLTAGE Weight POWER ABSORBTION MODEL r/min (Kg) WATT (Ampere) KITFD050 2800 220 - 240 KITFD075 KITFD100 DIMENSIONS FOR INSTALLATION MEASURES IN MILLIMETER MODEL KITFD050 KITFD075 KITFD100... -
Page 22: Installation
INSTALLATION For safety purposes it is important that the hook ups are done by qualified personnel Ensure that the hole in which the food waste disposer, located at the bottom of the sink, is appropriately sized: ROUND WASTE (STANDARD) SQUARE WASTE (OPTIONAL) For installation of the disposer follow the insertion order of the parts in the installation kit as shown in the figure: 1. -
Page 23: Electric Connection
After correctly installing the top parts (1, 2, 3, 4, 6, 7, 8, 9) position the body of the disposer and tighten the connection ring nut, rotating it all the way until reaching the mechanical travel limit of the LOCK position indicated in the figure: Position the body of the food waste disposer so that the electrical rearm device is facing outward and always easily reachable. -
Page 24: Button Switch Installation
BUTTON SWITCH INSTALLATION For installation of the food waste disposer START - STOP pneumatic push button follow the connection diagram shown in the figure: 1. Pneumatic push button 2. Gasket 3. Connection surface (sink edge/surface) 4. Fixing ring nut 5. Pipe 6. -
Page 25: Dishwasher Connection
DISHWASHER CONNECTION Before connecting the dishwasher drain piping, using a screwdriver and a hammer, remove the diaphragm on the disposer body as illustrated in the figure and remove any residual plastic parts from inside the grinding chamber. Removal of the diaphragm DRAINAGE CONNECTION Connect the piping indicated in the figure to the facility’s local sewer drain. -
Page 26: Start-Up
START-UP ATTENTION Before starting up the machine, it is necessary to ensure that: all the electric groundings are connected to the protective conductor PE. placement, installation and connections have been carried out in accordan- ce with best working practices, following the instructions indicated in this manual. -
Page 27: Cleaning Operations
CLEANING OPERATION When using the disposer for food waste it is possible that grease or food particles may accumulate in the grinding chamber or in the top protective gasket, causing foul odours. This residue can be removed and the appliance cleaned proceeding as follows: a. -
Page 28: Residual Risks
RESIDUAL RISKS The residual risks associated with the machine are minimized by the manufacturing standards. Nevertheless, the following situations can occur due to incorrect use of the product: N° RESIDUAL RISKS Spilling of liquids on the floor that can render the treading surface slippery Risk of electrocution due to erroneous connection of the power cord connected to the 230 Vac voltage socket There is a possibility of the ejection of objects due to the introduction of solid... -
Page 29: Transport
WARRANTY The Food waste disposer is covered by the Manufacturer’s warranty for the following period from the date of sale. • KITFD050: 2 YEARS • KITFD075: 2 YEARS • KITFD100: 2 YEARS If, during this period, upon inspection by the Manufacturer, any parts or devices are damaged or defective, the Manufacturer will replace or repair such defective part(s). - Page 30 Sehr geehrter Kunde, Sie haben ein Produkt der SMEG erworben und wir möchten uns für das entgegengebrachte Vertrauen bedanken. Die Tradition und Zuverlässigkeit unseres Unternehmens gewährleisten die technisch-opti- sche Qualität der von Ihnen getroffenen Wahl. Schließlich werden all unsere Produkte mit erstklassigen Materialien und nach baulichen Kriterien gefertigt, die selbst höchsten Kundenanforderungen gerecht...
-
Page 31: Hinweissymbole
Die vorliegende Gebrauchsanweisung bezieht sich auf das Elektrogerät, das als Zerkleinerer von Speiseabfällen bezeichnet wird (geläufiger als KAZ - Küchenabfallzerkleinerer bekannt), der Baureihe: KITFD050 - KITFD075 - KITFD100. Der Küchenabfallzerk- leinerer ist ein Elektrogerät, das ausschließlich für die Verwendung im Haushalt entworfen und gebaut wurde. Er darf nicht in Räumen verwendet werden, in denen besondere Bedingungen herrschen, wie ätzende oder explosive Atmosphäre (Stäube, Dämp-... -
Page 32: Herstellerdaten
Firma SMEG Spa keinerlei Haftung. Vor dem Ausführen etwaiger Wartungsmaßnahmen stets die Strom- und die Wasserversorgung des Geräts trennen.Zum Auswechseln von Bautei- len und/oder Zubehör stets ausschließlich originale Ersatzteile der SMEG Spa verwenden. Hüllen und Gehäuse der elektrischen Vorrichtungen nicht öffnen. - Page 33 DE DE ACHTUNG! Beim Gebrauch der Elektrogeräte (Küchenabfallzerkleinerer) sind stets die zulässigen Verwendungswei- sen zu berücksichtigen und einige Sicherheitsvorschriften zu beachten, insbesondere: a. Dieses Gerät ist nicht dazu gedacht von Personen (Kinder eingeschlossen) benutzt zu werden, deren physische, sensorische oder geistige Merkmale oder Erfahrungs- bzw. Kenntnismangel sie daran hindern, das Gerät in Sicherheit ohne Beaufsichtigung oder Anleitung zu gebrauchen.
-
Page 34: Funktion Des Geräts
FUNKTION DES GERÄTS BESTIMMUNG UND EINSATZUMGEBUNG Der Küchenabfallzerkleinerer ist ein Gerät, das für den Einbau und die Verwendung im häuslichen Bereich, speziell in der Küche, an den Abfluss der Spüle angeschlossen, gebaut wurde. Es ist die Benutzung nur mit sauberem Wasser vorgesehen. BESCHREIBUNG DES GERÄTS Der Küchenabfallzerkleinerer besteht aus einem warmgeformten isolierenden Kunststoffgehäuse, in dessen Inneren untergebracht sind:... -
Page 35: Technische Anforderungen
TECHNISCHE ANFORDERUNGEN TECHNISCHE MERKMALE SPANNUNG Gewicht LEISTUNG STROMAUFNAH- MODELL U/min (kg) WATT ME (Ampere) KITFD050 2800 220 - 240 KITFD075 KITFD100 EINBAUAUSMASSE MASSE IN MILLIMETERN MODELL KITFD050 KITFD075 KITFD100... -
Page 36: Installation
INSTALLATION Zu Sicherheitszwecken ist wichtig, dass die Anschlüsse von Fachpersonal ausgeführt werden. Sicherstellen, dass die Öffnung auf dem Boden der Spüle, an der der Küchenabfallzerkleinerer montiert wird, die richtigen Abmessungen aufweist : Siebkörbchen Rund (Standard) Siebkörbchen Quadratisch (Optional) Für die Montage des Küchenabfallzerkleinerers die Einbauabfolge der im Installations-Bausatz enthaltenen Einzelteile, wie in der Abbildung aufgeführt, befolgen 1. -
Page 37: Elektrischer Anschluss
Nach ordnungsgemäßer Montage der oberen Einzelteile (1,2,3,4,5,6,7,8,9) den Gerätekorpus platzieren und den Einhängering soweit anziehen, bis der in der Abbildung gezeigte mechanische Endanschlag LOCK erreicht wird: Den Korpus des Küchenabfallzerkleinerers derart platzieren, dass die elektrische Rücksetzvorrichtung nach außen zeigt und stets leicht zu erreichen ist. ELEKTRISCHER ANSCHLUSS Maßnahmen an den elektrischen Bauteilen dürfen in Übereinstimmung mit den geltenden Vorschriften zur Verhütung von Arbeitsunfällen ausschließlich von qualifiziertem Fachpersonal vorgenommen werden. -
Page 38: Installation Der Drucklufttaste
INSTALLATION DER DRUCKLUFTTASTE Für die Installation der START bzw. STOPP-Druckluft-Taste des Küchenabfallzerkleinerers das in der Abbil- dung gezeigte Anschlussschema befolgen: 1. Drucklufttaste 2. Dichtung 3. Befestigungsebene (Spülenrand bzw. Arbeitsplatte) 4. Befestigungsgewindering 5. Schlauch 6. Schlauchanschluss WASSERANSCHLUSS UND ABFLUSS Maßnahmen an den elektrischen Bauteilen dürfen in Übereinstimmung mit den geltenden Vorschriften zur Verhütung von Arbeitsunfällen ausschließlich von qualifiziertem Fachpersonal vorgenommen werden. -
Page 39: Anschluss Der Spülmaschine
ANSCHLUSS DER SPÜLMASCHINE Vor dem Anschluss des Ablaufrohrs der Spülmaschine mithilfe eines Schraubenziehers und einem Ham- mer die Scherblende in der Kurve des Ablaufs laut Abbildung beseitigen und etwaige Reste von Kunststof- fteilen aus der Zerkleinerungskammer entfernen. Beseitigung der Scherblende ANSCHLUSS AN DAS KANALISATIONSSYSTEM Das in der Abbildung gezeigte Rohr an die Kanalisation des Raums anschließen. -
Page 40: Inbetriebnahme
INBETRIEBNAHME ACHTUNG! Vor der Inbetriebnahme des Geräts muss sichergestellt werden dass: Alle Masseanschlüsse korrekt an den PE-Schutzleiter (Erdung) angeschlossen sind. Aufstellung, Installation und Anschlüsse korrekt und fachgerecht ausgeführt und dabei die Anleitungen des Handbuchs beachtet wurden. ACHTUNG! Benutzen Sie bitte nicht das Gerät bevor es von einem Techniker geprüft worden ist. GEBRAUCHSANWEISUNGEN 1. -
Page 41: Reinigung Des Abfallzerkleinerers
REINIGUNG DES ABFALLZERKLEINERERS Beim Gebrauch des Küchenabfallzerkleinerers ist es möglich, dass sich Essens- oder Fettreste in der Zerkleinerun- gskammer oder in der oberen Schutzdichtung ansammeln und schlechte Gerüche verursachen. Es ist möglich, diese Rückstände zu entfernen und das Gerät folgendermaßen zu reinigen: a. -
Page 42: Restrisiken
RESTRISIKEN Die in Verbindung mit dem Gerät erkannten Restrisiken wurden durch die baulichen Merkmale minimiert, dennoch kann es infolge eines unsachgemäßen Gebrauchs zu folgenden Gefahrensituationen kommen: N° RESTRISIKEN Vergossene Flüssigkeit am Boden kann die Oberfläche glatt und rutschig machen. Dazu kann es bei unsach- gemäßem Befüllen der Becken oder unsachgemäßen Maßnahmen an den Vorrichtungen kommen. -
Page 43: Transport Und Handling
Abdeckungen gelagert werden, da es feuchtigkeitsempfindliche Elektrogeräte enthält. GARANTIE Der Küchenabfallzerkleiner wird vom Ersteller für den folgenden Zeitraum (ab Kaufsdatum). • KITFD050: 2 JAHRE • KITFD075: 2 JAHRE • KITFD100: 2 JAHRE Während der Garantielaufzeit werden defekte bzw. fehlerhafte Teile und Vorrichtungen nach werksseitiger Überprüfung ersetzt. - Page 44 Cher Client, Vous avez fait l’acquisition d’un produit SMEG et nous vous remercions pour la préférence que vous nous avez accordée. La tradition et le sérieux de notre Entreprise garantissent la qualité technique et esthétique du choix que vous avez fait ; En effet tous nos produits sont réalisés avec des matériaux de première qualité...
-
Page 45: Signalisation
Le présent mode d’emploi se réfère à l’appareil électrique dénommé broyeur de déchets alimentaires (plus communément appelé broyeur) de la série : KITFD050 - KITFD075 - KITFD100. Le broyeur de déchets alimentaires est un appareil électrique conçu et réalisé exclusivement pour un usage domestique ; il ne peut pas être utilisé dans des environnements présentant des conditions particulières comme des atmosphères corrosives ou explosives (poussières, vapeurs ou gaz). -
Page 46: Données Du Producteur
SMEG Spa décline toute responsabilité dérivant d’une installation, d’un réglage et d’un entretien de l’appareil erronés. Avant d’effectuer la moindre intervention d’entretien couper l’alimentation en courant et fermer l’alimentation en eau en amont de l’appareil. - Page 47 DE FR ATTENTION Lors de l’utilisation des appareils électriques (broyeur de déchets alimentaires) il est nécessaire de toujours garder à l’esprit les modalités d’utilisation autorisées et de respecter certaines normes de sécurité, notamment les suivantes : a. Cet appareil n’est pas conçu pour être utilisé par des personnes (y compris des enfants) dont les ca- ractéristiques physiques, sensorielles ou mentales ou le manque d’expérience et de connaissance les em- pêchent d’utiliser l’appareil en toute sécurité...
-
Page 48: Fonction De L'appareil
FONCTION DE L’APPAREIL DESTINATION ET ENVIRONNEMENT D’EXPLOITATION Le broyeur de déchets alimentaires est un appareil construit pour être inséré et utilisé dans un environne- ment domestique, précisément en cuisine, raccordé à l’évacuation de l’évier. Seul l’usage avec des eaux propres est prévu. DESCRIPTION DE L’APPAREIL Le broyeur de déchets alimentaires est composé... -
Page 49: Critères Techniques
CRITÈRES TECHNIQUES CARACTÉRISTIQUES TECHNIQUES TENSION Poids (kg) PUISSAN- ABSORPTION MODÈLE tours/min CE WATT (Ampère) KITFD050 2800 220 - 240 KITFD075 KITFD100 DIMENSIONS POUR L’INSTALLATION MESURES EN MILLIMÈTRES MODÈLE KITFD050 KITFD075 KITFD100... -
Page 50: Installation
INSTALLATION Pour des raisons de sécurité, il est important que les positionnements soient réalisés par du personnel qualifié. Veiller à ce que le trou à partir duquel sera installé le broyeur de déchets alimentaires, situé au fond de l’évier, présente des dimensions adéquates : Bonde ronde (STANDARD) Bonde carrée (OPZIONALE) Pour le montage du broyeur, respecter la séquence d’insertion des composants présents dans le kit... -
Page 51: Raccordement Électrique
Après avoir correctement monté les composants supérieurs (1,2,3,4,6,7,8,9), positionner le corps du broyeur et serrer le collier de fixation en le faisant tourner complètement jusqu’à atteindre la butée mécan- ique de la position LOCK indiquée dans la figure : Positionner le corps du broyeur de déchets alimentaires de façon à ce que le dispositif de réarmement électrique soit dirigé... -
Page 52: Installation Bouton Pneumatique
INSTALLATION BOUTON PNEUMATIQUE Pour l’installation du bouton pneumatique START - STOP du broyeur de déchets alimentaires, respecter le schéma de raccordement indiqué dans la figure : 1. Bouton pneumatique 2. Joint 3. Plan de fixation (bord/plan évier) 4. Anneau de serrage 5. -
Page 53: Raccordement Lave-Vaisselle
RACCORDEMENT LAVE-VAISSELLE Avant de raccorder la tuyauterie pour l’évacuation du lave-vaisselle, à l’aide d’un tournevis et d’un marteau, éliminer le diaphragme présent dans le corps du broyeur, comme indiqué dans la figure, et retirer tout résidu éventuel de pièces plastiques présentes à l’intérieur de la chambre de broyage. Élimination diaphragme RACCORDEMENT ÉVACUATION DES EAUX USÉES Raccorder la tuyauterie indiquée dans la figure au système d’évacuation des eaux usées de la pièce. -
Page 54: Mise En Service
MISE EN SERVICE ATTENTION Avant de mettre en service la machine il est nécessaire: de s’assurer que toutes les masses électriques soient raccordées au conducteur de protection PE. Avant de mettre en service la machine s’assurer que toutes les phases de posi- tionnement d’installation et de branchements aient été... -
Page 55: Nettoyage Du Broyeur De Déchets
NETTOYAGE DU BROYEUR DE DÉCHETS L’utilisation d’un broyeur de déchets alimentaires peut entraîner l’accumulation de particules de graisse ou de nourriture dans la chambre de broyage ou dans le dispositif supérieur de protection, générant de mauvai- ses odeurs. Il est possible d’éliminer ces résidus et de nettoyer l’appareil en procédant comme suit : a. -
Page 56: Risques Résiduels
RISQUES RÉSIDUELS Les risques résiduels relevés et associés à la machine sont réduits au maximum du fait des caractéristiques de construction de la machine. Toutefois les situations suivantes dérivant d’une utilisation incorrecte du produit peuvent se présenter: N° RISQUES RÉSIDUELS Ecoulements de liquides au sol qui peuvent rendre les surfaces de passage glis- santes Possibilité... -
Page 57: Transport, Déplacement
GARANTIE Le broyeur de déchets alimentaires est couvert par la garantie du fabricant pour la période suivante à comp- ter de la date d’achat. • KITFD050: 2 ANS • KITFD075: 2 ANS • KITFD100: 2 ANS Au cours de cette période les pièces et dispositifs endommagés ou défectueux pourront être remplacés après analyse et contrôle des composants au siège du fabricant. - Page 58 SMEG SMEG...
- Page 59 " " ! " " "! " KITFD050 - KITFD075 - KITFD100...
- Page 60 Strada Longitudinale A 1258, Z.I. Mazzocchio 04014 Pontinia (LT) - Italy Tel. +39.0773.840036 Fax. +39.0773.840038 elleci@elleci.it ELLECI Spa Via Migliara 53 z.i. Mazzocchio 04014 PONTINIA - LT - ITALY Tel . +39(0) 773 - 840036 Fax . +39(0) 773 - 840038 SMEG SMEG...
- Page 63 KITFD050 2800 220 - 240 KITFD075 KITFD100 KITFD050 KITFD075 KITFD100...
- Page 65 LOCK (Id = 0.03 A) ةيئاذغلا تايافنلل يرارحلا تتشملا مادختسا عونمم ةيلمع ءارجإ متي نأ بجي .يئابرهكلا رايتلا سبقم وأ سباقلا ،يئابرهكلا لبكلا يف ذوذش وأ للخ ،لطع يأ تامالع روهظ ةلاح يف .رطاخملا بنجتل نيلهؤم صاخشأ وأ ةعنصملا ةهجلا فرط نم ةفلاتلا ةيئابرهكلا تالباكلا لادبتسا...
- Page 68 PE .
- Page 70 start-stop لبكلا يف ذوذش وأ للخ ،لطع يأ تامالع روهظ ةلاح يف بجي .يئابرهكلا رايتلا سبقم وأ سباقلا ،يئابرهكلا ةفلات رايتلاب ةيذغتلا تالباك ةيئابرهكلا تالباكلا لادبتسا ةيلمع ءارجإ متي نأ نيلهؤم صاخشأ وأ ةعنصملا ةهجلا فرط نم ةفلاتلا .رطاخملا بنجتل...
- Page 71 KITFD050 KITFD075 KITFD100...
- Page 72 DICHIARAZIONE DI CONFORMITÀ - DECLARATION OF CONFORMITY - Il sottoscritto in qualità di Legale Rappresentante della Società / The undersigned, in capacity of the Company’s legal representative SMEG AFTER - SMEG dept. - Via Leoinardo da Vinci 4 - 42016 Guastalla (RE) Italy 0522.170.70.70 DICHIARA - DECLARES che il prodotto - that the product KITFD050 - KITFD075 - KITFD100.