
Related Manuals for Philips SE6554B/05


Summary of Contents for Philips SE6554B/05
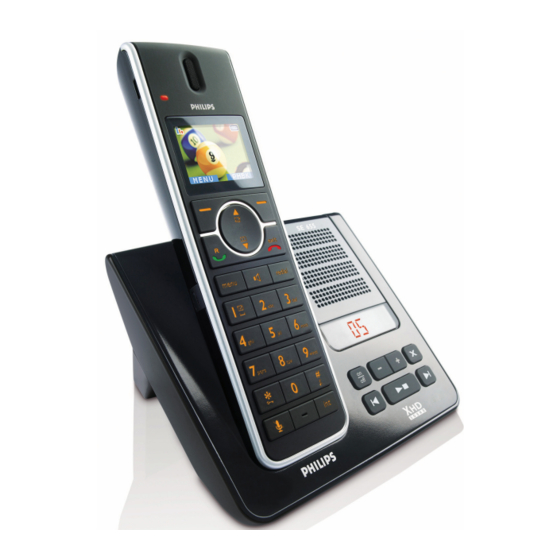
- Page 1 Register your product and get support at www.philips.com/welcome Telephone Answering Machine Warning Use only rechargeable batteries. Charge the handset for 24 hours before use. SE655...
-
Page 3: Table Of Contents
Table of contents Important Power requirements Conformity Using GAP standard compliance Recycling and disposal Electric, Magnetic and Electromagnetic Fields (“EMF”) Your phone What’s in the box Overview of your phone Display icons and Messages 11 Overview of the base station Getting started Connect the base station 14 Wall mounting the base... -
Page 4: Voice Mail
5.7.3 Save a redial number into the phonebook 5.7.4 Delete a redial number 5.7.5 Delete all redial numbers Call waiting Using the Call log 5.9.1 Access the Call log 5.9.2 Save call list entry into the phonebook 5.9.3 Delete a call list entry 5.9.4 Delete all call list entries 5.10... - Page 5 Call Forward when Unanswered 8.3.1 Change Call Forward when Unanswered Activation Codes 8.3.2 Change Call Forward when Unanswered Deactivation Code Voice Mail 8.4.1 Access Voice Mail 8.4.2 Set Voice Mail Number Voice Mail 2 Information Service 8.6.1 Access Info Service 8.6.2 Set Info Service Number Information Service 2...
- Page 6 Frequently asked questions 12.1 Connection 12.2 Set-up 12.3 Sound 12.4 Product behaviour INDEX Table of contents...
-
Page 7: Important
• Do not allow the charger to come into contact with liquids. • Never use any other battery than the one delivered with the product or recommended by Philips: risk of explosion. Important • Always use the cables provided with the product. -
Page 8: Conformity
158ºF). • Battery life may be shortened in low temperature conditions. Conformity We, Philips, declare that the product is in compliance with the essential requirements and other relevant provisions of Directive 1999/5/EC. This product can only be connected to the analogue telephone networks of the countries mentioned on the packaging. -
Page 9: Electric, Magnetic And
Philips plays an active role in the development of international EMF and safety standards, enabling Philips to anticipate further developments in standardisation for early... -
Page 10: Your Phone
Your phone Congratulations on your purchase and welcome to Philips! To fully benefit from the support that Philips offers, register your product at www.philips.com/welcome. What’s in the box Handset 2 AAA rechargeable batteries User manual Note * You may find in the box the line adaptor delivered separately from the line cable. In this case, you have to connect the line adaptor to the line cord first before plugging the line cord to the line socket. -
Page 11: Overview Of Your Phone
Overview of your phone Event LED The event LED on your handset blinks when there is a new message recorded on your telephone answering machine. If you have subscribed to Caller Line Identification, the event LED also blinks when there is a new call, a new SMS or a new voice mail message. - Page 12 When the handset is switched off: Long press (1 second) to switch it on. During a call: Hang up a call. In other modes: Press to return to idle mode. Menu key m In idle mode: Go to the main menu. Redial key r Access the Redial list in idle mode.
-
Page 13: Display Icons And Messages
Display icons and Messages Indicates that the battery is fully charged. This icon blinks during charge and when the battery is low. When the Icon is empty the battery is practically discharged. Note If Warning Batt flashes together with a blinking battery icon, batteries of the wrong type are installed in the handset. - Page 14 Back/ Back appears when in menu Clear mode. Press the key directly below to return to the previous menu level. Clear appears when making an entry. Press the key directly below to clear (delete) a character or number when making an entry. Long press to clear all.
-
Page 15: Overview Of The Base Station
Overview of the base station Paging key a Page handset. Long press to start registration procedure. Speaker Message counter Steady ON: shows the number of old messages. Blinking: Shows the number of new messages only. Two horizontal bars “--” blinking: Indicates that the answering machine memory is full. -
Page 16: Getting Started
Getting started Connect the base station Place the base station in a central location near the telephone line socket and electricity socket. Connect the line cord and the power cable to their corresponding connectors at the back of the base station. -
Page 17: Install Your Phone
bracket and ➁ rotating the bracket outward. Turn the bracket around. Attach the bracket to the opposite side of the base station. Insert screws (not included) into the wall. Align the mounting hole on the back of the base with the screws on the wall. -
Page 18: Charge Battery
Slide out the battery cover. Place the batteries in the correct polarity as indicated and replace the cover. 3.3.2 Charge battery Warning The handset must be charged for at least 24 hours before using it for the first time. When the battery level becomes low, the low battery sensor warns you by blinking the battery icon. -
Page 19: Using Multipacks
Set each digit of the date and time using the numeric keys. See section 5.12.1 - “Set Date and Time”. Note The date format and time format are initially determined by the country selection. Press o OK to confirm. • A validation tone is emitted. At the same time the handset switches to idle mode. -
Page 20: Menu Structure
Menu structure The SE655 has seven menus as shown in the following table. Menu Name Phonebook Personal Settings Clock and Alarm Advanced Settings Network Services Answer Machine Press the menu key m to enter menu mode. Use navigation keys n to navigate within the menus and all submenus. - Page 21 Personal Settings Personal Set Handset Name Handset Tones Language Wallpaper Color Theme Contrast Backlight Time Auto Hang-up Getting started Enter name Ring Volume No bar (off) One bar … Five bars Progressive Ring Tones Name of tones 1 … Name of tones 15 Key Beep List of languages Wallpaper 1...
- Page 22 Clock and Alarm Clock & Alarm Set Date/Time Set Format Alarm Alarm Tone Enter date & time Time Format 12 Hours 24 Hours Date Format DD/MM MM/DD On Once On Daily Melody 1 Melody 2 Melody 3 Getting started...
- Page 23 Advanced Settings Advanced Set Easy Call Conference Call Barring XHD Sound Change PIN Register Unregister Country Reset Auto Prefix Recall Time Dial Mode First Ring Getting started Mode Off (by default) Number Enter number Off (by default) Enter PIN Mode Number On (by default) List of countries...
- Page 24 Network Services Netw. Services Call Forward Call Fwd Busy Call Fwd Unans Voicemail Voicemail 2 Info Info 2 Call Return Cancel Call BK Withhold ID Activate Enter Number: Deactivate Change Code Activation Deactivation Activate Enter Number: Deactivate Change Code Activation Deactivation Activate Enter Number:...
- Page 25 Write SMS Inbox Drafts Settings Getting started Read Reply Forward Save Number Delete Delete all Read Send Edit Delete Delete all SMS Reception On (by default) Change Box Nr SMS Centre SMS Centre 1 SMS Centre 2 SMS Centre 3 Default Centre SMS Centre 1 SMS Centre 2...
-
Page 26: Answer Machine
Answer Machine Answer Machine Play Delete All Answer On/Off Record OGM Answer Mode Settings Repeat Next Previous Delete Answer & Rec. Play Record Message Delete Answer Only Play Record Message Delete Answer & Rec. Answer Only Ring Delay 3 Rings 4 Rings 5 Rings 6 Rings... -
Page 27: Using Your Phone
Using your phone Make a call 4.1.1 Predialling Enter the number. (A maximum of 24 digits including * and # are allowed. Press c Clear to delete the last digit.) Or long press to delete all. Press t. • The call is initiated. 4.1.2 Direct dialling Pick up the handset and press t. -
Page 28: Call Using Direct Access Memory
Press o Select. • The call is initiated. 4.1.7 Call using Direct Access Memory Press a number key 3 to 9 for more than 2 seconds to dial a stored direct access memory number. Note • In multihandset packs, each handset has its own direct access memories. -
Page 29: Use More Of Your Phone
Use more of your phone Switch the handset off/on To switch the handset off, press and hold h in idle mode for at least 5 seconds. To switch it on, press and hold h for at least one second. Keypad lock/unlock Press and hold * for 3 seconds to lock/ unlock the keypad in idle mode. -
Page 30: Activate/Deactivate
5.4.3 Activate/Deactivate loudspeaker mode Danger Handsfree activation can suddenly increase the volume in the earpiece to a very high level. Make sure the handset is not too close to your ear. During a call, press l to activate the loudspeaker mode. Press l again to deactivate the loudspeaker mode. -
Page 31: Modify A Phonebook Entry
Instead of scrolling n to browse the phonebook entries, you can press the numeric key corresponding to the first letter of the entry you wish to locate. For example, pressing 2 will show the entries starting with A. Pressing 2 again will show the entries starting with B, etc. -
Page 32: Delete A Phonebook Entry
5.6.5 Delete a phonebook entry Press m in idle mode. Phonebook is highlighted; press o Select. Scroll n to Delete and press o Select. Scroll n to select an entry to delete and press o Select. Delete? is displayed on the screen. Press o OK to confirm deletion. -
Page 33: Using The Redial List
5.6.7.2 Delete Direct Access Memory Press m in idle mode. Phonebook is highlighted; press o Select. Scroll n to Direct Memory and press o Select. Scroll n to the key you wish to delete the memory from and press o Menu. Scroll n to Delete and press o Select. -
Page 34: Delete A Redial Number
5.7.4 Delete a redial number Press r in idle mode, scroll n to select an entry and press o Menu. Scroll n to Delete and press o Select. Delete? is displayed on the screen. Press o OK to confirm deletion. •... -
Page 35: Save Call List Entry Into The
• Press t to dial out the number of the selected call log entry. To view the call details, press o Menu and then press o Select. The display shows the caller information. • Press c Back at any time to return to the previous menu. -
Page 36: Intercom Another Handset
5.10.1 Intercom another handset Note If the handset does not belong to SE650/ 655 range, this function may not be available. Press i in idle mode. • Intercom is established immediately if there are only 2 registered handsets. If there are more than 2 registered handsets, scroll n to select the handset to call and press o OK. -
Page 37: Paging
During the call, press i to put the external call on hold (the caller can no longer hear you). • The display shows the numbers of the handsets registered to the base. Scroll n to the number of the handset you wish to establish the conference call with and press o Select. -
Page 38: Set Alarm
Time Format is highlighted in the display. Press o Select, then scroll n to select 12hours or 24hours. Press o Select to select the option. • A validation tone is emitted and the screen returns to the Set Format menu. 5.12.2.2 Set Date Format Press m in idle mode, scroll n to Clock &... -
Page 39: Personal Settings
Change the Handset Name You can name the handset and display the handset name in idle mode. The default handset name of your handset is Philips. Press m in idle mode, scroll n to Personal Set and press o Select. -
Page 40: Activate/Deactivate Key Beep
6.2.3 Activate/Deactivate Key Beep A single beep tone is emitted when a key is pressed. You can enable or disable the key beep. Press m in idle mode, scroll n to Personal Set, and press o Select. Scroll n to Handset Tones and press o Select. -
Page 41: Set The Backlight Time
available on your handset. The default is level 3. Press m in idle mode, scroll n to Personal Set, and press o Select. Scroll n to Contrast and press o Select. Scroll n to the desired display contrast, and press o Select to confirm. -
Page 42: Set Easy Call Number
Mode is highlighted in the display. Press o Select again to select Mode, then scroll n to On. Press o Select to confirm the selection. • If an Easy Call number has not been set, you will be prompted to input the Easy Call number. •... -
Page 43: Set A Call Barring Number
Press m in idle mode, scroll n to Advanced Set and press o Select. Scroll n to Call Barring and press o Select. Enter the PIN number. • If you enter and incorrect PIN number, an error tone will sound and “Wrong PIN!”... -
Page 44: Registration
easy access to them. Do not lose the PIN code. Press m in idle mode, scroll n to Advanced Set and press o Select. Scroll n to Change PIN and press o Select. Old PIN: will be displayed. Enter the current PIN and press o OK. •... -
Page 45: Easy Registration
7.6.1 Easy registration Insert the unregistered handset in the base station to automatically begin registration. Registering… is displayed on the screen. • Upon successful registration, a validation tone is emitted and the handset number (1 to 5) will be assigned by the base automatically. -
Page 46: Set Auto Prefix
Press m in idle mode, scroll n to Advanced Set and press o Select. Scroll n to Reset and press o Select. Reset? is displayed on the screen. Press o OK to confirm. • A validation tone is emitted. • The unit is reset to its default settings. -
Page 47: Change The Dial Mode (Country-Dependent)
Ring Volume Level 3 Ring Tone Ring 1 Earpiece Level 3 Volume Speaker Level 3 Volume Key Beep Display Country group Language dependent Wallpaper Wallpaper 1 Color Color 1 Theme Display Level 3 Contrast Backlight 20 Seconds Time Auto Hang- Handset Philips Name... -
Page 48: Network Services
Parameter Default Value Time/Date Country dependent Format Time/Date 00:00 01/01/2008 Set Alarm Alarm Tone Bell 2 Dial Mode Country group dependent Recall Time Country group dependent PIN Code 0000 Call Barring Call Barring Cleared Number XHD Sound Easy Call Easy Call Cleared Number Auto Prefix... -
Page 49: Change Call Forward Activation Codes
Forward, scroll to Deactivate and press o Select. If you selected Activate, you will be prompted to enter the number for call forward. Enter the number (maximum 24 digits) and press o The Call forward codes and the number are dialed. Press h and return to idle mode. -
Page 50: Change Call Forward When Busy Activation Codes
Scroll n to Call Fwd Busy and press o Select. To activate Call Fwd Busy, scroll n to Activate and press o Select. To deactivate Call Fwd Busy, scroll to Deactivate and press o Select. If you selected Activate, you will be prompted to enter the number for call forward when busy. -
Page 51: Unanswered Activation
or deactivate Call Forward when Unanswered as follows: Press m in idle mode, scroll n to Netw. Services, and press o Select. Scroll n to Call Fwd Unans and press o Select. To activate Call Fwd Unans, scroll n to Activate and press o Select. -
Page 52: Voice Mail
Note Press c Clear to delete entered numbers. Long press c Clear to clear the entire entry. Voice Mail Use this function to access your voice mail account. 8.4.1 Access Voice Mail Press m in idle mode, scroll n to Netw. -
Page 53: Call Return
Information Service 2 Use this function to access a second information service account. Access and setting procedure is same as for Info Service. Call Return This function allows you to get information on who called you last. 8.8.1 Access the Call Return Service Press m in idle mode, scroll n to Netw. -
Page 54: Withhold Id
Press m in idle mode, scroll n to Netw. Services, and press o Select. Scroll n to Cancel Call BK and press o Select. Scroll n to Settings and press o Select. Enter the cancel call back number (maximum 14 digits) and press o •... -
Page 55: Write And Send An Sms
Note See 5.3 text or number entry for characters usable with Short Message Service. Write and Send an SMS Press m in idle mode, scroll n to SMS, and press o Select. Write SMS will be selected in the display. Press o Select. The Write SMS screen will display. -
Page 56: Read Sms Messages (Check Inbox)
9.2.1 Read SMS Messages (Check Inbox) Press m in idle mode, scroll n to SMS, and press o Select. Scroll n to Inbox and press o Select to open the SMS inbox. Scroll n to scroll through the messages. • If a message is from the number of someone in your phonebook, the phonebook information will be displayed. -
Page 57: Delete An Sms Message
9.2.5 Delete an SMS Message Open an SMS message. (See 9.2.1 above.) Press o Option to open the inbox submenu, then scroll n to Delete and press o Select. Delete? is displayed. Press o OK to delete the message. (Press c Back to return to the SMS submenu.) •... -
Page 58: Delete A Draft
Press o Option to open the drafts submenu, then scroll n to Edit and press o Select. The Write SMS screen will display with the draft message ready to edit. When you are finished editing the message press o OK. The procedure then is similar to the normal procedure for sending an SMS message. -
Page 59: Sms Centre
• A confirmation tone will sound and the display will return to the SMS Settings menu. 9.4.2 SMS Centre Use this menu to set the incoming and outgoing numbers for up to three SMS centres. Press m in idle mode, scroll n to SMS, and press o Select. -
Page 60: Playing Messages
procedures are covered below. There is also a menu to set the answering machine options. The telephone answering machine is ON by default. To switch the answering machine between on and off, press e on your base station. Alternatively, you may switch the answering machine on and off via your handset (see section 10.6.2). -
Page 61: Turn The Answering Machine On/Off
seconds, and the display returns to the Answer Machine menu. 10.3 Turn the Answering Machine On/Off You can turn the answering machine on or off from the handset as follows. Press the m key in idle mode, scroll n to Answer Machine, and press o Select. -
Page 62: Answering Machine Settings
You can set the answering machine to play a personalized outgoing message. See 10.4 above. 10.6 Answering Machine Settings 10.6.1 Ring Delay This is the number of rings before the answering machine answers and starts playing your greeting message. You can set the answering machine to start playing your greeting message after 3 to 8 rings or the “Economy”... -
Page 63: Handset Screening
10.6.2.2 Controlling the Answering Machine from an external call From your external phone, dial home. • The answering machine answers and starts playing your greeting message. Press # key and enter the remote access code (same as your PIN code). •... -
Page 64: Technical Data
(-4 to 158ºF). Relative humidity • Operation: Up to 95% at 40°C • Storage: Up to 95% at 40°C 12 Frequently asked questions www.philips.com/support In this chapter, you will find the most frequently asked questions and answers about your phone. -
Page 65: Connection
12.1 Connection The handset does not switch on! • Charge the batteries: Put the handset on the base station to charge. After a few moments, the phone will switch • You may have accidentally switched off the handset. In this case, press and hold h for at least 1 second to switch it on again (see section 5.1 - “Switch the handset off/on”). -
Page 66: Product Behaviour
12.4 Product behaviour Keypad does not work! • Unlock your keypad: Long press * in idle mode. The handset warms up when making a long call and when it is on the base station! • This is a normal behavior. The handset consumes energy while calling and charging. - Page 67 Unable to perform remote operation • Make sure the remote access is on (see Section 10.6.2). • Make sure you entered the correct remote access code. • Use a touch-tone phone. Note If the above solutions do not help, remove the power from both the handset and the base.
-
Page 68: Index
13 INDEX Access Info Service 50 Access phonebook 28 Access Redial list 31 Access the Call log 32 Access the Call Return Service 51 Activate/Deactivate loudspeaker mode 28 Activate/Deactivate Remote Access 60 Activating Withhold ID 52 Adjust earpiece or speaker volume 27 Advanced settings 39 Advanced Settings menu tree 21 Answer a call 26... - Page 69 Delete a call list entry 33 Delete a Draft 56 Delete a phonebook entry 30 Delete a redial number 32 Delete all call list entries 33 Delete all Drafts 56 Delete all messages 58 Delete all phonebook entries 30 Delete all redial numbers 32 Delete all SMS Messages 55 Delete an SMS Message 55 Delete Direct Access Memory 31...
- Page 70 Read SMS Messages 54 Recall time 44 Registration 42 Remote Access 60 Reply to an SMS Message 54 Reset Unit 43 Ring Delay 60 Ring tones 37 Ring Volume 37 Save a redial number 31 Save call list entry 33 Save the Number of an SMS Message 54 Select phonebook melody 29 Select the Color Theme 38...
- Page 71 What’s in the box 8 Withhold ID 52 Write and Send an SMS 53 XHD Sound 41 Your phone 8 UCZZ01937AZ(1) INDEX...
- Page 72 ©2008 Koninklijke Philips Electronics N.V. All rights reserved Reproduction in whole or in part is prohibited without the written consent of the copyright owner Document order number: 3111 285 47011 (GB)