Table of Contents
Advertisement
Quick Links
Advertisement
Table of Contents
Troubleshooting

Related Manuals for natus Xltek Trex HD


Summary of Contents for natus Xltek Trex HD
- Page 1 ® Xltek Trex HD User & Service Manual...
- Page 2 This copy of the User Manual shall be used only in accordance with the conditions of sale of Natus Medical Incorporated or its distributors. Natus Medical Incorporated makes no representations or warranties of any kind whatsoever with respect to this document.
-
Page 3: Table Of Contents
ROCEDURES AND ARNINGS 4.2..............24 ONDUCTED MMUNITY ROCEDURES AND ARNINGS DESCRIPTION OF SYMBOLS ...................... 25 XLTEK TREX HD SPECIFICATIONS ................... 27 PRODUCT IMAGES ........................29 7.1. HD (F ) ....................... 29 RONT 7.2. HD (R ) ......................... 30 UNPACKING ..........................31... - Page 4 User & Service Manual Xltek® Trex HD Amplifier 8.1. HD P ......................31 ACKAGE TEMS 8.2....................... 32 PTIONAL CCESSORIES SETTING UP ..........................33 9.1........................33 ETTING TARTED 9.1.1................ 33 LACEMENT OF THE PERATOR AND ATIENT 9.1.2......................33 EGINNING A STUDY 9.1.3.
- Page 5 Xltek® Trex HD Amplifier User & Service Manual 11.7........................48 ISPLAYED ANGES GUARANTEEING SUFFICIENT BATTERY POWER ..............49 12.1. AA B ) ................49 ATTERY OWER WITH ATTERIES ONLY 12.2. AA B ............50 ATTERY OWER WITH ATTERIES AND OWER EXTERNAL POWER PACK ......................
-
Page 6: Introduction
Trex HD amplifier, with its leading-edge mechanical design, provides you with maximum reliability and performance for clinical electroencephalographic (EEG) and polysomnographic (PSG) ® recordings. It is designed to be used with Natus SleepWorks™ or NeuroWorks software to assist with diagnosis. -
Page 7: Essential Performance
NOTE: In addition to reading this manual, we encourage you to explore the online Help of the software to enable you to take advantage of everything that Natus has designed the Trex HD amplifier to do. More detailed instructions relating to the operation and customization of the system are provided in the online Help. - Page 8 User & Service Manual Xltek® Trex HD Amplifier Symbol/ Description/Function Convention Names of control keys, function keys, options, and labels are shown in bold. Bold Bold text is also used to emphasize important names or ideas. Italic Italic text is used for captions.
-
Page 9: Safety And Standards Conformity
Xltek® Trex HD Amplifier User & Service Manual Safety and Standards Conformity 2.1. Safety and Standards Conformity for XLTEK Trex HD 2.1.1. Standards of Compliance and Normative References Electroencephalograph system, model Trex HD; rated two AA 1.5 V batteries, 0.065 A, 0.170 W. - Page 10 User & Service Manual Xltek® Trex HD Amplifier Medical electrical equipment – Part 1: General CAN /CSA-C22.2 No. 60601-1: 08(R2013) + C2:2011 requirements for basic safety and essential performance ANSI/AAMI ES60601-1:2005/(R)2012 + C1:2009/(R)2012 and A2:2010/(R)2012 IEC 60601-1:2005 + C1:2006 and C2:2007, Third Edition CENELEC EN 60601-1:2006 + A1:2013 Medical electrical equipment –...
-
Page 11: Declaration Of Compliance For Iec 60601-1-2
Xltek® Trex HD Amplifier User & Service Manual Harmonic Current Emissions IEC 61000-3-3:2013, ed 3.0 Electromagnetic Compatibility (EMC) Part 3-3: Limits - Limitation of Voltage Changes, Voltage Fluctuations and Flicker in Public Low-voltage Supply Systems CISPR 11 ed 5.0 with A1:2010 Industrial, Scientific and Medical (ISM) Radio-Frequency Equipment - Electromagnetic Disturbance Characteristics - Limits and Methods of Measurement... - Page 12 User & Service Manual Xltek® Trex HD Amplifier Table 2 - Electromagnetic Immunity Guidance and Manufacturer’s Declaration – Electromagnetic Immunity The Trex HD is intended for use in the electromagnetic environment specified below. The customer or the user of the Trex HD should assure that it is used in such an environment. Immunity Test IEC 60601 Compliance...
- Page 13 Xltek® Trex HD Amplifier User & Service Manual Table 3 - Electromagnetic Immunity – for EQUIPMENT and SYSTEMS that are not LIFE- SUPPORTING Guidance and Manufacturer’s Declaration – Electromagnetic Immunity The Trex HD is intended for use in the electromagnetic environment specified below. The customer or the user of the Trex HD should assure that it is used in such an environment.
- Page 14 User & Service Manual Xltek® Trex HD Amplifier GMRS 460, 430 – 470 ± 5 kHz deviation FRS 460 1 kHz sine Pulse 704 – 787 LTE Band 13, 17 modulation 217 Hz GSM 800/900, Pulse TETRA 800, iDEN 800 – 960 modulation 820, CDMA 18 Hz...
-
Page 15: Electromagnetic Immunity (Emi) Information - Fcc
Connect the equipment into an outlet on a circuit different from that to which the receiver is connected. Consult the dealer or an experienced radio/TV technician for help. Changes or modifications not expressly approved by Natus may void the user’s WARNING: authority to operate the equipment. -
Page 16: Warnings And Cautions
10 minutes in duration. Natus systems are not AP or APG rated. DO NOT USE an Natus system in the presence of a flammable anesthetic mixture with air, oxygen, or nitrous oxide. - Page 17 The Trex HD needs special precautions regarding Electromagnetic Compatibility (EMC) and must be installed and operated according to EMC guidelines (see Section 2.1.2). Using the Trex HD with cables and accessories not approved by Natus may negatively affect EMC performance, including electromagnetic immunity (see Section 2.1.3).
-
Page 18: Electrical Warnings And Cautions
User & Service Manual Xltek® Trex HD Amplifier 3.2. Electrical Warnings and Cautions XLTEK systems are intended for connection to a properly grounded electrical outlet only. Conductive parts of electrodes and their connectors are not to contact other conductive parts including earth. -
Page 19: Wireless Option Warnings And Cautions
Xltek® Trex HD Amplifier User & Service Manual 3.3. Wireless Option Warnings and Cautions The wireless feature of the Trex HD presents a synchronization of the EEG signal with the video recording. This feature is not a substitute for other means of patient monitoring and supervision. -
Page 20: Pulse Oximeter Warnings
User & Service Manual Xltek® Trex HD Amplifier Connecting other medical equipment, such as an electrical stimulator, simultaneously to the same patient may constitute a safety hazard. Do NOT touch any Trex HD system accessible metal parts and the patient simultaneously. If a computer is located in the patient environment, it must be 60601-1 approved or 60950-1 approved and powered by a 60601-1 approved isolation transformer. - Page 21 Xltek® Trex HD Amplifier User & Service Manual A pulse oximeter should be considered an early warning device. As a trend towards patient deoxygenation is indicated, blood samples should be analyzed by a laboratory co-oximeter to completely understand the patient’s condition. Significant levels of dysfunctional hemoglobins (HbCO or MetHb) may cause inaccurate measurements.
-
Page 22: Pulse Oximeter Sensor Warnings
User & Service Manual Xltek® Trex HD Amplifier Inspection of monitors, cables, and probes should be completed prior to each use to ensure compatibility and maintain patient safety. The Trex HD amplifier system does NOT include SpO or Pulse Rate alarms. 3.6. -
Page 23: Transportation Warnings
Make sure that any platform, table, cart, or other surface used during the operation, transport, or temporary or permanent storage of the system and its components is adequate, sturdy, and safe. Natus is not responsible for any injury or damage that may result from inadequate, poorly constructed, or unapproved transports, carts, or operating surfaces. -
Page 24: Procedures And Warnings
User & Service Manual XLTEK Trex HD Amplifier Procedures and Warnings 4.1. Electrostatic Discharge (ESD) Handling Procedures and Warnings Before performing any setup or placement procedures, read the precautions outlined in this section. WARNING: Be sure to take the appropriate Electrostatic Discharge (ESD) precautions. -
Page 25: Conducted Immunity Procedures And Warnings
Xltek® Trex HD Amplifier User & Service Manual 4.2. Conducted Immunity Procedures and Warnings Conducted immunity is defined as the ability of an electronic product to tolerate the influence of electrical energy from other electronic products or electromagnetic phenomena. The electrical energy from other electronic devices located in nearby equipment are usually propagated through the connecting cables. -
Page 26: Description Of Symbols
User & Service Manual XLTEK Trex HD Amplifier Description of Symbols Symbol Description ATTENTION: Consult Accompanying Documents Consult Accompanying Documents Consult Operating Instructions Protective Earth (Ground) Type BF Equipment Dangerous Voltage Alternating Current Direct Current Power On Power Off EU only: Do Not Dispose as Unsorted Municipal Waste... - Page 27 Xltek® Trex HD Amplifier User & Service Manual Symbol Description Class II Equipment (non-grounded enclosure) ESD Sensitive Static Sensitive RF Equipment for Non-ionizing Radiation Wireless Bluetooth Identification USB Connection Nonin Pulse Oximeter Sensor SpO2 Connector - Not for Continuous Monitoring (no alarm for SpO2) Non-Waterproof Device Manufacturer Information Made in Canada...
-
Page 28: Xltek Trex Hd Specifications
User & Service Manual XLTEK Trex HD Amplifier XLTEK Trex HD Specifications Specification Value(s) Patient Electrical Connections 24 Referential Inputs (+ ground, + reference) ± 10 mV Resolution 16 bit A/D 4 Differential Inputs ± 10 mV Resolution 16 bit A/D... - Page 29 Xltek® Trex HD Amplifier User & Service Manual Specification Value(s) Operating Parameters Operating Environmental Limits Temperature: 5°C to 40°C Humidity: 15% to 93% Atmospheric Pressure: 700 hPa to1060 hPa Transport and Storage Temperature Range - 40°C to 70°C Transport and Storage Humidity Range 10% to 100%, including condensation Transport and Storage Atmospheric Pressure 500 hPa to 1060 hPa...
-
Page 30: Product Images
User & Service Manual XLTEK Trex HD Amplifier Product Images 7.1. Trex HD (Front View) Trex HD Amplifier Power LED Status LED Oximeter / Photic Connection Reference Input (forward) Common Input (rear) 24 Referential Inputs (two rows) Patient Event Switch Connection... -
Page 31: Trex Hd (Rear View)
Xltek® Trex HD Amplifier User & Service Manual 7.2. Trex HD (Rear View) NOTE: Dispose of used, non-rechargeable batteries in accordance with local regulations. -
Page 32: Unpacking
User & Service Manual XLTEK Trex HD Amplifier Unpacking The following applies to both Trex HD standard amplifier packages but the Trex HD EEG and Sleep labels state “Trex HD” and “Trex HD Sleep”, respectively. 8.1. Trex HD Package Items The Trex HD amplifier package includes the following items: ... -
Page 33: Optional Accessories
Nonin Xpod® Oximeter Natus Photic Stimulator Trex HD Cable for Natus Photic Stimulator (2.4 m / 7.9 ft) NOTE: The Trex HD amplifier should only be used with cables, transducers, electrodes, sensor, and switches that are supplied or approved by Natus. -
Page 34: Setting Up
User & Service Manual XLTEK Trex HD Amplifier Setting Up The Trex HD is designed to work with an Natus computer system running Natus Database (XLDB) and NeuroWorks or SleepWorks software. 9.1. Getting Started NOTE: In the event of a power failure, the current recording will resume using the last programmed settings upon the restoration of power. -
Page 35: Powering Down The System
Xltek® Trex HD Amplifier User & Service Manual 9.1.3. Powering Down the System Utilize the following steps to ensure your system is powered down completely and safely. 1. Close any active studies in the NeuroWorks software. 2. Shut the computer down; ensuring to follow the proper shut down procedure. 3. -
Page 36: Lanyard Setup
User & Service Manual XLTEK Trex HD Amplifier 9.2.2. Lanyard Setup To use the lanyard setup: 1. Attach the lanyard to the two (2) rings on the back of the pouch. 2. After attaching the electrodes to the patient, place the Trex HD into the pouch with the electrode wires exiting at the top or on the sides, as required. -
Page 37: Setting Up Trex Hd Amplifier For An Ambulatory Video Study
9.4. Setting up Trex HD Amplifier for an Ambulatory Video Study 1. Connect the Trex HD and camcorder to the acquisition computer using the supplied (or Natus approved) cables. Use the supplied USB to mini-USB cable to connect the camcorder to the... -
Page 38: Setting Up Camcorder And Trex Hd Video Interface (Tvi)
This video functionality is available only with the Trex HD. The Trex HD contains a Bluetooth module which communicates wirelessly with the Trex HD Video Interface (TVI) attached to the camcorder. NOTE: Only use the camcorder model and accessories supplied or approved by Natus. - Page 39 Xltek® Trex HD Amplifier User & Service Manual 9.4.1.1. Trex HD Video Adaptor LED color functionality: Green indicates that the TVI is powered on. Periodically flashing blue light flashes indicates the TVI is ‘paired’ with a nearby Trex HD amplifier.
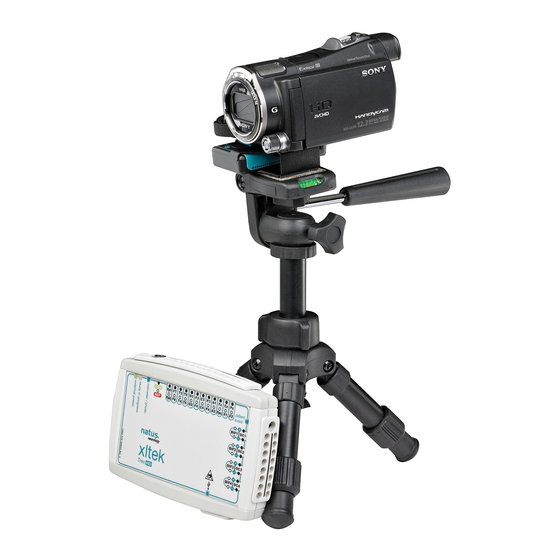
- Page 40 User & Service Manual XLTEK Trex HD Amplifier 1.1.1.1.2 Tripod and Clamp Mounting Overview Clamp Configuration Tripod Configuration Camcorder Mounting IR Illuminator Camcorder Trex HD Video Interface Camera Ball Pivot Mounting Clamp Stud Mounting Clamp Mounting Clamp Wedge Tripod NOTE: Refer to manufacturer instructions for operation and installation of components A, B,...
-
Page 41: Testing The Trex Hd Amplifier
Xltek® Trex HD Amplifier User & Service Manual 9.4.1.3. Trex HD Video Interface Mounting The TVI may remain secured to the camcorder as it is moved from the carry case to the tripod or clamp. 1. Orient the TVI such that the LEDs are to the rear of the camcorder. 2. -
Page 42: Calibration And Verification
To verify that the Trex HD amplifier is correctly calibrated, perform the following procedure: 1. Connect the Trex HD to a Natus computer and turn on the system. 2. Start Natus Database (XLDB). 3. To start a new study, click New EEG or Sleep. -
Page 43: Impedance Check
Xltek® Trex HD Amplifier User & Service Manual Channel Test Signal Toolbar 9.5.3. Impedance Check An impedance check is performed to ensure that the electrode contact with the patient is satisfactory. You can perform an impedance check at any time during a study. To Run an Impedance Check from the Software When an impedance check is initiated, the software scans all channels (in auto scan mode). -
Page 44: Transport System Specifications And Maintenance
Refer to the corresponding Instructions for Use for all system components prior to use. This should include, but is not limited to: cameras, computers, stimulators, and software. NOTE: Transportation System setup and installation should be performed by Natus qualified personnel only. -
Page 45: Ergojust Cart Specifications
Make sure that any platform, table, cart, or other surface used during the operation, transport, or temporary or permanent storage of the system and its components is adequate, sturdy, and safe. Natus is not responsible for any injury or damage that may result from inadequate, poorly constructed, or unapproved transports, carts, or operating surfaces. -
Page 46: Nonin Xpod Pulse Oximeter
User & Service Manual XLTEK Trex HD Amplifier 11. Nonin Xpod Pulse Oximeter NOTE: Refer to the Instructions for Use for any pulse oximeter, sensor, or cable extender prior to use. The following topic lists the specifications for the Nonin Xpod board that is built into the Trex HD Amplifier. -
Page 47: Accessories
Xltek® Trex HD Amplifier User & Service Manual 2. Pulse rate Event, notes the time of the event and is recorded 3. “Channel Off” indication 4. Low Quality 5. “-----” indication if the probe is misaligned or is not receiving a signal. 11.5. -
Page 48: Measurements
User & Service Manual XLTEK Trex HD Amplifier Model Number Description 8000SL-3 Sensor, Reusable, Soft, Large, 1 m (3 ft) cable 7000A Flexi-Form® III Adult, 1 m (3 ft) cable, 24-pack 7000P 7000I Flexi-Form III Infant, 1 m (3 ft) cable, 24-pack... -
Page 49: Displayed Ranges
Xltek® Trex HD Amplifier User & Service Manual anemia or low hemoglobin concentrations cardiogreen or other intravascular dyes carboxyhemoglobin methemoglobin dysfunctional hemoglobin artificial nails or fingernail polish a sensor not at heart level 11.7. -
Page 50: Guaranteeing Sufficient Battery Power
User & Service Manual XLTEK Trex HD Amplifier 12. Guaranteeing Sufficient Battery Power 12.1. Battery Power with AA Batteries (only) The Trex HD is powered by two AA alkaline batteries for ambulatory recordings. An optional power pack is available to extend recording time without the need to replace batteries. For more information, see Battery Power with AA Batteries and Power Pack. -
Page 51: Battery Power With Aa Batteries And Power Pack
12.2. Battery Power with AA Batteries and Power Pack Natus offers a power pack (p/n 019822) to extend the recording time of the Trex HD to up to 72 hours without requiring replacement of the internal AA batteries. The power pack kit includes a power pack (p/n 018795), a power supply (p/n 019755), and a Trex HD cable (p/n 018727). -
Page 52: External Power Pack
User & Service Manual XLTEK Trex HD Amplifier 13. External Power Pack 13.1. Power Pack Symbols Symbol Description Power Pack is charging Power Pack charge status. This mark along with the 4 LEDs to the left of the Refresh Push Button will show state of charge of the battery. -
Page 53: External Power Pack Warnings And Cautions
Xltek® Trex HD Amplifier User & Service Manual 13.3. External Power Pack Warnings and Cautions Charge battery only in clean, well-ventilated, non-hazardous locations. For infrequently used batteries, or batteries for long-term storage (longer than 3 months), the recommended method of storage is to leave the battery connected to the power supply. If stored disconnected from the power supply, charge the battery to approximately 40% charge prior to storing and recharge annually if not used sooner. -
Page 54: Using The External Power Pack Kit
User & Service Manual XLTEK Trex HD Amplifier 13.4. Using the External Power Pack Kit The Trex HD external battery pack is connected to the Trex HD via the mini-USB input. When the external battery pack is providing power to the Trex HD, the green external power LED light remains on. -
Page 55: External Power Pack And Charging Details
Xltek® Trex HD Amplifier User & Service Manual 13.5. External Power Pack and Charging Details The Li-Ion battery provides approximately 500 charge/discharge cycles over the course of a two-year expected life. The life of the power pack will be significantly reduced if exposed to excessively high/low temperatures. -
Page 56: Charging The External Power Pack
User & Service Manual XLTEK Trex HD Amplifier 13.6. Charging the External Power Pack To charge the power pack: 1. Inspect the power pack. If there are any cracks or damage do not charge the power pack. Properly dispose of the power pack and replace. -
Page 57: Troubleshooting The External Power Pack
Xltek® Trex HD Amplifier User & Service Manual 13.9. Troubleshooting the External Power Pack Use the table below to help identify possible causes and corrective actions for problems you may experience. Problem Probable Cause Corrective Action AC power cord is not connected Check all power supply to a wall outlet. -
Page 58: How To Disable Channels And Set Frequency
User & Service Manual XLTEK Trex HD Amplifier 14. How to Disable Channels and Set Frequency In NeuroWorks or SleepWorks, choose Edit > Settings > Acquisition. Select Trex Ambulatory in the first drop-down box. In the Channel Status section, select Set manually. -
Page 59: Maintenance, Cleaning, & Disposal
For servicing problems that require corrective maintenance and/or internal component service, call Technical Support at 1-800-303-0306, or contact your local Natus representative. Periodically check cable connections and electrodes for damage and wear. Inspect cables for bent pins. -
Page 60: Disposal
At the end of the expected service life, when disposing of the Trex HD amplifier and its components, it is recommended that federal, state, and local laws be followed for proper disposal of printed circuit boards, plastics, and metal parts. For disposal of non-Natus accessories, please follow the instructions provided with these items. -
Page 61: Troubleshooting
Xltek® Trex HD Amplifier User & Service Manual 16. Troubleshooting If you are experiencing problems, try the solutions listed below. Troubleshooting Checklist Ask the patient to relax. Inspect your cables. Make sure there is a tight connection between the Trex HD and the computer. Make sure the patient electrodes are connected to the correct channel in the amplifier. -
Page 62: Getting Help
XLTEK Trex HD Amplifier 17. Getting Help Natus is committed to providing you with support so you can operate the Trex HD amplifier with ease and confidence. If you need help, follow these steps to find a solution: Step 1: Document the Incident Carefully document the incident. -
Page 63: Eeg And Sleep Accessories
Xltek® Trex HD Amplifier User & Service Manual 18. EEG and Sleep Accessories The following are compatible accessories: Part Number Description 008043 Trex HD Headbox 021995 Trex HD Pouch W8190X MINI USB CABLE 1.8 m 007994 TrexHD Carry Case 019822 External Power Pack Kit 011606 Ambulatory Video Upgrade Kit for Trex HD... - Page 64 Sensor, Durafoam Disposable, Small, 1 m (3 ft) cable EEG and Sleep accessories which can be used with the Trex HD amplifier are available for you to browse the Natus Neurology Catalog online at www.natus.com or call Natus Sales and Support at 1-800-303- 0306.
-
Page 65: Index
Xltek® Trex HD Amplifier User & Service Manual 19. Index Warnings and Cautions ..........21 Connect Trex HD to Computer ......... 35 Accessories ............... 60 Optional ................ 31 Ambulatory Study Setup ........... 35 Disable Channels .............. 55 Disconnecting External Power Pack ............ 53 Power Pack .............. - Page 66 User & Service Manual XLTEK Trex HD Amplifier Nonin Accessories .............. 44 Impedance Check .............. 41 Cables ..............44 Intended use ............... 5 Oximetry Sensors ..........45 Isolation Transformer ............43 Indications for Use ........... 44 Measurements ............46 Sensor Warnings and Cautions ..........
- Page 67 Xltek® Trex HD Amplifier User & Service Manual Safety Standard of Compliance and Normative ..... 7 Testing Unpacking................. 30 Calibration ..............40 Channel Test ..............40 External Power Pack ............ 51 Impedance Check ............41 Power Pack ..............51 Trex HD Amplifier ............39 Using the Manual ...............
- Page 68 A Total Service Solution Standing behind every XLTEK product is Natus Medical Incorporated, an internationally respected innovator of medical products and services. Our Neurology systems are backed up by an in-house support team staffed with technical and clinical experts, 24/7 support, remote support via WebEx or VPN, the largest clinical and technical field support network in Neuro/Sleep and customized service contracts that include preventative maintenance visits and computer upgrades.