
Related Manuals for laguna Fusion 2


Summary of Contents for laguna Fusion 2
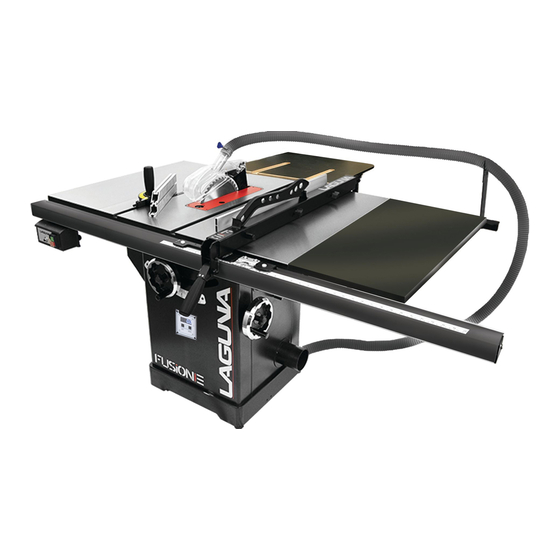
- Page 1 SET UP AND MAINTENANCE MANUAL Fusion Tablesaws Laguna Tools UK www.lagunatools.uk Tel +44 (0) 1530 516921 sales@lagunatools.uk...
-
Page 2: Dear Woodworker
Dear Woodworker Thank you for your purchase and welcome to the Laguna Tools group of discerning woodworkers. We understand that you have a choice of where to purchase your machines and appreciate the confidence you have in the Laguna Tools brand. -
Page 3: Table Of Contents
Fusion Tablesaw Table of Contents Dear Woodworker ......................................... 2 Fusion 3 Tablesaw Specifications ....................................4 Fusion 2 Tablesaw Specifications ....................................6 General Safety ..........................................8 Tool Overview ..........................................15 Controls........................................... 15 Setup ............................................16 Receiving and Unpacking ....................................... 16 Inventory ..........................................16 Loose Parts &... -
Page 4: Fusion 3 Tablesaw Specifications
Sliding Cam Action Fully Adjustable Fence Face Dimensions (LxWxth.) 670 x 80 x 17 mm Throat Plate Type Professional Square Zero Clearance Throat Plate Dimensions (LxWxth.) 372 x 104.5 x 13 mm Floor to Table Height 887 mm © 09/2019, Laguna Tools, Inc. - Page 5 Height adjustment moves straight up easily with mechanical assist. Arbor tilt is now on 2:1 ratio gear box. The new Laguna Arbor is Sturdy and built to last. Perfectly flat and precision ground mirror finished tabletop. Designed for industrial use.
-
Page 6: Fusion 2 Tablesaw Specifications
Fusion Tablesaw Fusion Tablesaw Fusion 2 Tablesaw Specifications Advertised Name Fusion 2 Table saw Stock Model CEF236230175 Professional Square Zero Clearance Throat Plate (pre-installed) 10" 40T Blade (pre-installed) Riving Knife (pre-installed) Mitre Gauge (ships in tool holder) Tool Holder (pre-installed) - Page 7 Newly designed precision arbor mounted directly to cabinet top. Height adjustment moves straight up easily with mechanical assist. Arbor tilt is now on 2:1 ratio gear box. The new Laguna Arbor is Sturdy and built to last. Perfectly flat and precision ground mirror finished tabletop.
-
Page 8: General Safety
Fusion Tablesaw General Safety warning: Read all safety considerations. Failure to follow this set of guidelines can result in unwarranted damage to the machine and serious injury to the operator and bystanders. Save all warnings and instructions for future reference. Intended Use Table saw and the workpiece guide equipment supplied with it are intended to be used exclusively for the following purposes: ●... - Page 9 Fusion Tablesaw BATTERY PACK, PICKING UP OR CARRYING THE TOOL. Carrying power tools with your finger on the switch or energizing power tools that have the switch on invites accidents. REMOVE ANY ADJUSTING KEY OR WRENCH BEFORE TURNING THE POWER TOOL ON. A wrench or a key left attached to a rotating part of the power tool may result in personal injury.
- Page 10 Fusion Tablesaw STORE IDLE POWER TOOLS OUT OF THE REACH OF CHILDREN AND DO NOT ALLOW PERSONS UNFAMILIAR WITH THE POWER TOOL OR THESE INSTRUCTIONS TO OPERATE THE POWER TOOL. Power tools are dangerous in the hands of untrained users. ...
- Page 11 Fusion Tablesaw Guarding related warnings DANGER: NEVER PLACE YOUR FINGERS OR HANDS IN THE VICINITY OR IN LINE WITH THE SAW BLADE. A moment of inattention or a slip could direct your hand towards the saw blade and result in serious personal injury. ...
- Page 12 Fusion Tablesaw Large panels tend to sag under their own weight. Support(s) must be placed under all portions of the panel overhanging the table top. USE EXTRA CAUTION WHEN CUTTING A WORKPIECE THAT IS TWISTED, KNOTTED, WARPED OR DOES NOT HAVE A STRAIGHT EDGE TO GUIDE IT WITH A MITRE GAUGE OR ALONG THE FENCE.
- Page 13 Fusion Tablesaw REQUIREMENTS OF ELECTRICAL POWER Motor List of the motor using & pre-wired voltage Item 1.75HP 1.5HP 1300KW 2200KW 1100KW Voltage(V) 230V The input power supply of the machine is AC230V+PE. The steady-state AC power supply is 0.9 Phase ~1.1 times of the rated value.
- Page 14 A notice about safety and Tool Use The tools sold by Laguna Tools are safe when used properly, described by The American National Safety Institute, the EN Standards of safe tool use, and the IEC standards of safe tool use. Laguna Tools is in no way responsible for injury or death that occurs while using this product. YOUR PERSONAL SAFTEY IS 100% YOUR RESPONSIBILITY AND USING THIS PRODUCT REQUIRES 100% OF YOUR ATTENTION.
-
Page 15: Tool Overview
Tool Overview Your new Laguna Tools machine is comprised of different components to make a long lasting and precise piece of machinery that will help you with your next project. Understanding your new machine and its components will make you a better craftsman. -
Page 16: Setup
To avoid set-up problems, to prevent potential damage Use Caution: Your new Laguna Tools machine is heavy. Use a to the machine and personal injury, read through the entire setup minimum of two people when lifting the tool into position and moving section prior to setting up the machine. -
Page 17: Loose Parts & Overview
Fusion Tablesaw Loose Parts & Overview Your new machine has been mostly assembled at the certified ISO 91001 factory where it was made. Some parts must be assembled by the purchaser. Please read all steps first before proceeding with step one. (5) M8x1.5+ lock washer + washer +nut (5) Square Head... -
Page 18: Installing/Removing The Throatplate
Fusion Tablesaw 6. Insert short rail and switch 7. Join front fence supports 8. Align the front rail with blade Insert the short front rail into the first square head Align the pins and join the two front rail pieces and Using the blade notching on the measuring tape, bolt. -
Page 19: Installing/Removing Safety Accessories
Note on the Riving Knife Warning: Since Riving Knife, other than those offered by Laguna, has not been tested with this product, use of such accessories with this tool could be hazardous. To reduce the risk of injury, only Laguna, recommended accessories should be used with this product. -
Page 20: Installing/Removing The Blade
Fusion Tablesaw Installing/Removing the Blade Guard 3. insert the blade guard 4. position TO LEFT OF CASING 1. Un-plug the tablesaw! 2. Make sure the lock is in open position 3. Insert the blade guard 4. Position the guard insert 5. -
Page 21: Adjustments
Fusion Tablesaw Adjustments Your Laguna Tools machine comes fully adjusted from the factory, but it is good practice to double check these adjustments and make sure the tool is in safe operating condition. Fence Adjustments Fitting the fence: You will need to fit the fence to the right side of the blade to use the table saw. In the fit position, the fence can move freely with limited friction due to the installed nylon and plastic glide bushings. -
Page 22: Table Adjustments
Fusion Tablesaw Adjusting the Fence to be Parallel with the Blade: It is very important to only operated this saw with the blade parallel to the fence. NOTICE: If this section does not help, please see the table adjustments section: Adjusting the Table to be Parallel with the Blade. The blade needs to be parallel to the table (mitre slots) to effectively make the fence parallel to the blade. - Page 23 Fusion Tablesaw Loosen Table Loosen Table Bolts Loosen Table Bolts Bolts Locate and loosen right side table to cabinet bolt Locate and loosen left side table to cabinet bolt Locate and adjust the rear table to cabinet bolt. (above the tool holder). (above the motor cover).
-
Page 24: Arbor And Tilt Adjustments
Fusion Tablesaw Arbor and Tilt Adjustments Adjusting the Blade Tilt Limits You can check the arbor (blade) tilt limits with an angle finder or 45-degree triangle. If these limits are not within 0 degrees and 45 degrees, use the following steps to adjust. 2. -
Page 25: Accessory Adjustments
Fusion Tablesaw Changing Belt Adjustment bolt Accessing the Belt the Belt Unplug the tablesaw! Remove all throatplates, blades, and blade accessories. Remove the motor cover. Remove the dust shroud. Loosen the Belt adjustment bolt and loosen belt by raising motor. Remove belt. -
Page 26: Push Block And Push Stick
Fusion Tablesaw There is a 101.6 mm dust outlet located on the lower left of the saw cabinet allowing for the connection to a dust collection system (not included). Air current speed is 20m/s for vacuum suction dust emission index. When air current speed of dust collector device (in accordance with EN 12779:2004+ A1:2009) is not lower than 20m/s, ensure machine can be normal exhausted. -
Page 27: Type Of Cut
Fusion Tablesaw Type of Cut Warning: Always wear safety glasses, Note: This saw is only designed to cut a respirator and hearing protection when wood. operating this machine RIPPING Cutting a wood plank or sheet of plywood lengthwise to reduce its width is called “ripping”. - Page 28 Fusion Tablesaw CROSS CUTTING Cutting against the grain, to shorten the length of a board is crosscutting. With some smaller sized and rectangular pieces, you often have the choice of ripping or crosscutting. Always use the miter gauge, when crosscutting; never cut a piece unsupported.
-
Page 29: Maintenance
Fusion Tablesaw Maintenance To keep you Laguna Tools machine in top performance for many years please follow this maintenance schedule and refer to any instructions. Daily Check: Notes • Loose mounting bolts • Damaged saw blade • Damaged riving knifes, splitters, or blade guards •... -
Page 30: Trouble-Shooting
Fusion Tablesaw Trouble-Shooting Behavior Possible Causes Possible Solution 1. Start capacitor at fault 1. Test/replace if faulty. 2. Motor connection wired wrong 2. Correct motor wiring connections. 3. Wiring at fault 3. Check/fix broken, disconnected, or corroded wires. 4. Motor Start/Stop switch at fault 4. -
Page 31: Wiring Diagram: Fusion F2 230V
Fusion T8 b1 esaw WARNING: WARNING: 1. Wiring should only be done by professional 1. Enough space around the machine and the electricians. Always make sure the machine is cabinets should be kept in order to maintain properly earthed. conveniently. 2. -
Page 32: Wiring Diagram: Fusion F3 230V
Fusion Tablesaw Wiring Diagram: Fusion F3 230V... -
Page 33: Parts Diagrams
Fusion Tablesaw Parts Diagrams Fence Assembly... -
Page 34: Miter Gauge, Blade Guard
Fusion Tablesaw MITRE GAUGE, Blade guard... -
Page 35: Motor And Trunnion
Fusion Tablesaw Motor and Trunnion... -
Page 36: Cabinet
Fusion Tablesaw cabinet... -
Page 37: F3 Cabinet
Fusion Tablesaw F3 Cabinet... -
Page 38: Parts List
Parts List 924707-000 S/A Fence .1 174712-308 Fence Beam .2 310534-909 Fence Extension Bar .3 310535-909 Fence Connect Bar .4 250799-620 Indicator .5 172847-905 Bracket for Indicator .6 001101-205 Round Head Self-Tapping Screw M3*1.06P*6 .7 000304-210 Pan Head Screw M6*1.0P*6 .8 000302-101 Pan Head Screw M4*0.7P*6... - Page 39 .1 230140-615 Handle 006002-051 Flat Washer 8.5*18*3.0t 090109-008 Miter Gauge 000302-106 Pan Head Screw M4*0.7P*16 008002-100 Hex Nut M4*0.7P 003303-105 Pan Head Screw 3/16"-24NC*3/8" 250226-620 Indicator 130053-903 Indicator Block 360447-902 Pin, Stop 290023-902 Shoulder screw 310496-904 Bar 571614-000 Scale Label RTH060401 Extension block 000304-107 Pan Head Screw M6x1.0P-16...
- Page 40 008308-100 Hex Nut, Nylon M10*1.5P(17B*12H) 008306-100 Hex Nut, Nylon M8*1.25P 010005-000 Retaining Ring STW-14 130359-903 Bracket for Riving Knife 000104-111 CAP Screw M8*1.25P*35 280259-901 Spring 170542-904 Storage for Miter Gauge 130387-903 Block 174715-904 Riving Knife 001902-110 SET Screw, Nylock M6*1.0P*8 251358-615 Knob 280179-000...
- Page 41 008316-200 Hex Nut, Nylon M10*1.5P 006001-075 Flat Washer 10.3*22*2.0t 010103-000 Retaining Ring RTW-35 030211-002 Bearing 6003 190270-901 Spacer 174305-901 Fixed Plate 014354-000 Poly V-Belt 135J7 361351-901 Arbor 000002-103 Hex Screw M6*1.0P*16 006001-020 Flat Washer 6.2*20*3.0t 006007-114 Flat Washer 6.4*16*1.6t 361245-901 Lead Screw 010007-000 Retaining Ring...
- Page 42 920703-000 Fixing Knob 090326-000 Worm Gear Box 320395-901 Worm Gear 030106-001 Bearing 6201 010102-000 Retaining Ring RTW-32 130361-000 Gear 006001-127 Flat Washer 5.5*22*2.0t 000001-109 Hex Screw M5*0.8P*12 000104-113 CAP Screw M8*1.25P*45 320394-901 Worm Shaft 001902-109 SET Screw, Nylock M6*1.0P*6 012002-007 4*4*20 030104-001 Bearing...
- Page 43 121 001603-102 Round Head Screw with Washer M6*1.0P*10/6*13.2*1.0t 122 170965-904 Fix Plate 123 250407-615 Worm Shaft Bracket 124 RTH6306 S/A Magnetic Switch 230V TUV for CEF2 10” Tablesaw 124 RTH6401 S/A Magnetic Switch 230V TUV for CEF3 10” Tablesaw 3HP 230V TUV for CEF3 10” RTH6402 S/A Magnetic Switch Tablesaw...
- Page 44 144 008603-100 Square Nut M6*1.0P(10B*5H) 145 012002-005 4*4*12 147 130368-903 Bushing 148 001901-101 SET Screw, Nylock M5*0.8P*5 156 361251-905 Parallel Pin 157 361250-901 Fixing Bolt 159 110071-000 Lock Handle Hex. Stocket Round Head Screw, 160 002504-102 M4*0.7P*6 Nylock 161 006001-045 Flat Washer 8.5*16*1.0t 162 006702-100...