Advertisement
Advertisement
Table of Contents

Related Manuals for MakerPi M1


Summary of Contents for MakerPi M1
- Page 1 Quick Start Guide...
-
Page 2: Table Of Contents
Contents Chapter 1 Getting to know your MakerPi M1 ..............2 1.1 Introduction of M1 ....................... 2 1.2 Notices ..........................3 Chapter 2 preparation before printing ................4 Chapter 3 Load & Unload ....................6 3.1 Load ............................ 6 3.2 Unload ..........................8 Chapter 4 Printing ........................ -
Page 3: Chapter 1 Getting To Know Your Makerpi M1
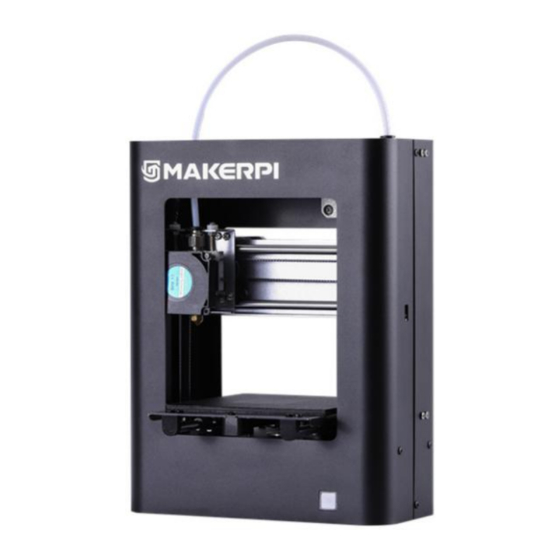
Chapter 1 Getting to know your MakerPi M1 1.1 Introduction of MakerPi M1 PTFE Tube Extruder Platform Start Button Extruder USB interface DIP Switch micro-USB interface TF card slot Power input - 2 -... -
Page 4: Notices
1.2 Notices 1, During the period of operation of the 3D printer and for a period of time after the end of printing, the temperature of the nozzle is as high as 200 ° C or more. So do not touch the nozzle with your hand. -
Page 5: Chapter 2 Preparation Before Printing
Chapter 2 Preparation before Printing Connect TPFE Tube to extruder and filament intake - 4 -... - Page 6 Hang the filament at the side of the 3d printer Rack Mounting hole Connect power supply to 3d printer - 5 -...
-
Page 7: Chapter 3 Load & Unload
Chapter 3 Load & Unload 3.1 Load Passing the filament trough extruder Passing the filament trough extruder Toggle the switch to the left as the load (to the left is the load, the right is the unload, the middle is the stop). - Page 8 When the red light flickers, the printer nozzle begins to heat, the green light is always on, the printer nozzle is heated, and the printer begins to load。 - 7 -...
-
Page 9: Unload
3.2 Unload Toggle the switch to the right as the unload (to the left is the load, the right is the unload, the middle is the stop). When the red light flickers, the printer nozzle begins to heat, the green light is always on, the ... -
Page 10: Chapter 4 Printing
Chapter 4 Printing Please named your printing file as 0.gcode, download on the TF Card Then insert the TF Card(please power off before insert the TF Card) - 9 -... - Page 11 Please turn the DIP Switch on the middle. Click the front print button to automatically recognize the print file and start printing (wait for the nozzle to heat up and the M1 starts printing) - 10 -...
-
Page 12: Chapter 5 Analysis Of Common Problems
Chapter 5 Analysis of Common Problems 1. When using the machine, the metal shell on the surface of the machine may be electrostatically charged and will not cause any impact on the human body. The solution can be done by grounding the metal of the machine housing. 2. - Page 13 5.1 Loading the extrusion gear card, the load is not smooth 5.2 Whether the loading is normal (eg: the tray is stuck) 5.3 Disassemble the extrusion gear, clean the gear, and check the degree of gear wear. 5.4 The PLA print nozzle temperature is 190-220, and the ABS print nozzle temperature is 210-230.