Table of Contents
Advertisement
Quick Links
Advertisement
Table of Contents

Related Manuals for Toshiba T10


Summary of Contents for Toshiba T10
- Page 1 INSTRUCTION MANUAL...
-
Page 2: Fcc Statement
Attention For customers in the U.S.A. DIGITAL STILL CAMERA PDR-T10 Tested To Comply With FCC Standards FOR HOME OR OFFICE USE FCC Statement This device complies with Part 15 of the FCC Rules. Operation is subject to the following two conditions:... -
Page 3: I Attention
Attention (continued) CAUTION If you modify the camera in any way, without getting approval from Toshiba Corporation, your camera may violate FCC regulations. Violation of FCC regulations may cause the FCC to void your right to use the modified camera. -
Page 4: I Before Reading This Manual
• Use of the software and Instruction Manual packaged with this Software Application is allowed only on one personal computer. • Toshiba Corporation is not liable whatsoever for any damages to the user or a third party as a result of use of a device by the software and Instruction Manual packaged with this Software Application. -
Page 5: I Notes On Software
• Software version upgrade For better use, the firmware of the camera may be upgraded after shipment. The methods of version upgrade are available in our homepage. Homepage URL: http://www2.toshiba.co.jp/mobileav/camera Abbreviations Used in This Manual Windows 98 This refers to the Microsoft... -
Page 6: I Safety Precautions
Exemption Clauses • Toshiba Corporation bears no responsibility for any damages or losses arising from earthquakes, fire or any other act of God, acts by third parties, misuse by the user or use under extreme operating conditions. - Page 7 Safety Precautions (continued) DANGER Do not heat, disassemble or throw the batteries into fire or water. Doing this might cause it to rupture, ignite or heat up, resulting in fire or major injury. Do not strike the batteries with a hammer, or step on, drop, or subject the battery to strong impact.
- Page 8 Safety Precautions (continued) WARNING Do not allow metallic objects or other flammable foreign matter inside the camera. This might cause a fire or electric shock. Do not open the battery cover, and insert or allow such objects to fall inside. Do not disassemble, change or repair the camera.
- Page 9 Safety Precautions (continued) CAUTION Do not leave the camera in places where the temperature may rise significantly, such as inside a car. This might adversely affect the case or the parts inside, resulting in fire. Do not place or wrap the camera in cloth or blankets.
- Page 10 Safety Precautions (continued) CAUTION Do not subject the LCD monitor to impact. If the LCD monitor is impacted, the glass on the screen may be broken and internal fluid may leak. If the internal fluid enters your eyes or comes into contact with your body or clothes, immediately rinse with fresh water.
-
Page 11: Table Of Contents
Contents Preface I Attention ... 2 I Before Reading This Manual ... 3 I Notes on Software ... 4 I Safety Precautions ... 5 I Contents ... 10 I Notes on Handling Your Camera ... 11 I Notes on Batteries ... 12 I Notes on the AC Adapter ... -
Page 12: Notes On Handling Your Camera
Do not expose the camera to sand or dust. • The PDR-T10 is particularly sensitive to sand and dust. If the camera comes into contact with sand or dust, not only will the camera become damaged, it will also no longer be repairable. -
Page 13: Notes On Batteries
To extend the use of the camera, we strongly recommend that you only use the following types of batteries: • AA Nickel battery (not rechargeable) : ZR6G (Toshiba “Giga Energy”) • AA Nickel Metal Hydride (NiMh) battery (Rechargeable) : TH-3 (Toshiba) •... -
Page 14: Notes On Handling The Ac Adapter
Notes on Handling the AC Adapter Be sure to use only the specified AC adapter (sold separately). Using a different AC adapter might cause the camera to malfunction. When you use the AC adapter, carefully read and strictly observe the Safety Precautions from page 5 onwards and the notes described below. -
Page 15: I Notes On Sd Card
• SD card includes a non-volatile semiconductor memory (NAND Flash EEP-ROM). Under normal use data stored on SD cards cannot be destroyed (lost). If used improperly, however, the data may be destroyed (lost). Please note that Toshiba will accept no responsibility whatsoever for destroyed (lost) data, regardless of the type or cause of the problem or damage. -
Page 16: I Notes On Touch Panel
Notes on Touch Panel In this camera, all input operations other than operations of the POWER switch and shutter button are performed on the touch panel. The use of a touch panel reduces the number of key operations, thereby improving operability, and also results in a neater design thanks to the absence of buttons. -
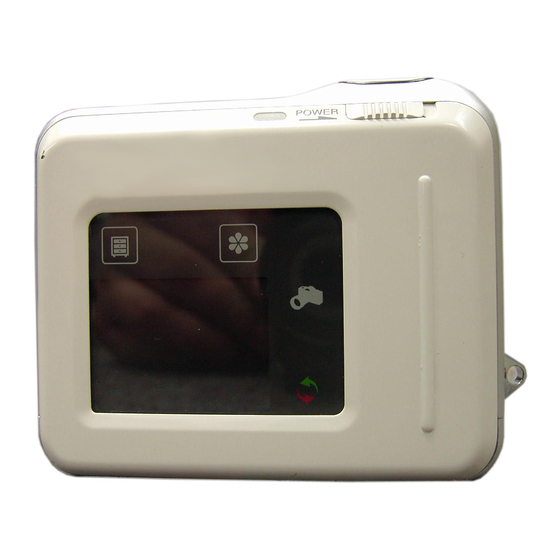
Page 17: I Names Of The Parts
Names of Parts Self-timer Lamp ➲ P. 30 Face pad ➲ P. 17 Strap attachment Attach the strap as shown on the illustration. Important • Magnet is used on the front side of the camera. Be careful not to place magnetic cards such as credit cards or the like near the front side of camera. -
Page 18: I Replacing The Face Pad
Replacing the Face Pad With the camera, the face pad can be replaced as desired. Various types of face pads are available for purchase. Be careful not to drop the camera when replacing the face pad. Detaching the Face Pad Open the battery/SD card cover. -
Page 19: I Inserting And Removing The Batteries
Loading and Removing the Batteries This camera uses two size AA batteries. Manganese batteries cannot be used. Before loading the batteries, be sure to read “Notes on Batteries” on page 12. Loading the Batteries Important • When an AC adapter is connected, check that the power is OFF. •... -
Page 20: Using The Power Outlet
Using the Power Outlet If you use the AC adapter (sold separately) in a room with a power outlet, you can take photographs for an extended period of time. This also prevents unsuccessful photography or failed transfer of data to a PC due to battery wear. For details on handling the AC adapter, be sure to read page 13. -
Page 21: I Loading And Removing The Sd Card
Inserting and Removing the SD card • For details on handling the SD card, be sure to read page 14. Important • Before you insert or remove the SD card, be sure to turn the camera off. If the SD card is inserted or removed with the power ON, it may cause malfunction and damage important data. -
Page 22: Turning The Power On/Off
Turning the Power ON/OFF Turning the Power ON Load the batteries and insert the SD card. Loading batteries ➲ page 18 Inserting SD card ➲ page 20 Slide the POWER switch in the direction of the arrow. The indicator is lit, and the photography mode starts up. If no operation is performed for a fix period of time, Auto power off is activated. -
Page 23: Setting The Date And Time
Setting the Date and Time When you use the camera for the first time or if you have left the camera for a long time without the batteries loaded, set the date and time. Reset Date & time set 2002 2002 Touch the menu key [ Touch the setup Icon... -
Page 24: I Switching The Mode (Photography Mode <--> Play Mode)
Switching the Mode (Photography Mode <--> Play Mode) There are two methods of switching between photograpy mode and play mode. Using the Mode Key Whenever the mode key is touched, photography mode and play mode switches. Using Touch Sensor / Auto Mode Switch Function This camera is equipped with a touch sensor/auto mode switch function to improve convenience. -
Page 25: Taking Photographs
Taking Photographs Load the batteries and insert the SD card into the camera, and turn the power ON. The photography mode is launched. Loading the batteries ➲ page 18 Inserting SD card ➲ page 20 Turning the power ON ➲ page 21 Determine the composition while looking at the LCD monitor. - Page 26 Taking Photographs (continued) Display the Photograph Information The photograph information can be displayed to check the camera’s status in the photography mode. Also, display the photograph information before changing the scene mode, flash and self timer settings. Setting the scene mode ➲ page 26 Setting the flash ➲...
-
Page 27: Setting The Scene Mode
Setting the Scene Mode When the photograph conditions in accordance with the scene mode are selected, the camera makes the optimum settings automatically. The scene mode is initially set to the auto [ ] mode. In the photography mode... Switching the mode ➲ page 23 For descriptions of the individual scene modes, see the following page. - Page 28 Setting the Scene Mode (continued) About Scene Mode The scene mode has the following 6 options. ] Auto Default setting. No special setting is necessary. Available flash: All ] Landscape Select this option to take photographs of distant scenery or landscapes.
-
Page 29: Setting The Flash
Setting the Flash You can take a photo with the flash set. In the default setting, the flash will be automatically set [ The flash firing mode can be set to suit the conditions of photography. The effective firing distance of the flash is approximately OOm to OOm. In the photography mode... -
Page 30: About Flash
Setting the Flash (continued) About Flash The flash has the following 6 options. ] Auto A default setting. The flash fires automatically according to the photography conditions. ] Forced Flash In this mode, the flash always fires. Use the Forced Flash mode when the subject is backlit, or in artificial light (fluorescent lighting, etc.). -
Page 31: I Self-Timer Photography
Self-timer Photography When the self-timer is used, the camera automatically takes a picture after the preset time. (Possible to change the set time) In the photography mode... Switching the mode ➲ page 23 For descriptions of each self timer settings, see the following. ] : Takes a photo after 10 seconds. -
Page 32: Digital Zoom Photography
Digital Zoom Photography This function enlarges the center of the screen and takes photographs in the digital zoom mode with an increased focal distance. In the photography mode... Switching the mode ➲ page 23 When you press the zoom key [ -->... -
Page 33: I Changing The Preset Conditions Of Recording Menu
Changing the Preset Conditions of Recording menu Establish the photography settings. The settings for recording menu are not canceled even if the power is turned OFF or the Auto Power OFF function is activated. If the batteries are removed or the AC adapter is disconnected, the settings will return to their defaults. -
Page 34: White Balance
Changing the Preset Conditions of Recording menu (continued) Positive (+) Compensation • Copying of printed text (black characters on white paper) • Backlit portraits • Very bright scenes (such as snowfields) and highly reflective subjects Shots made up predominantly of sky •... -
Page 35: I Playing
Playing Load the batteries and insert the SD card into the camera, and turn the power ON. The photography mode is launched. Switch to play mode. Touch the mode key [ Switching the mode ➲ page 23 The last recorded image appears. You can play the previous/next image one frame at a time with [ Display the Play Information The play information screen displays details on the image. -
Page 36: I Displaying A List Of Images (Thumbnail Display)
Displaying a List of Images (Thumbnail Display) Six images are shown on one screen. This is called the thumbnail display. Use the thumbnail display to find the desired images quickly from many images. In the play mode... Switching the mode ➲ page 23 When an image is touched, it is selected. -
Page 37: Erasing Images
Erasing Images You can erase the photographed images. In the play mode... Switching the mode ➲ page 23 ] : Erasing one image Erases the currently displayed image. When the icon is touched, “Erase image” is displayed at the center of the screen. -
Page 38: Zoom Play
Zoom Play Images are played enlarged. In the play mode... Switching the mode ➲ page 23 The screen on the upper left corner indicates the area currently displayed on the LCD monitor. Touch [ ] , [ ] or [ When you press the zoom key [ times -->... -
Page 39: I Changing Settings Of Play Menu
Changing Settings of Play Menu Establish the Play settings. The settings for play menu are not canceled even if the power is turned OFF or the Auto Power OFF function is activated. If the batteries are removed or the AC adapter is disconnected, the settings will return to their defaults. Touch [ ] or [ ] to scroll through the items and to display one at a time. -
Page 40: Display Switching
Changing Settings of Play Menu (continued) Display Switch You can switch the information displayed at the bottom of the play menu. ] : Displays the date and time of the photograph taken. ] : Displays the number of folder and file. (Default) ] : Displays the image quality. -
Page 41: I Setting Dpof
Setting DPOF (Digital Print Order Format) DPOF (Digital Print Order Format) “DPOF” is a standard for recording information for printing directly on SD cards and other media. Files compatible with the DPOF format can easily be printed on printers compat- ible with the DPOF format or laboratory printing services. -
Page 42: I Connecting Pc
Connecting PC To install the software contained in the supplied CD-ROM, your personal computer must conform to the system requirements in the table below. Check the following items before you install the software. Minimum System Requirements Memory Free space on hard disk Color monitor Device File Structure... -
Page 43: I Installing The Image Viewing Software
Installing the Image Viewing Software Install the “Image Expert” software into your personal computer to view images. <For Windows> Applicable OS : Windows 98/2000/ME/XP Insert the supplied CD-ROM into the CD-ROM drive. Display language selection screen appears. Click “English”. Click “Install Image Expert”. Follow the on-screen instructions and install Image Expert. -
Page 44: Installing The Usb Driver
Installing the USB driver The USB driver must be installed when connecting the supplied USB cable to the personal computer for the first time. Pay attention to the direction of the terminal when connecting the USB cable. <For Windows> Applicable OS : Windows98/2000/Me/XP. Install the USB driver contained in the supplied CD-ROM for windows 98. -
Page 45: To The Computer
Transferring the Camera’s Images to the Computer Launch the image viewing software “Image Expert” and transfer the camera’s images to the computer. • The data may be damaged if the camera’s power is terminated while image Important data is being transferred. We recommend the use of the AC adapter (sold seperately) when connecting the camera to the PC. - Page 46 Transferring the Camera’s Images to the Computer (continued) <For Macintosh> If Image Expert is not yet installed, first install it. Installing image viewing software ➲ page 42 Connect the computer and camera with the USB cable When the USB cable is connected with both the computer and camera started up, the computer automatically detects the camera.
-
Page 47: I Changing The Basic Settings Of The Camera
Changing the Basic Settings of the Camera This feature allows you to change the settings for images as well as the settings for the camera. The settings for set-up menu are not canceled even if the power is turned OFF or the Auto Power OFF function is activated. -
Page 48: Time And Date
Change the Basic Settings of the Camera (continued) Date & Time Set the time and date. For Date & Time , see “Setting the date and time” on page 22. Sound When you touch the key or icon, set whether or not to sound the beep tone. -
Page 49: Formatting The Sd Card
Formatting the SD card Formatting (Initializing) the SD card. In the setup menu... Changing the basic settings of the Camera Reset Format For mat For mat For mat Important • Note that even protected images will be erased when the SD card is formatted. -
Page 50: Specifications
Specifications Model name PDR-T10 Pickup elements 1/2.7” CCD sensor (total number of pixels: approx. 2.01million) Sensitivity Equivalent to ISO 100/200/400 Lens Single focus lens F3.1/F8 Focal length f=5.96mm (equivalent to 35mm on a 38mm camera) Auto-focus TTL system. AF, focus adjusting range: approxi. 20cm to infinity Detection system: Contrast detection system. -
Page 51: Separately Sold Accessories
PDR-KFPI (4 face pads) PDR-KFPI (4 face pads) For the method of replacing the face pad, read “Replacing the Face Pad”. ( For the color pattern or type of the face pad, confirm at Toshiba’s homepage. Toshiba’s homepage: http://www2.toshiba.co.jp/mobileav/camera ➲... -
Page 52: I List Of Warning Messages
List of Warning Messages The following warning messages are displayed on the LCD monitor. <During Photography mode> Message NO CARD CARD FULL CARD ERROR CARD PROTECTED NOT FORMATTED FULL FOLDER ERROR <During Play Mode> Message NO CARD CARD FULL CARD ERROR NOT FORMATTED INCONFORM DATA FOLDER ERROR... -
Page 53: I Faq
The following are some frequently asked questions. Q: When I press the shutter button, the picture is not taken immedi- ately. Why is this? A: Are you using the “half-shutter” function (half-pressing the shutter button)? With the camera, the focus and exposure are adjusted when the shutter button is half-pressed. - Page 54 FAQ (continued) Q: I want to send at photo as an e-mail attachment. How can I reduce its size? A: When sending photos as e-mail attachments, the image (file) size should not be too large. Use the included image viewing program called Image Expert to save photos in reduced size.
-
Page 55: I Troubleshooting
Troubleshooting First check the warning displayed on the LCD monitor (➲ page 51) and the Indicator (➲ page 16). Then check the following items. Problem No power supply The batteries are exhausted. The AC adapter plug is diconnected from the power outlet. - Page 56 Troubleshooting (continued) Problem Causes I cannot use the The flash is set to flash to take Suppressed Flash mode. pictures. You pressed the shutter button while the flash was charging. I cannot set the The scene mode is set. flash. The play image is The subject is too far too dark even...
-
Page 57: Global Contacts
For customers in the United States and Canada Register your product On-Line There are many advantages to being a member of the Toshiba Digital Camera community. Toshiba provides free firmware upgrades for applicable models, allowing you to get the latest technology and enhancement for your camera direct from the web site. There are... -
Page 58: I Index
Index Alphabetic order AC Adapter ... 13, 19 Auto Focus ... 24 Auto Mode Switch ... 23,46 Auto Power OFF ... 47 Battery ... 12,18 Brightness of LCD Monitor ... 33,38 Color ... 32 Connecting to PC ... 41, 44, 45 DCF ... - Page 59 * Pour la clientéle en dehors de la France, des États-Unis et du Canada se reporter aux "Contacts mondiaux" de la page antérieure et contactez la compagnie Toshiba la plus proche pour obtenir assistance. Für Kunden in Deutschland Website für Digitalkamera: www.toshiba.de/consumer...