Table of Contents
Advertisement
Installation
&
Maintenance
Manual
INVERTER-DRIVEN
MULTI-SPLIT SYSTEM
HEAT PUMP
AIR CONDITIONERS
- Set Free mini-HNRQ1 Series -
Models:
Outdoor Units:
RAS-3.0HNBRKQ1
RAS-4.0HNBRKQ1
RAS-5.0HNBRKQ1
RAS-6.5HNBRKQ1
RAS-8.0HNBRMQ1
RAS-11HNBRMQ1
READ AND UNDERSTAND
THIS MANUAL BEFORE
USING THIS HEAT-PUMP
AIR CONDITIONERS.
KEEP THIS MANUAL FOR
FUTURE REFERENCE.
RAS-3.5HNBRKQ1
RAS-4.5HNBRKQ1
RAS-6.0HNBRKQ1
RAS-7.0HNBRMQ1
RAS-10HNBRMQ1
RAS-12HNBRMQ1
P01627Q
Original Instructions
Advertisement
Table of Contents

Related Manuals for Hitachi Set Free mini-HNRQ1 Series


Summary of Contents for Hitachi Set Free mini-HNRQ1 Series
- Page 1 Installation & Maintenance Manual INVERTER-DRIVEN MULTI-SPLIT SYSTEM HEAT PUMP AIR CONDITIONERS - Set Free mini-HNRQ1 Series - Models: Outdoor Units: RAS-3.0HNBRKQ1 RAS-3.5HNBRKQ1 RAS-4.0HNBRKQ1 RAS-4.5HNBRKQ1 RAS-5.0HNBRKQ1 RAS-6.0HNBRKQ1 RAS-6.5HNBRKQ1 RAS-7.0HNBRMQ1 RAS-8.0HNBRMQ1 RAS-10HNBRMQ1 RAS-11HNBRMQ1 RAS-12HNBRMQ1 READ AND UNDERSTAND P01627Q THIS MANUAL BEFORE USING THIS HEAT-PUMP Original Instructions AIR CONDITIONERS.
- Page 2 IMPORTANT NOTICE ● The company pursues a policy of continuous improvement in design and performance of products. The right is therefore reserved to vary specifications without notice. ● The company cannot anticipate every possible circumstance that might involve a potential hazard. ●...
- Page 3 CHECKING PRODUCT RECEIVED ● Upon receiving this product, inspect it for any shipping damage. Claims for damage, either apparent or concealed, should be filed immediately with the shipping company. ● Check the model number, electrical characteristics (power supply, voltage and frequency) and accessories to determine if they are correct.
-
Page 4: Table Of Contents
CONTENTS 1. Safety Instructions ............................1 2. Before Installation ............................4 2.1 Necessary Tools and Instrument List for Installation ................4 2.2 Structure ..............................6 2.3 Refrigerant Cycle Diagram ........................9 2.4 Model of Outdoor Unit ...........................10 2.5 Transportation ............................11 2.6 Factory Supplied Accessories .......................12 3. -
Page 5: Safety Instructions
1. Safety Instructions <Signal Words> ● Signal words are used to identify levels of hazard seriousness. Definitions for identifying hazard levels are provided below with their respective signal words. DANGER : DANGER indicates a hazardous situation which, if not avoided, will result in death or serious injury. - Page 6 WARNING ● Please do not use sprays such as pesticide, oil paint, hair spray or other flammable gases within 1 meter of the unit. ● If the circuit breaker acts or fuse acts frequently, please stop the system operation immediately and contact your local dealer or customer service.
- Page 7 NOTICE ● Do not tread on the product or place sundries on the product. ● Do not place or put any material on the product or inside the product. ● Provide a strong and correct foundation so that: A. The outdoor unit is not on an incline. B.
-
Page 8: Before Installation
2. Before Installation 2.1 Necessary Tools and Instrument List for Installation Tool Tool Handsaw Wrench Phillips Screwdriver, Slotted Screwdriver Scale Vacuum Pump Charging Cylinder Refrigerant Gas Hose Gauge Manifold Megohmmeter Wire Cutters Copper Pipe Bender Gas Leak Detector Manual Water Pump (for Indoor Unit) Leveller Pliers Crimper for Solderless Terminals... - Page 9 ● ■ Interchangeability is available with current R22 : Only for Refrigerant R410A (No Interchangeability with R22) ◎ ★ : Prohibited : Only for Refrigerant R407C (No Interchangeability with R22) Interchangeability with R22 Reason of Non-Interchangeability and Attention Measuring Instrument and Tool (○: Strictly Required) R410A R407C...
-
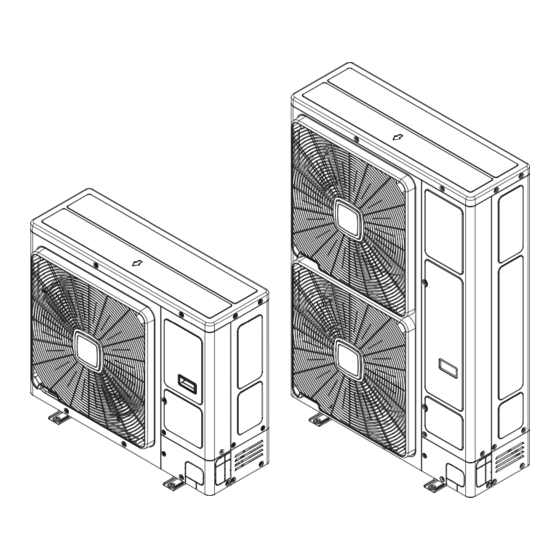
Page 10: Structure
2.2 Structure Model: RAS-3.0~3.5HNBRKQ1 Part Name Part Name Part Name Part Name Chassis Filter Solenoid Valve Accumulator High Pressure Low Pressure Vibration Absorber Air Outlet Sensor Sensor High Pressure Crankcase Heater 4-Way Valve Propeller Fan Switch Compressor Oil Separator Check Joint Fan Motor Electronic Liquid Stop Valve... - Page 11 Model: RAS-4.0HNBRKQ1~RAS-6.5HNBRKQ1 Part Name Part Name Part Name Part Name Chassis Filter Electrical Box Air Outlet High Pressure Vibration Absorber Check Joint Propeller Fan Sensor High Pressure Low Pressure Crankcase Heater Fan Motor Switch Sensor Compressor Filter 4-Way Valve Air Inlet Liquid Stop Valve Check Valve Accumulator...
- Page 12 Model: RAS-7.0HNBRMQ1~RAS-12HNBRMQ1 Part Name Part Name Part Name Part Name Chassis Filter Solenoid Valve Accumulator High Pressure Low Pressure Vibration Absorber Air Outlet Sensor Sensor High Pressure Crankcase Heater 4-Way Valve Propeller Fan Switch Compressor Oil Separator Check Joint Fan Motor Electronic Liquid Stop Valve Check Valve...
-
Page 13: Refrigerant Cycle Diagram
2.3 Refrigerant Cycle Diagram Model:RAS-3.0~6.5HNBRKQ1 Model:RAS-7.0~12HNBRMQ1 Part Name Part Name Part Name Compressor Fan Motor Oil Capillary Tube Oil Separator Distributor Filter 4 High Pressure Switch Filter 1 Solenoid Valve High Pressure Sensor Electronic Expansion Valve Low Pressure Sensor Check Valve Filter 2 Crankcase Heater 4-Way Valve... -
Page 14: Model Of Outdoor Unit
2.4 Model of Outdoor Unit The number of indoor units that can be connected to an outdoor unit is defined in the following table : Table 2.1 System Combination Min. Total Max. Total Numbers of the Min. Capacity Rated Capacity of the Capacity of the indoor units can at Individual... -
Page 15: Transportation
2.5 Transportation Transport the product as near to the installation location before unwrapping the package. NOTICE ● Do not put any material or stand on the product. ● Apply two lifting wires onto the outdoor unit, when lifting it by crane. ●... -
Page 16: Factory Supplied Accessories
Model Net Weight (kg) Gross Weight (kg) RAS-10HNBRMQ1 RAS-11HNBRMQ1 RAS-12HNBRMQ1 WARNING Do not place or leave any other objects (cables, tools) inside the outdoor unit or control board and verify that nothing remains there prior to installation and test run. Ignoring the instructions can lead to damage and fire incidents. - Page 17 ● Where the air quality is of high acidity. ● Where harmful gases can be generated from decomposition. ● Do not install the indoor unit where such dripping can cause moisture damage or uneven locations: Use a raised concrete pad or concrete blocks to provide a solid and level foundation for the unit to prevent water damage and abnormal vibration.
-
Page 18: Service Space
3.2 Service Space When the outdoor unit is installed, the allowed service space is as follows: ● If there is not enough service space for air inlets and outlets, it may result in a performance drop-off and mechanical issues due to insufficient air intake. ●... - Page 19 (2) Obstacles on the outlet side and no obstacle in the upper side. Unit: mm Single Installation Multiple Installation...
- Page 20 (3) Obstacles on right and left side of single installation. (a) There is no obstacle in the upper side. Unit: mm (b) There are obstacles in the upper side. Unit: mm (4) Multi-row and multiple installations. Unit: mm NOTE: If L is larger than H, mount the units on a base so that H is greater or equal to L. Be sure to seal up every surface of the base. If the base allows the airflow to go, it may cause a short-circuit.
-
Page 21: Installation Work
3.3 Installation Work (1) Secure the outdoor unit with the anchor bolts. In order to avoid the vibration from transmitting to the indoor by the base of the unit, the 5~10mm thickness of rubber gaskets (field supplied) should be placed under the feet of the outdoor unit, which could decrease the vibration into the room. - Page 22 Model: RAS-7.0~12HNBRMQ1 Unit: mm (3) The drain holes are working during the heating and defrosting operation. Choose a place where well drainage is available or provide a groove for draining. (4) The unit will condensate in heating mode, and the condensate will freeze in colder climates, which may cause the road slippery, if not properly managed.
-
Page 23: Refrigerant Piping Work
4. Refrigerant Piping Work WARNING ● The design pressure for this product is 601 psi (4.15MPa). The pressure required for refrigerant R410A is 1.4 times higher than that of the refrigerant R22. That means that the refrigerant piping for R410A must be thicker than that for R22. - Page 24 (7) Cautions for Brazing Work (A) For piping connections, complete non-oxidation brazing with a nitrogen charge. If brazing the pipes without the nitrogen substitution, a large amount of oxidized scaling will be generated in the piping. This oxidized scaling can cause clogging inside the expansion valve, solenoid valve, accumulator, and compressor, which can damage the unit.
- Page 25 (B) Joint Selection The minimum thickness of joint and flare nut dimension are selected from the table below: Minimum Thickness of Joint Flare Nut Dimension B Unit: mm Unit: mm Diameter(Φd) R410A Diameter(Φd) R410A 6.35 6.35 9.52 9.52 Flare Nut 12.7 12.7 15.88...
-
Page 26: Model Of Branch Pipe
Required Tightening Torque for Flare Nut Nominal outside diameter (according to EN 12735-1 and EN 12735-2) Minimum wall Tightening torque Thickness Imperial series (N·m) Metric series (mm) (mm) (mm) (in) 0,80 14 -- 18 6,35 0,80 14 -- 18 7,94 5/16 0,80 33 -- 42... - Page 27 (2) Precaution for branch pipe connection Use the branch pipe to connect the outdoor/indoor units. Mounted the branch pipes to a pillar, a wall, or a ceiling. Keep the inlet pipe of the branch pipe straight, and the length of the straight pipe is no less than 0.5 meter. Keep Horizontal Keep Horizontal To Indoor Unit...
-
Page 28: Refrigerant Piping Size
4.3 Refrigerant Piping Size Example of connection: connection of 4 indoor units. Table 4.1 Piping Size of Main Pipe Pipe between the outdoor unit and the first branch pipe; Stop Valve(mm) The pipes between the branch pipes Model Liquid Liquid Marks RAS-3.0~6.5HNBRKQ1 Φ15.88... -
Page 29: Refrigerant Piping Work For Outdoor Unit
4.4 Refrigerant Piping Work for Outdoor Unit (1) The refrigerant piping can be installed in four directions (front, right, bottom or rear side) as shown in the following figures. Model: RAS-3.0~3.5HNBRKQ1 Model: RAS-4.0~6.5HNBRKQ1; RAS-7.0~12HNBRMQ1... - Page 30 Attention for Removing Service Cover – Procedures of Removing Cover – ● Remove the screws according to the figure above. NOTE: Remove the screws and hold the service cover with your hands. If not,the service cover may fall down. ● Slowly push the service cover downward. (2) Securely use two wrenches at the following position when removing or installing the pipe.
-
Page 31: Air Tight Test
4.5 Air Tight Test (1) The stop valves should be closed completely (factory-setting). Do not open the stop valves until all the refrigerant piping connections, air tight test, and vacuum have been completed. (2) The refrigerant used for the outdoor unit is R410A. Use the pressure gauge and the charging hose for exclusive use of R410A. -
Page 32: Vacuuming
4.6 Vacuuming (1) Connect the main fold gauge and the charging hoses to the check joints of the stop valves with a vacuum pump. (2) Vacuum the refrigerant piping of the system with the vacuum pump until the pressure reaches -0.1MPa or lower. -
Page 33: Additional Refrigerant Charge Calculation
4.7 Additional Refrigerant Charge Calculation Although this unit has been charged with refrigerant, additional refrigerant charge is required on the site. Determine additional quantity of refrigerant required according to the following table, and charge it into the system. (1) Calculating the method of Additional Refrigerant Charge Total Additional Model Item... -
Page 34: Additional Refrigerant Charge Work
4.8 Additional Refrigerant Charge Work (1) The additional refrigerant charge is required according to the calculation. (2) Before charge work, make sure that the stop valves are fully closed. (3) Charge the additional refrigerant from the check joint of liquid stop valve. (4) After refrigerant has been charged, fully open the liquid stop valve and gas stop valve. -
Page 35: Electrical Wiring
5. Electrical Wiring WARNING ● Turn off the main power switch of the indoor unit and the outdoor unit, then wait for more than 10 minutes before electrical wiring work or a periodical check is performed. ● Ensure that the indoor fan and the outdoor fan have been stopped before electrical wiring work or a periodical check is performed. -
Page 36: Electrical Wiring Connection
5.2 Electrical Wiring Connection Connect the electrical wiring according to the following figures: Figure 5.1 Electrical Wiring Connection for RAS-3.0~6.5HNBRKQ1 Figure 5.2 Electrical Wiring Connection for RAS-7.0~12HNBRMQ1... - Page 37 Table 5.1 Electrical Data and Recommended Characteristics Maximum Power Supply Transmission Rated Running Rated Model Power Supply Wiring cable Sensitive Ampacity Ampacity (Cores×mm (Cores×mm Ampacity (mA) RAS-3.0~3.5HNBRKQ1 220-240V/1Ph/50Hz 3×4.0 2×0.75 RAS-4.0~6.5HNBRKQ1 220-240V/1Ph/50Hz 3×6.0 2×0.75 RAS-7.0~8.0HNBRMQ1 380-415V/3Ph/50Hz 5×6.0 2×0.75 RAS-10~12HNBRMQ1 380-415V/3Ph/50Hz 5×6.0 2×0.75 (1) Connect the power supply wirings to the terminal block TB1 and ground wiring to the terminal in the...
-
Page 38: Electrical Wiring For Outdoor Unit
5.3 Electrical Wiring for Outdoor Unit Avoid the wirings touching the refrigerant pipes, plate edges and electrical parts inside the unit. If not, the wires will be damaged and at the worst, a fire will occur. Figure 5.3 Electrical Wiring for RAS-3.0~6.5HNBRKQ1... - Page 39 Figure 5.4 Electrical Wiring for RAS-7.0~12HNBRMQ1 NOTES: Perform all the electrical work in accordance with the manual and in compliance with the local regulations and safety standards. ● The electrical wiring should be applied by the qualified person. The recommended electrical characteristics are calculated by the related safety standards. The environment temperature is less ●...
-
Page 40: Dip Switch Setting Of Outdoor Unit
6. DIP Switch Setting of Outdoor Unit There are several DIP Switches in the front of the outdoor unit, which is designed for test and diagnostic conveniently. It has the advantages that it can monitor the real-time status of the outdoor unit, display the alarm codes, view the historical alarm codes, and so on. - Page 41 (4) Setting Refrigerant Cycle No. In the same refrigerant cycle, set the same refrigerant cycle No. for the outdoor unit and the indoor units as shown below. The range of refrigerant cycle No. is between 0 and 63. Refrigerant Cycle No. = The value of the DSW4 (System Address Setting: Double Digit) + The value of the RSW1 (System Address Setting: Single Digit).
-
Page 42: Test Run
7. Test Run Test run of outdoor units and indoor units should be performed one by one sequentially. And record the results in the table 7.1. 7.1 Before Test Run (1) Do not operate the system until all the points have been examined and cleared. ●... -
Page 43: Test Run By Wired Controller
7.3 Test Run by Wired Controller This test run method is for the wired controller (Model: PC-ARF1). As for other remote controllers, refer to Installation and Maintenance Manual attached to each wired controller (1) Check to ensure that stop valves for gas and liquid of the outdoor unit are fully opened. (In the case of combined outdoor units, check to ensure that all stop valves of the outdoor units are fully opened.) (2) Perform the test run of indoor units one by one sequentially, and then check the accordance of the refrigerant... - Page 44 < Example > The cooling operation is not performed if the outdoor temperature is below -5ºC DB. DB: Dry Bulb, WB: Wet Bulb Temperature Maximum Minimum Indoor 32ºC DB/23ºC WB 21ºC DB/15ºC WB Cooling Operation Outdoor Stable 48ºC DB Interval 48~52ºC DB -5ºC DB* Indoor 27ºC DB...
- Page 45 Table 7.1 Test Run and Maintenance Record Model: SERIAL No.: COMPRESSOR MFG. No. DATE: CUSTOMER'S NAME AND ADDRESS: 1. Is the rotation direction of the indoor unit fan correct? 2. Is the rotation direction of the outdoor unit fans correct? 3.
- Page 46 Table 7.2 Alarm Code Alarm Malfunction Reason Code Activation of Float Switch (High Water Level in Condensation Activation of Protection Device (01) Drainage Pan, Problem with Drain Piping, Float Switch, or (Float Switch) Condensation Drainage Pan) Activation of Protection Device Activation of PSH (Piping Clogging, Excessive Refrigerant, Inert Gas (High Pressure Cut) Mixing)
- Page 47 Alarm Malfunction Reason Code Outdoor Unit, Indoor Machine Different Tier, Brand Exception Incorrect of Indoor Unit Combination Combination Abnormality of Picking up Circuit for Failure of Protection Detecting Device Protection in Outdoor Unit (Incorrect Wiring of Outdoor PCB) Combination Problem between Inverter PCB and Incorrect Combination between Inverter PCB and Outdoor PCB Outdoor PCB Activation of Pressure Ratio Decrease Protection...
-
Page 48: Safety And Control Device Setting
8. Safety and Control Device Setting The compressor is protected by the following devices and their combinations: (1) High Pressure Switch: This switch cuts out the operation of the compressor when the discharge pressure exceeds the setting. (2) Crankcase Heater: This band type heater protects against oil foaming during cold starting, as it is energized while the compressor is stopped. - Page 49 DEMO...
- Page 50 DEMO...
- Page 51 DEMO...
- Page 52 1114326 Qingdao Hisense Hitachi Air-conditioning Systems Co.,Ltd. Add: Hisense Information Industry Park 218,Qianwangang Road, Qingdao Economic Development Zone,China P01627Q 2019.04 V02 Specifications in this catalogue are subject to change without notice,in order that Hisense may bring the latest innovations to...