Advertisement
Advertisement
Table of Contents

Related Manuals for HIKVISION HiLook


Summary of Contents for HIKVISION HiLook
- Page 1 Network PTZ Camera·Qui ck Start Gui de Multi-Sensor Network PTZ Camera Quick Start Guide...
- Page 2 Any and all information, including, among others, wordings, pictures, gra phs are the properties of Hangzhou Hikvision Digital Technology Co., Ltd. or i ts s ubsidiaries (hereinafter referred to be “Hikvision”). Thi s user manual (hereinafter referred to be “the Manual”) cannot...
- Page 3 PRODUCT, EVEN IF HIKVISION HAS BEEN ADVISED OF THE POSSIBILITY OF SUCH DAMAGES. REGARDING TO THE PRODUCT WITH INTERNET ACCESS, THE USE OF PRODUCT SHALL BE WHOLLY AT YOUR OWN RISKS. HIKVISION SHALL NOT TAKE ANY RESPONSIBILITES FOR ABNORMAL OPERATION, PRIVACY LEAKAGE OR OTHER DAMAGES RESULTING FROM CYBER ATTACK, HACKER ATTACK, VIRUS INSPECTION, OR OTHER INTERNET SECURITY RISKS;...
- Page 4 Network PTZ Camera·Qui ck Start Gui de IN THE EVENT OF ANY CONFLICTS BETWEEN THIS MANUAL AND THE APPLICABLE LAW, THE LATER PREVAILS. 0504121080517...
- Page 5 Network PTZ Camera·Qui ck Start Gui de Regulatory Information FCC Information Pl ease take attention that changes or modification not expressly a pproved by the party responsible for compliance could void the us er’s authority to operate the equipment. FCC compliance: Thi s equipment has been tested a nd found to comply with the limits for a Class B digital d evice, pursuant to part 15 of the FCC Rules.
- Page 6 Network PTZ Camera·Qui ck Start Gui de 1. Thi s device may not cause harmful interference. 2. Thi s device must accept any i nterference received, including i nterference that may ca use undesired operation. EU Conformity Statement Thi s product and - i f a pplicable - the supplied a ccessories too are marked with "CE"...
- Page 7 Network PTZ Camera·Qui ck Start Gui de Thi s device meets the CAN ICES-3 (B)/NMB-3(B) standards requirements. Safety Instruction These instructions are intended to ensure that user can use the product correctly to avoid danger or property l oss. The precaution measure is divided i nto “Warnings” and “Cautions” Warnings: Serious i njury or death may occur i f any of the warnings a re neglected.
- Page 8 Network PTZ Camera·Qui ck Start Gui de Do not connect several devices to one power a dapter as adapter overl oad may cause over-heating or a fire hazard. Ma ke sure that the plug is firmly connected to the power socket. ...
- Page 9 Network PTZ Camera·Qui ck Start Gui de Do not touch senor modules with fingers. If cleaning is necessary, us e clean cloth with a bit of ethanol and wipe it gently. If the ca mera will not be used for an extended period, replace the l ens ca p to protect the sensor from dirt.
-
Page 10: Table Of Contents
Network PTZ Camera·Qui ck Start Gui de Table of Contents 1 Overview..................1 2 Installation ..................3 2.1 Ins talling the Memory Ca rd ............3 2.2 Ceiling Mounting ..............4 2.3 Wall Mounting ................7 2.4 Pendant Mounting..............9 3 Setting the PTZ Camera over the LAN........... -
Page 11: Overview
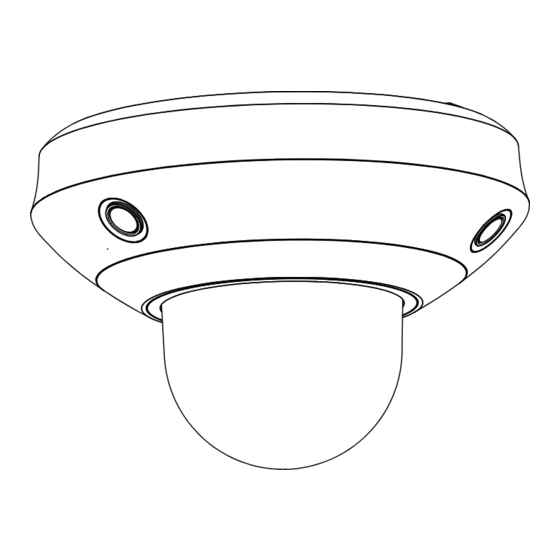
Network PTZ Camera·Qui ck Start Gui de 1 Overview Reset Button Memory Card Slot Network Interface (PoE) Power Supply (12 VDC) Audio Input Audio Output Fi gure 1-1 Overvi ew... - Page 12 Network PTZ Camera·Qui ck Start Gui de Note: Pres s RESET when the camera is powering on or rebooting to restore the default settings, i ncluding the u ser name, password, IP address, a nd port No., etc.
-
Page 13: Installation
Network PTZ Camera·Qui ck Start Gui de 2 Installation Before you start: Check the package contents and make sure that the device in the pa ckage is i n good condition and all the assembly parts are i ncluded. Note: Do not power the camera up until the installation is finished. -
Page 14: Ceiling Mounting
Network PTZ Camera·Qui ck Start Gui de Fi gure 2-1 Remove the Ins tal l a tion Pl a te Insert the memory ca rd into the memory card slot as shown i n Fi gure 2-2. Fi gure 2-2 Ins ert the Memory Ca rd 2.2 Ceiling Mounting Before you start: ... - Page 15 Network PTZ Camera·Qui ck Start Gui de Ma ke sure the ceiling is strong enough to withstand more than four times the weight of the camera and its accessories. Steps: Install the installation plate. 1) Rotate the i nstallation plate anticlockwise to separate it from the ca mera.
- Page 16 Network PTZ Camera·Qui ck Start Gui de Route the cables. Ca bles of the network PTZ camera can be routed either from top or s ide of the camera back box, as shown in Figure 2-5 and Fi gure 2-6. Fi gure 2-5 Route the Ca bl es from Top Fi gure 2-6 Route the Ca bl es from Si de Install the camera.
-
Page 17: Wall Mounting
Network PTZ Camera·Qui ck Start Gui de 1) Al i gn the camera with the installation plate, and rotate the ca mera clockwise to fix the camera onto the installation pl ate. Note: Al i gn the FRONT label on the camera with the FRONT label on the installation plate. - Page 18 Network PTZ Camera·Qui ck Start Gui de 3) Fi x the bracket seat on the wall with four PA4×25 screws as s hown i n Figure 2-7. Fi gure 2-7 Ins tal l the Bra cket Sea t Install the wall mounting bracket. 1) Route the cables through the bracket.
-
Page 19: Pendant Mounting
Network PTZ Camera·Qui ck Start Gui de Install the camera. 1) Rotate the i nstallation plate anticlockwise to separate it from the ca mera. 2) Connect the cables to the corresponding interfaces on the ca mera. 3) Al i gn the camera with the bracket, and rotate the camera cl ockwise to fix the camera on the bracket. - Page 20 Network PTZ Camera·Qui ck Start Gui de Install the bracket. Fix the pendant bracket on the place where you wa nt to i nstall the camera as shown in Figure 2-10. Fi gure 2-10 Ins tal l the Bra cket Route the cables, a nd connect the cables to the corresponding i nterfaces on the camera as shown in Fi gure 2-11.
- Page 21 Network PTZ Camera·Qui ck Start Gui de 1) Al i gn the camera with the installation plate on the pendant mounting bracket, a nd rotate the camera cl ockwise to fix the ca mera on the i nstallation plate. 2) Remove the protective films after i nstallation. Note: Do not touch the bubble directly with your hands.
-
Page 22: Setting The Ptz Camera Over The Lan
Network PTZ Camera·Qui ck Start Gui de 3 Setting the PTZ Camera over the LAN Notes: You s hall a cknowledge that the use of the product with Internet a ccess might be under network security risks. For a voidance of a ny network attacks and i nformation leakage, strengthen your own protection. -
Page 23: Activating The Camera
Network PTZ Camera·Qui ck Start Gui de Network PTZ Camera Computer Fi gure 3-2 Connecting vi a a Swi tch or a Router 3.2 Activating the Camera Purpose: You a re required to activate the camera first by s etting a strong pa ssword for it before you can use the camera. - Page 24 Network PTZ Camera·Qui ck Start Gui de Input the IP address i nto the address bar of the web browser, a nd enter the a ctivation interface. Notes: The default IP address of the camera is 192.168.1.64. The computer a nd the camera should belong to the same s ubnet.
-
Page 25: Activation Via Sadp Software
Network PTZ Camera·Qui ck Start Gui de 3.2.2 Activation via SADP Software SADP s oftware is used for detecting the online device, activating the devi ce, a nd resetting the password. Get the SADP s oftware from the supplied disk or the official website, a nd install the SADP according to the prompts. - Page 26 Network PTZ Camera·Qui ck Start Gui de Create a password and input the password in the password field, a nd confirm the password.
-
Page 27: Modifying The Ip Address
Network PTZ Camera·Qui ck Start Gui de STRONG PASSWORD RECOMMENDED– We highly recommend you create a strong password of your own choosing (using a minimum of 8 characters, including at least three of the following categories: upper case letters, lower case letters, numbers, and special characters) in order to increase the security of your product. - Page 28 Network PTZ Camera·Qui ck Start Gui de Steps: Run the SADP software. Sel ect a n active device. Cha nge the device IP a ddress to the same s ubnet with your computer by either modifying the IP address manually or checking Enable DHCP.
- Page 29 Network PTZ Camera·Qui ck Start Gui de s upported by SADP. Refer to the user manual of SADP for details.
-
Page 30: Accessing Via Web Browser
Network PTZ Camera·Qui ck Start Gui de 4 Accessing via Web Browser System Requirement: Operating System: Mi crosoft Windows XP SP1 a nd a bove vers ion/Vista/Win7/Server 2003/Server 2008 32bits CPU: Intel Pentium IV 3.0 GHz or higher RAM: 1G or hi gher Di splay: 1024 ×... - Page 31 Network PTZ Camera·Qui ck Start Gui de Cl i ck Login. Install the plug-in before viewing the live vi deo and managing the network PTZ camera. Follow the installation prompts to i nstall the plug-in. Note: You may have to cl ose the web browser to finish the i nstallation of the plug-in.
- Page 32 Network PTZ Camera·Qui ck Start Gui de UD10120B...