Sony UP-D897 Instructions For Use Manual
Digital graphic printer
Hide thumbs
Also See for UP-D897:
- Specifications (2 pages) ,
- Instructions for use manual (25 pages) ,
- Service manual (60 pages)

Related Manuals for Sony UP-D897


Summary of Contents for Sony UP-D897
- Page 1 2-345-260-11 (4) Digital Graphic Printer Instructions for Use UP-D897 © 2005 Sony Corporation...
- Page 2 This unit has been certified according to Standard CSA C22.2 No.601.1. For the customers in the U.S.A. and Canada Model UP-D897 is Non-Patient Equipment. This unit can not be used in the vicinity of patients. * Patient Vicinity Important safeguards/notices for use in the medical environments 1.
- Page 3 Consult your dealer. (According to standard EN60601-1-2 and CISPR11, Class B, Group 1) Caution When you dispose of the unit or accessories, you must obey the law in the relative area or country and the regulation in the relative hospital. Warning on power connection Use a proper power cord for your local power supply.
-
Page 4: Table Of Contents
Table of Contents Getting Started Overview ... 5 Location and Function of Parts and Controls ... 5 Front Panel ... 5 Rear Panel ... 6 Connections ... 6 Connecting to the USB Connector ... 6 Installing the Printer Driver ... 6 Paper ... -
Page 5: Getting Started
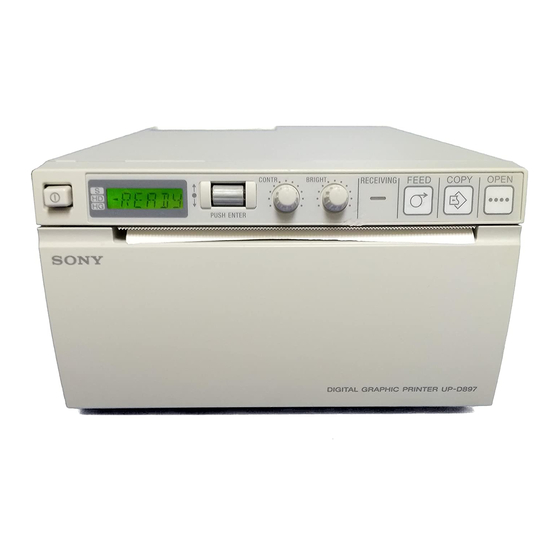
Getting Started Overview Quiet, High Quality, Fast Printing • Employs a thin thermal head with a built-in high speed drive IC, capable of high resolution images of 12.8 dots/mm. • Print speeds of approximately 1 high quality image (960 × 1280 dots) every 2 seconds when printing at high speed. -
Page 6: Rear Panel
• Printer operation is not guaranteed when connecting to the computer using the USB cable via a hub. Connecting to the USB Connector UP-D897 (USB) connector USB connecting cable (supplied) Installing the Printer Driver Install the printer driver provided with the printer. -
Page 7: Paper
Paper Use only Sony UPP-110S/110HD/110HG paper designed for use with this unit. High print quality cannot be guaranteed if any other paper is used with this unit, and such paper could damage the unit. You cannot use the UPP-110HA as specified for the UP-D890/890 series printer. - Page 8 Press the OPEN button to open the paper door. Remove the label from the leading edge of the paper, pull out about 15~20 cm (about 6~8 in.) of the paper, and then set the paper roll in the paper tray. Note To avoid exposing the paper to dust, dirt, etc.
-
Page 9: Operation
Operation Adjustments and Settings Using the Menu You can carry out adjustments and settings to meet your requirements. Those settings and adjustments are retained even if the unit is turned off. Menu Flow The contents displayed on the LCD changes in sequence as you turn the jog dial as shown in the following menu You can set up the unit according to its intended purpose, connected equipments or your individual... -
Page 10: Menu List
Uses the be used printer driver for the UP- D895. [CO:897]: Uses the printer driver for the UP-D897. BACK: Cancels the setting change and returns to the item selection column. To select whether DI: REV: Starts to print in... -
Page 11: Basic Menu Operations
Item Function Settings RSIZE To select whether [RS:OFF]: Prints the image or not the image at the original size. is enlarged RS:ON: Prints the image at a larger size, according to the paper size set by the printer driver. BACK: Cancels the setting change and returns to the item selection column. - Page 12 The back light on the LCD lights in green. Confirm that “READY” is displayed on the LCD, and press the jog dial. The unit enters the menu mode. When you perform a menu operation for the first time after you purchase the unit, the top item of the “BEEP”...
-
Page 13: Registering Menu Settings
To cancel the setting 1 Display “BACK” by turning the jog dial in step 2 Press the jog dial. The display on the LCD returns to “DIR.” To continue menu operations Make settings by repeating steps 3 to 5. To end the menu operation Display “BACK”... -
Page 14: Printing
Printing Before Starting a Print Job Always check the following points: • unit connected correctly? (page 6) • Printer driver installed? (page 6) • Paper loaded correctly? (page 7) • Menu settings and menu adjustments done correctly? (page 9) Starting a Print Job Press the power ON/OFF switch to turn the unit on. -
Page 15: Adjusting The Contrast And Brightness
Adjusting the Contrast and Brightness You can adjust the contrast and brightness of the unit using the CONTR control and BRIGHT control on the front panel. To adjust the contrast You can adjust the contrast of printouts using the CONTR control. To make the contrast stronger: Turn the CONTR control clockwise. -
Page 16: Others
Others Precautions On Safety • Check the operating voltage before operation. Operate the unit only with a power source specified in “Specifications”. • Stop operation immediately if any liquid or solid object falls into the cabinet. Unplug the unit and have it checked by qualified personnel. -
Page 17: Maintenance
Maintenance Cleaning the Cabinet Use a wrung out damp cloth, or a damp cloth soaked in water and a mild detergent, to clean the cabinet surface. To avoid damaging the cabinet of the unit, never use alcohol, thinner, or any other type of organic solvent, or any type of abrasive cleaner, to clean the cabinet. -
Page 18: Specifications
Hi-Speed USB (USB 2.0) Accessories provided Thermal head cleaning sheet (1) CD-ROM (including multi-lingual operating instructions, Readme and printer driver) (1) Media label (1) USB cable 1-824-211-41 (SONY) (1) Before Using this Printer (1) Service Contact List (1) Software License (1) -
Page 19: Troubleshooting
Medical Specifications Protection against electric shock: Class I Protection against harmful ingress of water: Ordinary Degree of safety in the presence of flammable anesthetics or oxygen: Not suitable for use in the presence of flammable anesthetics or oxygen Mode of operation: Continuous The design and these specifications are subject to change without prior notification. -
Page 20: Error Messages
Error Messages Messages appear on the LCD under the following conditions. Take the remedial actions shown next to the messages to correct the problem. Messages Description and remedy DOOR The paper door is open. tClose the paper door until it is locked securely. -
Page 21: Index
Index Connections 6 Error messages 20 Getting Started 5 Location and function of parts and controls front panel 5 rear panel 6 Maintenance cleaning the cabinet 17 cleaning the platen roller 17 cleaning the thermal head 17 Menu basic operations 11 list 10 loading the menu settings 13 menu flow 9... - Page 22 Sony Corporation...