Table of Contents
Advertisement
Advertisement
Table of Contents

Related Manuals for HARDKERNEL ODROID-XU4


Summary of Contents for HARDKERNEL ODROID-XU4
- Page 1 USER MANUAL ODROID-XU4 rev. 20170310...
-
Page 2: Table Of Contents
Index ODROID-XU4 Beginner’s Guide Chapter 1 • Welcome ..................1 Differences between a typical PC and a Single Board Computer (SBC) ..2 Components Included on an SBC ..............2 Block Diagram ....................3 Board Image ....................3 Power Supply ....................4 Monitor......................5 Keyboard and Mouse ..................5 Ethernet and Wifi .....................6... - Page 3 Index ODROID-XU4 Beginner’s Guide Booting Up .....................30 Linux Basics ....................31 Kernel ......................32 Graphical User Interface (GUI) ...............32 720p vs 1080p ....................32 Progressive vs Interlaced Video ..............33 Video Downconversion ...................33 Video Upconversion ..................34 HDMI Overscan ....................34 Command Line Interface ................36 Disk Partitions....................36 Web Browsing ....................37...
- Page 4 Index ODROID-XU4 Beginner’s Guide ODROID-SHOW2 ...................56 Weather Board ....................58 USB Audio Adapter ..................59 USB-SPDIF ....................61 USB-CAM 720p ....................62 USB3/SATA3 HDD/SDD Interface Kit and SATA Bridge Board ......63 USB3/SATA3 HDD/SSD RAID0/1 Enclosure ..........66 USB GPS Module ...................68 myAHRS+ Board ....................70 Cloudshell .......................72 Expansion Board ....................75...
- Page 5 © 2015 Hard Kernel, Ltd. • 704 Anyang K-Center, Gwanyang, Dongan, Anyang, Gyeonggi, South Korea, 431-815 Hardkernel manufactures the ODROID family of quad-core development boards and the world’s first ARM big.LITTLE single board computer. Read our monthly magazine at http://magazine.odroid.com.
-
Page 6: Chapter 1 • Welcome
Some of the modern operating systems that run on the ODROID-XU4 are Ubuntu, Android, Fedora, ARCHLinux, Debian, and OpenELEC, with thousands of free open-source software packages available. The ODROID-XU4 is an ARM device, which is the most widely used architecture for mobile devices and embedded 32-bit computing. -
Page 7: Differences Between A Typical Pc And A Single Board Computer (Sbc)
XU4 also includes a 40-pin GPIO port, an external RTC battery connector, a USB-UART serial console port, an eMMC module connector, and a dedicated slot for a microSD card. For more details, refer to the ODROID-XU4 introductory videos https://youtu.be/wtqfC9v0xB0 https://youtu.be/lUchfyTpOjU... -
Page 8: Block Diagram
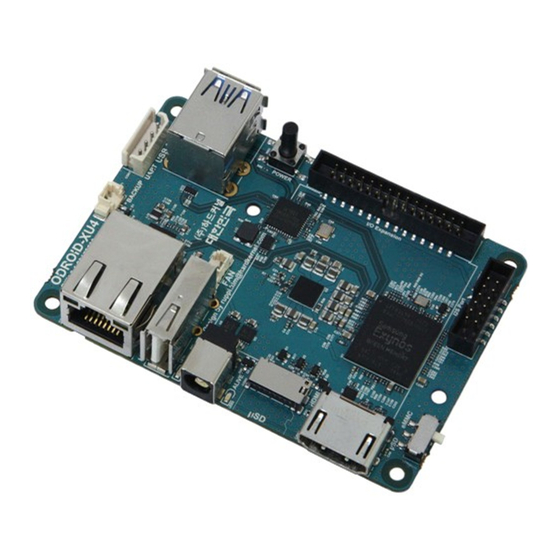
Chapter 1 Block Diagram The following diagram illustrates conceptually how the compo- nents of the XU4 fit together: XU4 Block Diagram and Annotated Board Image ODROID-XU4 USER MANUAL... -
Page 9: Power Supply
2-pin PSU into the power outlet. The pins are Asian standard, and you may need an adapter to use in your region, such as the Americas. The PSU pictured above is available from Hardkernel. DC plug cable If you have a 5V DC 4A PSU which does not have the required plug, you can cut off the plug from such a power supply. -
Page 10: Monitor
Chapter 1 This cable is also available from Hardkernel, and may be paired with the SmartPower peripheral, which is an excellent bench power supply with variable voltage. Monitor The XU4 offers an HDMI port for connecting an HDMI-com- pliant monitor. It is recommended to use the Hardkernel supplied HDMI cable, but many other high quality standard cables should also work. -
Page 11: Ethernet And Wifi
If you are unable to push it in, it may be misaligned. Recheck and flip the microSD card if you notice a wrong insertion direction. The image below shows a properly mounted microSD card. XU4 closeup with microSD card attached ODROID-XU4 USER MANUAL... -
Page 12: Emmc Module
The image below depicts how the eMMC module appears after it is mounted. XU4 closeup with eMMC module attached LED status The ODROID-XU4 includes several LED lights that indicate the status of the device: • Is on when power is available blue •... -
Page 13: Technical Specifications
30 sec- onds. According to our testing, most Sandisk microSD cards don’t cause a long boot delay. The ODROID-XU4 model is compatible with a wide array of microSD cards, but class 10 cards or above are highly recommended. - Page 14 The 30-pin GPIO port can be used as GPIO/IRQ/SPI/ADC, and the 12-pin GPIO port can be used as GPIO/I2S/I2C for electronics and robotics. The GPIO pins on an ODROID-XU4 are a great way to inter- face with physical devices like buttons and LEDs using a lightweight Linux controller.
-
Page 15: Heat Sink And Fan
Some owners prefer that the temperatures do not reach such high levels and install a heat sink, which is available from the Hardkernel store. Heat transfer from components to the surround- ing air is related to the surface area available to transfer heat to the surrounding air. -
Page 16: Frequently Asked Questions
You may boot from either microSD card or eMMC module. Can I buy OS pre-loaded SD card or eMMC? Yes, they are available from Hardkernel as well as other distributors. Can I add extra RAM memory? No. The RAM is not removable or swappable. - Page 17 What are the minimum peripherals to run Ubuntu or Android with an ODROID-XU4? The following peripherals are not included with the basic ODROID-XU4 board, but may be purchased separately from the Hard- kernel store, or from a certified distributor: • HDMI monitor for output device & HDMI Cable •...
- Page 18 Use a 10/100/1000 LAN Ethernet connection, or purchase the WiFi module kit for a wireless connection. What display can I use? There is an HDMI Type-A output port on the ODROID-XU4. Below is a list of resolutions that are currently supported: • 1920x1200 (WUXGA) •...
- Page 19 No, but you can use a SATA-to-USB bridge device. Which power adapter should I use? The ODROID-XU4 consumes less than 1A in most cases, but it can climb to 4A if many passive USB peripherals are attached directly to the main board. It is recommended to use the Hardkernel 5V/4A PSU or USB-to-DC Plug cable with a 5V/4A charger.
- Page 20 However, the GPU userland drivers are in binary format due to ARM’s policies. Do I need to patch for optional accessories that are purchased from the Hardkernel store? No, they will work out-of-box with the kernels supplied with the oper- ating system.
-
Page 21: Chapter 2 • Getting Started
Linux), that connects via wired ethernet or WiFi to the router, and • At least one XU4, that connects (wired ethernet or WiFi) to the router, which uses a High-Definition Multimedia In- terface (HDMI) monitor (possibly touch-capable, such as an ODROID-VU). ODROID-XU4 USER MANUAL... -
Page 22: Preparing The Work Area
• A well-grounded surge-protector with 6 or more outlets, within reach of the free area. The above criteria will go a long way in ensuring a safe workspace for you and your projects involving boards such as the XU4. ODROID-XU4 USER MANUAL... -
Page 23: Flashing An Image
If you refer to the annotated board image, you can see that the XU4 supports two boot media types - microSD card or an eMMC module. They can be obtained from Hardkernel directly, either with Linux or Android, pre-installed. If you purchased one such device and if it has a factory-installed image, you can skip the flashing steps in this section and proceed to the next section. - Page 24 Align the metal strips of the microSD adapter to make contact with the pins in the microSD receptacle of the USB SD card reader / writer. In- sert the assembly by pressing firmly on the eMMC module until it clicks into place. ODROID-XU4 USER MANUAL...
-
Page 25: Windows
After the system has booted, launch a web-browser such as Firefox and navigate to , which will list all of the avail- http://bit.ly/1kMUC27 able Ubuntu images. Click on the link to download the latest Ubuntu 16.04 image, for example, http://bit.ly/2kINgjl ODROID-XU4 USER MANUAL... - Page 26 Chapter 2 List of Ubuntu images for the ODROID-XU4 Because the ODROID-XU4 is fully software compatible with the ODROID-XU3, many images listed on the Hardkernel website and the ODROID forums are labeled for the ODROID-XU3. Any image that was built for the ODROID-XU3 will work properly on the ODROID- XU4.
- Page 27 C:\Program Files (x86) C:\Program Files (x86)\win32diskimager2-binary\ You will need to be logged in to Windows OS as an administrator to move this directory. Then, create a shortcut for the application on the desktop using the following link: ODROID-XU4 USER MANUAL...
- Page 28 Android image? While you would download a different com- pressed file, all subsequent steps would be that same as those listed above. You would need to to launch the browser once again and point it ODROID-XU4 USER MANUAL...
-
Page 29: Linux
List of Android images for the ODROID-XU4 Flashing an Image on a Linux Ubuntu Computer In your Ubuntu Linux desktop, launch a terminal window. Create a working directory: $ cd ~ &&... -
Page 30: Osx
Android images can be found at http://bit.ly/1XwOatZ Flashing an Image on an OSX Computer The procedure for creating an image file using OSX is similar to Linux, with some small differences. First, download and install the ODROID-XU4 USER MANUAL... -
Page 31: Inserting The Emmc Module Or Sd Card
Depending on the peripherals attached, you may need a more powerful power supply, such as one rated at 5V/6A+. If the first power supply doesn’t work, try another supported model. If neither work, seek to RMA the XU4. ODROID-XU4 USER MANUAL... - Page 32 PC and select the correct resolution (see Chapter 1 for details). Some HDMI cables have compatibility issues, so make sure to use an official Hardkernel HDMI cable. Some monitors have non-stan- dard EDID functions. In this case, you need to select the non-EDID mode in the ODROID configuration utility.
-
Page 33: Configuring Linux
To update the HDMI resolution, edit the file /media/boot/boot.ini. Update the section titled “Screen Configuration for HDMI” by un-com- menting only one entry of the HDMI setting. For some older versions of Linux, you may be able to use the ODROID Utility to update the ODROID-XU4 USER MANUAL... -
Page 34: Configuring Android
$ sudo shutdown -h now Wait until the blue LED goes out, which indicates that all system activ- ity has completed. It is now safe to unplug the ODROID-XU4 power supply, remove the boot media, and detach the peripherals. ODROID-XU4 USER MANUAL... -
Page 35: Chapter 3 • Operating Systems
Booting Up Ubuntu (MATE desktop) can be ordered as a pre-installation on the eMMC or microSD card that comes with the ODROID-XU4. Please refer to Chapter 2 for instructions on downloading and flashing Ubuntu onto your XU4’s boot media. Once the XU4 has been powered on, it will boot to a desktop similar to the one shown in the following image. -
Page 36: Linux Basics
Lubuntu, Kubuntu, or Xubuntu, since they include a robust Applications menu and Software Center for downloading new applications, as shown in the image below. The Software Center may be installed using the following command: $ sudo apt-get install software-center ODROID-XU4 USER MANUAL... -
Page 37: Kernel
Chapter 3 If the ODROID-XU4 is being used as part of robotics project, a lightweight environment such as Blackbox may be more suitable, in order to free up the amount of memory available for the main controller application. Other specialized environments are also available from... -
Page 38: Progressive Vs Interlaced Video
For example, if you use a display that only supports native 720p, and you set your XU4 to a 1080p screen resolution, it will probably ODROID-XU4 USER MANUAL... -
Page 39: Video Upconversion
To the viewer, this results in a cleaner picture, and the overscan simply isn’t ODROID-XU4 USER MANUAL... - Page 40 Menu > View Mode Change to “Dot by Dot” Menu > Tools Change HDMI Source to “PC” Menu > Picture > Screen adjustment > Picture Size Screen Auto Config Menu > AV Preset > HDMI Change to “PC” ODROID-XU4 USER MANUAL...
-
Page 41: Command Line Interface
Disk Partitions Linux can read and write to a variety of disk formats, with the most common called EXT3, EXT4, and FAT. If disk compatibility with Windows and OSX is a priority, it is recommended to format external ODROID-XU4 USER MANUAL... -
Page 42: Web Browsing
Kodi (formerly XBMC) Kodi is an application which can turn an ODROID-XU4 into an amazingly powerful home media center. In fact, using the XU4 to run Kodi is the reason why many, if not most people purchased their XU4 in the first place. -
Page 43: Office And Productivity Applications
Kodi Installation To install Kodi, use the ODROID Utility published by Hardkernel. If the ODROID Utility is not already installed on the image, it may be downloaded using the following Terminal commands: $ sudo wget -O /usr/local/bin/odroid-utility.sh \... -
Page 44: How Do I Add A Midi Interface To The Xu4
Linux and/or Android device driver support which includes the MPU-401 interface. USB-to-MIDI-Adapter: A number of basic devices are available which have been proven to work on both Android and Linux. Compatible de- ODROID-XU4 USER MANUAL... -
Page 45: Experimental Music With The Xu4
Android is an easy-to-use, yet powerful operating system, in- tended for smartphones, tablets and other portable devices It also runs very well on the ODROID-XU4, not only as an inexpensive test- ing platform for building Android applications, but also as a set-top... -
Page 46: Odroid Utility And Updater
For the edges that you wish to adjust, click on the corresponding arrow in order to set the number of offset pixels. After adjusting the settings, click on the “Apply and Reboot” button. Installing Google Play and applications The official Hardkernel Android image comes without any Goo- ODROID-XU4 USER MANUAL... -
Page 47: Kodi
30 seconds, depending on the speed of your Inter- net connection. Gaming Most Android games are compatible with the ODROID-XU4, but some applications that use multitouch gestures won’t be playable with- out a touchscreen. The ODROID-VU, available from the Hardkernel Store, will allow all Android games to be played without the need for an auxiliary controller. -
Page 48: Using Bluetooth Devices With Android
ODROID-VU7 Plus: 7” 1024 x 600 5-finger touch display To use these displays with the XU4, connect the USB cable from them to the ODROID-XU4’s USB port via an HDMI Type A cable. Use an appropriate power supply, provide the required power to the dis- play. -
Page 49: Chapter 4 • Hardware Tinkering
USB port, which could damage the XU4. Make sure to backup your image before attempting to work with any new peripheral, especially if it requires installation of additional software. You can always revert to a known working state, should your efforts cause issues. ODROID-XU4 USER MANUAL... -
Page 50: Usb Uart
Chapter 4 Prerequisites Install the latest official Hardkernel Linux image from http:// onto an eMMC module or compatible microSD card. bit.ly/1Y9EZhJ The version information is found by typing the following command: $ uname -a Linux odroid 3.10.104-131 #1 SMP PREEMPT Sat Feb 18 01:04:01 UTC... - Page 51 COM7. This is the COM port that should be used in the PuTTY configuration. USB UART module on COM7 Next, launch PuTTY and select the Serial option on the left pane as shown next page. ODROID-XU4 USER MANUAL...
- Page 52 Serial configuration in PuTTY Saved serial configuration in PuTTY Serial line: COM7 Speed: 115200 Connection Type: Serial Give this configuration a name such as “XU4-1-usb-serial”, then save it. This saved configuration can be reloaded and used anytime, ODROID-XU4 USER MANUAL...
- Page 53 For this SSH option to work, the host PC system and the XU4 need to be visible to each other on the same local area network (LAN). Refer to the screenshot below for an example PuTTY configuration. Saved SSH configuration in PuTTY ODROID-XU4 USER MANUAL...
- Page 54 Ubuntu desktop Linux host system. Most of the steps apply to a host system running any Linux version, including a server OS. Linux Host Setup Access the Linux desktop of the host system and launch a ter- ODROID-XU4 USER MANUAL...
- Page 55 USB UART cable attached to the XU4. The ap- plication used to enable communication is called Minicom. Launch Minicom using the following commands: $ minicom -version minicom version 2.6.1 (compiled May 1 2012) Copyright (C) Miquel van Smoorenburg. $ sudo minicom -o -s ODROID-XU4 USER MANUAL...
- Page 56 Chapter 4 Here are the four screens necessary to configure and use Minicom: Port option Serial port data Save setup Minicom session ODROID-XU4 USER MANUAL...
-
Page 57: Bluetooth Module 2
4. Reboot the XU4 and you will observe boot-time information scroll through the minicom (terminal) session. Bluetooth Module 2 Hardkernel offers a bluetooth adapter called the Bluetooth (4.0) Module 2 which is certified to work with the XU4 under both Android and Linux in the following modes: •... - Page 58 SCO MTU: 64:8 UP RUNNING PSCAN RX bytes:685 acl:0 sco:0 events:50 errors:0 TX bytes:4159 acl:0 sco:0 commands:50 errors:0 $ sudo rfkill list all 0: hci0: Bluetooth Soft blocked: no Hard blocked: no Hard blocked: no Bluetooth Manager configuration screen ODROID-XU4 USER MANUAL...
- Page 59 Using a device that has Bluetooth support, enable it and scan for the XU4’s Bluetooth device called “odroid-0”. Select it in order to pair it with the XU4. Debug information will appear in the terminal instance where the hcidump utility was started, as shown in the image above. ODROID-XU4 USER MANUAL...
-
Page 60: Oduino One
Bus 003 Device 005: ID 2341:0043 Arduino SA Uno R3 (CDC ACM) … $ lsusb -D /dev/bus/usb/003/005 Device: ID 2341:0043 Arduino SA Uno R3 (CDC ACM) Couldn’t open device, some information will be missing Device Descriptor: bLength bDescriptorType bcdUSB 1.10 ODROID-XU4 USER MANUAL... -
Page 61: Odroid-Show2
… The activity on the ONE package may also be transmitted to the XU4. Hardkernel has provided C sample source code to display this information transmitted by the ONE at . Note http://bit.ly/1Q1K3p2 that it has been tested on some older platforms, but in order for it to work on the XU4, the sample code needs to be modified as described http://bit.ly/1p8uitU. - Page 62 $ cd ~ $ sudo apt-get install git $ git clone https://github.com/hardkernel/ODROID-SHOW $ cd ODROID-SHOW/example/linux $ gcc -o status status.c && sudo ./status You should see the LCD display similar to the image below. ODROID-SHOW2 displaying some system statistics...
-
Page 63: Weather Board
• It must NOT be installed during normal usage mode. Weather Board The Weather board is an add-on developed by Hardkernel that may be used with either the SHOW2 or a 16x2 LCD device. Follow the following steps to get the Weather board to work with the SHOW2 and the ODROID-XU4. -
Page 64: Usb Audio Adapter
The DC Plug cable accessory, shown below, is typically used to provide power to the XU4 using a special purpose power supply. These power supplies could include bench-top models or Hardkernel’s SmartPower. Ensure that the power supply provides clean power, rat- ed at 5V, 2.0+ Amps. - Page 65 Applications menu. Select the Recording tab and start recording. You should observe the recording level in the green bar located midway on the screen as shown in the image below. PulseAudio Volume Control showing recording progress ODROID-XU4 USER MANUAL...
-
Page 66: Usb-Spdif
Chapter 4 USB-SPDIF Hardkernel makes an XU4-compatible S/PDIF (Sony/Philips Digital Interface Format) kit with a USB interface, as shown below. This allows you to hook up the audio from the XU4 via USB to an am- plifier (A/V receiver), when the HDMI audio out option is not used. -
Page 67: Usb-Cam 720P
Tube video link that has audio included. Play it in order to verify that the audio is audible. USB-CAM 720P Hardkernel offers a USB-CAM rated at 720p with up to 30 fps. The image below shows a camera that is certified to work with the XU4:... -
Page 68: Usb3/Sata3 Hdd/Sdd Interface Kit And Sata Bridge Board
Camorama application USB3 / SATA3 HDD/SSD Interface Kit and SATA Bridge Board The USB3/SATA3 HDD/SDD interface kit offered by Hardkernel can be used to attach a SATA HDD or SSD to the XU4. The package includes the docking system, a power supply (12V/2A) and a USB3.0 cable. - Page 69 SSDs too, such as the PNY 240GB XLR8 model. Some older desktop SATA2 desktop-class HDDs may also work. Docking system with SATA HDD storage device attached to XU4 A brand new storage device, if unformatted, will not be automat- ODROID-XU4 USER MANUAL...
- Page 70 New partition information Enter a label name such as “xu4-hdd-01” and click the Add but- ton. You will be presented with the next screen. Select the new parti- ODROID-XU4 USER MANUAL...
-
Page 71: Usb3/Sata3 Hdd/Ssd Raid0/1 Enclosure
New hard drive mounted and ready for use USB3 / SATA2 HDD/SSD RAID 0/1 Enclosure As of February 2017, Hardkernel does not yet provide a kit that officially supports RAID 0/1 support for HDDs/SSDs. However, you may be successful in using some 3rd-party peripherals, such as the CineRAID CR-H212 2-bay 2.5”... - Page 72 XU4 cannot provide the peak startup power requirements of the enclosure via the USB3 port. Please note that Hardkernel does not endorse or support this enclosure and cannot be expected to provide help with its use on the XU4.
-
Page 73: Usb Gps Module
1% /media/odroid/xu4-01-raid1 Note that the file-system entry of /dev/sda1 is the same as the entry for the HDD storage device used in the official Hardkernel dock- ing system kit described in the previous section. No two entries can actually have the same filesystem names. They are the same here since these sections were written with only one external storage de- vice attached at a time. - Page 74 To test the higher level functionality of the GPS dongle, we can use the services of gpsd, a service daemon, that monitors one or more GPS modules and makes the pcv (position, course, velocity) data available via the TCP port 2947 of the host system. ODROID-XU4 USER MANUAL...
-
Page 75: Myahrs+ Board
(AHRS) that is minimally influenced by acceleration and magnetic disturbances, the low-cost USB2-based myAHRS+ board offered by Hardkernel is a good choice. It also sports an I2C interface useful in an embedded application like Arduino-based projects. The sensors it includes are: •... - Page 76 0x5740 STM32F407 bcdDevice 2.00 iManufacturer 1 STMicroelectronics iProduct 2 STM32 Virtual COM Port iSerial 3 000001010000 bNumConfigurations The board should be configured using the steps described at http://bit.ly/1TGve9g. Run the following command to view typical out- ODROID-XU4 USER MANUAL...
-
Page 77: Cloudshell
Cloudshell The powerful XU4, along with its I/O, makes for a very cost effec- tive DIY Network Attached Storage (NAS) Solution. Hardkernel has developed a compact NAS solution called the Cloudshell. It is essen- tially a modern case that includes the following: •... - Page 78 2.2” LCD. To ensure smartmontools (Genesys Logic USB3 / SATA support in Cloudshell) Ver. 6.5.4132 or higher is installed, run the following command: $ sudo apt install smartmontools ODROID-XU4 USER MANUAL...
- Page 79 Chapter 4 Hardkernel also offers an infrared remote control that can be configured to work the Cloudshell using the following commands: $ wget https://raw.githubusercontent.com/mdrjr/\ cloudshell_ir/master/install_ir.sh $ chmod +x install_ir.sh && sudo ./install_ir.sh The Xorg settings (etc/X11/xorg.conf) to enable the LCD and disable HDMI are shown below: Section “Device”...
-
Page 80: Expansion Board
Chapter 4 Expansion Board Hardkernel offers a convenient expansion board compatible with the XU4. It has the following inputs and outputs: • 4 x buttons (GPIO) • 1 x button (Power On) • 5 x LEDs (GPIO) • 1 x SPI Flash 2Mbit (Upto 20Mhz SPI clocking) •... -
Page 81: Shifter Shield
The display is a white on blue LCD display with tactile switches and I/O pins. The WiringPi library provides a convenient programming interface, which may be built using the following commands: $ git clone https://github.com/hardkernel/wiringPi $ cd wiringPi $ ./build... -
Page 82: Odroid-Vu7
ODROID-VU7 If you want to add a 7” HDMI display that supports 5-point multi- touch to your XU4 with low power requirements, Hardkernel has de- veloped the VU7 kit for this very purpose. Linux is supported with minimal setup, and Android compatibility is expected in early 2016. It supports the 800x480 resolution, and offers the ability to enabled or disable the backlighting. - Page 83 Additional details on using and setting up the ODROID-VU7 are available at http://bit.ly/1NWxgDx XU4 with the VU7 display VuShell for ODROID-VU7 If you wish to create a functional desktop PC that employs the XU4, the VU7 and other appropriate accessories, you could use the ODROID-XU4 USER MANUAL...
- Page 84 C1+. Using Linux kernel 3.10.92-63+ or higher, while attached to an- other display or via SSH, access the Terminal and type the following commands: $ cd /media/boot $ nano boot.ini Then, enable the following entries in the boot.ini file: ODROID-XU4 USER MANUAL...
-
Page 85: Micro Usb-Dc Power Bridge
Micro USB-DC Power Bridge When the XU4 is under heavy stress, its power requirements can increase sharply. As a result, the power supplied to the VU7/VU7-Plus displays can drop, which could lead to a flickering display. To ensure ODROID-XU4 USER MANUAL... -
Page 86: Odroid-Vu5
ODROID-VU5 If you wish to use a display that consumes less power than the VU7 and VU7 Plus, Hardkernel has developed a 5” HDMI 800 x 480 display kit that supports 5-point multi-touch to your XU4. It supports 800x430 resolution, and offers the ability to enable or disable the back- lighting. -
Page 87: Heat Sink
The steps required to install the heat sink are available at http://bit. ly/2l288mY. SmartPower2 Hardkernel has developed the next generation SmartPower2 accessory with an input of 15V 4A and an output of 5.3V 1A (USB host port) and 5A (terminal block). The latter can be used to power an XU4. -
Page 88: Ocam
Depth: 30-35 mm (Variable length for Manual Focusing) FOV: 65 Degree Shutter: Electric Rolling Shutter Interface: USB 3.0 Super-Speed Camera Control: Brightness, Contrast, Hue, Saturation, White Bal- ance Frame Rate (YUV): 2592x1944@7.5fps, 1920x1080@15fps, 1280x720@30fps, 640x480@120fps, 320x240@120fps Frame Rate (MJPEG): 1920x1080@30fps, 1280x720@45fps, 640x480@30fps ODROID-XU4 USER MANUAL... - Page 89 Several articles have been published that describe the versatile use of this camera with the XU4, available at http://bit.ly/2lMG2e8 • Face Detection Using OCAM and ODROID-XU4: How To Recognize Human Features • Camera Calibration Using OCAM and ODROID-XU4: A Technical Tutorial •...
- Page 90 : 5MP USB 3.0 Global Shutter Camera Another digital camera with a global shutter for use with the XU4 is the oCam-1MGN-U model. Like the oCam-5CRO-U, it is offered by Hardkernel and developed & manufactured by WITHROBOT Co., LTD. oCam with global shutter...
-
Page 91: Wifi Module 5
WiFi Module 5 The WiFi Module 5 is one of the most feature-rich WiFi modules offered by Hardkernel. It is an EEE 802.11ac/a/b/g/n WLAN module with dual-band (2.4Ghz and 5Ghz) support. The specifications include: • Realtek RTL8812AU chipset (ID = 0bda:8812) •... -
Page 92: Conclusion
Linux drivers available. The gadgets sold by Hardkernel at http:// have the advantage of having pre-configured drivers bit.ly/1fbE9ld included with the official Hardkernel disk images. We hope you enjoy tinkering and building your own projects using some of the techniques described here. Additional Resources ODROID forums: http://forum.odroid.com...