Sony CDX CDX-GT210 Operating Instructions Manual
Sony fm/am compact disc player operating instructions cdx-gt210, cdx-gt21w
Hide thumbs
Also See for CDX CDX-GT210:
- Service manual (42 pages) ,
- Operating instructions manual (32 pages) ,
- Installation/connections (2 pages)
Table of Contents
Advertisement
Available languages
Available languages
FM/AM
Compact Disc Player
Operating Instructions
Mode d'emploi
Owner's Record
The model and serial numbers are located on the bottom of the unit.
Record these numbers in the space provided below.
Refer to these numbers whenever you call upon your Sony dealer regarding this product.
Model No.
To cancel the demonstration (DEMO) display, see page 8.
Pour annuler l'affichage de démonstration (DEMO), reportez-vous à la page 9.
CDX-GT210
CDX-GT21W
© 2006 Sony Corporation
Serial No.
2-696-857-21 (1)
US
FR
Advertisement
Chapters
Table of Contents

Related Manuals for Sony CDX CDX-GT210


Summary of Contents for Sony CDX CDX-GT210
- Page 1 The model and serial numbers are located on the bottom of the unit. Record these numbers in the space provided below. Refer to these numbers whenever you call upon your Sony dealer regarding this product. Model No. To cancel the demonstration (DEMO) display, see page 8.
- Page 2 For installation and connections, see the supplied installation/connections manual. Warning This equipment has been tested and found to comply with the limits for a Class B digital device, pursuant to Part 15 of the FCC Rules. These limits are designed to provide reasonable protection against harmful interference in a residential installation.
-
Page 3: Table Of Contents
Table of Contents Welcome ! ......4 Getting Started Setting the clock ......4 Detaching the front panel . -
Page 4: Welcome
Welcome ! Thank you for purchasing this Sony Compact Disc Player. You can enjoy your drive with the following functions. • CD playback You can play CD-DA (also containing CD TEXT*) and CD-R/CD-RW (MP3/WMA files also containing Multi Session (page 10)). -
Page 5: Attaching The Front Panel
Attaching the front panel Engage part A of the front panel with part B of the unit, as illustrated, and push the left side into position until it clicks. Note Do not put anything on the inner surface of the front panel. -
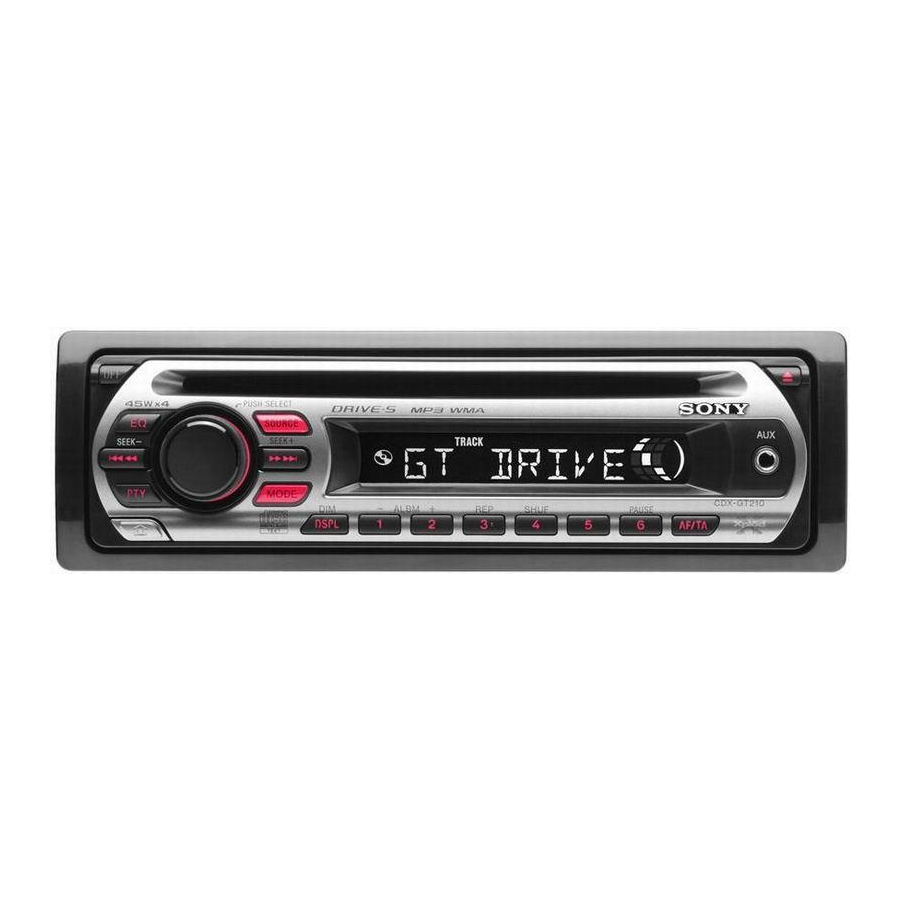
Page 6: Location Of Controls And Basic Operations
Location of controls and basic operations Main unit PUSH SELECT SEEK DSPL qa qs Refer to the pages listed for details. A OFF button To power off; stop the source. B EQ (equalizer) button 8 To select an equalizer type (XPLOD, NATURAL, HARD, UPBEAT, VOCAL, CUSTOM or OFF). -
Page 7: Display Items
Display items Track number/Elapsed playing time, Disc/ artist name, Album number* name, Track name, Text information* Clock *1 Album number is displayed only when the album is changed. *2 When playing an MP3, ID3 tag is displayed, and when playing a WMA, WMA tag is displayed. To change display items, press (DSPL);... -
Page 8: Other Functions
Other functions Changing the sound settings Adjusting the balance and fader — BAL/FAD Press the select button repeatedly until “BAL” or “FAD” appears. The item changes as follows: t HI* t BAL (left-right) t LOW* FAD (front-rear) t AUX* *1 When EQ lite is activated (page 8). *2 When AUX source is activated (page 9). -
Page 9: Using Optional Equipment
MONO (Monaural Mode)* To improve poor FM reception, select monaural reception mode. – “MONO-ON” : to hear stereo broadcast in monaural. – “MONO-OFF” ( ): to hear stereo broadcast in stereo. LOUD (Loudness) To allow you to listen clearly at low volume levels. -
Page 10: Additional Information
Additional Information Precautions • If your car has been parked in direct sunlight, allow the unit to cool off before operating it. • Power antenna (aerial) will extend automatically while the unit is operating. Moisture condensation On a rainy day or in a very damp area, moisture condensation may occur inside the lenses and display of the unit. -
Page 11: Maintenance
• Files protected by copyright are not playable. If you have any questions or problems concerning your unit that are not covered in this manual, consult your nearest Sony dealer. Maintenance Fuse replacement When replacing the fuse, be sure to use one matching the amperage rating stated on the original fuse. -
Page 12: Specifications
Remove the unit. 1 Insert both release keys simultaneously until they click. 2 Pull the release keys to unseat the unit. 3 Slide the unit out of the mounting. Specifications AUDIO POWER SPECIFICATIONS POWER OUTPUT AND TOTAL HARMONIC DISTORTION 23 watts per channel minimum continuous average power into 4 ohms, 4 channels driven from 20 Hz to 20 kHz with no more than 5% total harmonic distortion. -
Page 13: Troubleshooting
Troubleshooting The following checklist will help you remedy problems you may encounter with your unit. Before going through the checklist below, check the connection and operating procedures. General No power is being supplied to the unit. Check the connection. If everything is in order, check the fuse. -
Page 14: Error Displays/Messages
The character cannot be displayed with the unit. If these solutions do not help improve the situation, consult your nearest Sony dealer. If you take the unit to be repaired because of CD playback trouble, bring the disc that was used at the time the problem began. - Page 16 En ce qui concerne l’installation et les connexions, consulter le manuel d’installation/raccordement fourni. Avertissement ATTENTION L’utilisation d’instruments optiques avec ce produit augmente les risques pour les yeux. Avertissement si le contact de votre voiture ne dispose pas d’une position Veillez à régler la fonction Auto Off (page 9). L’appareil s’éteint complètement et automatiquement après le laps de temps choisi une fois l’appareil mis hors tension afin...
- Page 17 Table des matières Félicitations ! ......4 Préparation Réglage de l’horloge ..... 4 Retrait de la façade .
-
Page 18: Félicitations
Félicitations ! Nous vous remercions d’avoir fait l’acquisition de ce lecteur de disques compacts Sony. Ce lecteur vous offre les fonctions suivantes. • Lecture de CD Vous pouvez lire des CD-DA (contenant également des informations CD TEXT*) et des CD-R/CD-RW (fichiers MP3/WMA contenant également des enregistrements en multisessions... -
Page 19: Installation De La Façade
Installation de la façade Insérez la partie A de la façade dans la partie B de l’appareil, tel qu’illustré, puis poussez sur le côté gauche jusqu’au déclic de mise en place. Remarque Ne posez rien sur la face interne de la façade. -
Page 20: Emplacement Des Commandes Et Opérations De Base
Emplacement des commandes et opérations de base Appareil principal PUSH SELECT SEEK DSPL qa qs Pour plus de détails, reportez-vous aux numéros de pages indiqués. A Touche OFF Mise hors tension de l’appareil ; arrêt de la source. B Touche EQ (égaliseur) 8 Sélection d’un type d’égaliseur (XPLOD, NATURAL, HARD, UPBEAT, VOCAL, CUSTOM ou OFF). -
Page 21: Rubriques D'affichage
Rubriques d’affichage Numéro de plage/temps de lecture écoulé, nom du disque/de l’artiste, numéro de l’album* , nom de l’album, nom de la plage, informations textuelles* *1 Le numéro de l’album s’affiche uniquement lorsque vous changez d’album. *2 Lors de la lecture d’un fichier MP3, une étiquette ID3 s’affiche ;... -
Page 22: Recherche Automatique Des Fréquences
Recherche automatique des fréquences Sélectionnez la bande, puis appuyez sur (SEEK) –/+ pour rechercher la station. Le balayage s’interrompt lorsque l’appareil capte une station. Répétez cette procédure jusqu’à ce que vous captiez la station souhaitée. Conseil Si vous connaissez la fréquence de la station que vous souhaitez écouter, maintenez la touche (SEEK) –/+ enfoncée pour localiser la fréquence approximativement, puis appuyez plusieurs fois sur... -
Page 23: Réglage Des Paramètres De Configuration
Conseil Vous pouvez également régler d’autres types d’égaliseurs. Réglage des paramètres de configuration — SET Appuyez sur la touche de sélection et maintenez-la enfoncée. L’écran de configuration apparaît. Appuyez plusieurs fois sur la touche de sélection jusqu’à ce que le paramètre de votre choix apparaisse. -
Page 24: Informations Complémentaires
Raccordement de l’appareil audio portatif 1 Mettez l’appareil audio portatif hors tension. 2 Baissez le volume sur l’appareil. 3 Procédez au raccordement à l’appareil. Cordon de raccordement* (non fourni) * Veillez à utiliser une fiche droite. Réglage du niveau de volume Veillez à... -
Page 25: À Propos Des Fichiers Mp3/Wma
• Les disques de forme non standard (ex. : en forme de cœur, de carré ou d’étoile) ne peuvent pas être lus avec cet appareil. Vous risquez d’endommager votre appareil si vous essayez de le faire. N’utilisez pas de tels disques. •... -
Page 26: Entretien
Si le nouveau fusible fond également, il est possible que l’appareil soit défectueux. Dans ce cas, communiquez avec votre détaillant Sony le plus proche. Nettoyage des connecteurs L’appareil peut ne pas fonctionner correctement si les connecteurs entre l’appareil et la façade sont encrassés. -
Page 27: Caractéristiques Techniques
Caractéristiques techniques Lecteur CD Rapport signal/bruit : 95 dB Réponse en fréquence : 10 à 20,000 Hz Pleurage et scintillement : en dessous du seuil mesurable Radio Plage de syntonisation : 87,5 à 107,9 MHz Borne d’antenne : Connecteur d’antenne externe Fréquence intermédiaire :10,7 MHz/450 kHz Sensibilité... -
Page 28: Affichage Des Erreurs Et Messages
L’affichage disparaît de la fenêtre d’affichage ou il n’apparaît pas. • Le régulateur de luminosité est réglé à « DIM-ON » (page 9). • L’affichage disparaît si vous maintenez la touche (OFF) enfoncée. t Maintenez la touche (OFF) de l’appareil enfoncée jusqu’à... - Page 29 Il se peut que l’appareil soit défectueux. t Vérifiez le raccordement. Si le message d’erreur ne disparaît pas de l’affichage, communiquez avec votre détaillant Sony le plus proche. READ L’appareil lit toutes les informations relatives aux plages et aux albums du disque.
- Page 32 If you have any questions/problems regarding this product, try the following: Read Troubleshooting in these Operating Instructions. Please contact (U.S.A. only); Call http://www.sony.net/ Sony Corporation Printed in China 1-800-222-7669 http://www.SONY.com...