Advertisement
Quick Links
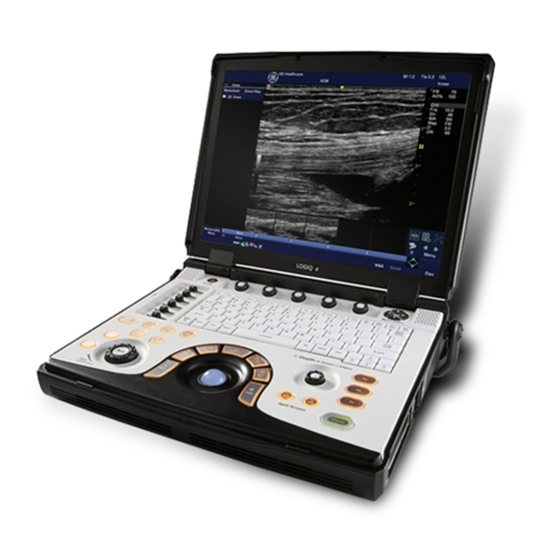
2. Time gain
compensation (TGC)
Move left/right to adjust
Report
Press to
access
patient
report
mode
Harmonics
Steer
Follow up
(optional
extra)
6.Exam
3. New
patient
Press to add
new patient
and access
patient
information
screen
M Mode
PW Doppler
7. Colour
Doppler
4. Gain/Auto
optimization
Rotate the key
to adjust the
Gain.
Press Auto
to activate/
deactivate auto
optimization.
15. Soft key knobs/menu
select keys
Function changes on screen
1. Power
depending on mode.
Help key
Reverse
Brings up
Press to reverse
searchable
image, left/
full manual.
right.
C
B
A
5. Power
8. Imaging/
Doppler
measurement
(PDI)
keys:
B Mode
Needle
enhancement
(optional extra)
GE Logiq R7
Quick Guide
13. Utility
Press to enter the set
up function pages and
configure the system.
Function keys
D
E
F
G
9. Depth/
Zoom/Ellipse
Rotate to
alter. Press
Cursor
A
to change
Clear
B
between
Body Mark
C
modes.
Calcs
D
M/D Cursor
E
Scan Area
F
Enter
G
Comment
Add
annotations.
Further image
optimisation
Volume
and
brightness
keys
10. Switch
between left
and right screen.
Your complete animal imaging solution
14.
Alphanumeric
keyboard
Use the
keyboard to
enter patient
information
and
annotations
12. Print Keys
P1 Save
P2 Print
P3 Send to
USB
11. Freeze
Press to
freeze the
image or
return to
scanning.
Advertisement

Related Manuals for GE Logiq R7

Summary of Contents for GE Logiq R7
- Page 1 GE Logiq R7 Quick Guide 15. Soft key knobs/menu 13. Utility select keys Press to enter the set Function changes on screen up function pages and 1. Power depending on mode. configure the system. Help key Reverse Function keys Brings up 2.
- Page 2 GE Logiq R7 Quick Guide Connecting the Probe Annotating an image 1. Handling the probe carefully, slide the connector 1. To add text to an image, begin typing on the straight into the port whilst the machine is not keyboard. The word fill-in function will offer words imaging (e.g.