Honeywell DC915 Series Installation And Operation Manual
Portable, wired & wireless doorbell
Hide thumbs
Also See for DC915 Series:
- User manual (6 pages) ,
- Quick start manual (4 pages) ,
- Troubleshooting (2 pages)
Advertisement
Installation and Operation Guide
Portable, Wired & Wireless Doorbell
Preparation
Content will vary according to your kit
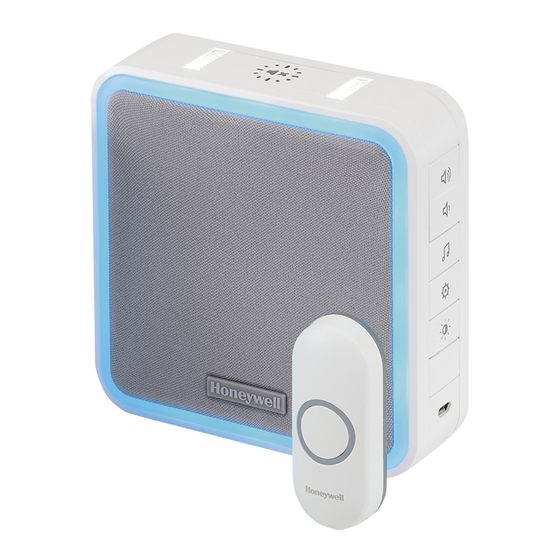
Doorbell
Anchors
Push
Push Button Mounting
Button
Bracket and Adhesive Pad
The push button supplied with this kit is pre-programmed to operate with the doorbell.
If it is not, see "Connect a Push Button" on page 8. Push button model and
contents may vary from those shown above.
Doorbell Wall
Mounting Bracket for
DC91X Models Only
Mounting Bracket for
DW915 Models Only
Wall
Round Head
Screws
CR2032
Battery
Flat Head
Screws
DC915/7XX
DW915XX
English
German
French
Dutch
For installation, you will need
Doorbell Wall
USB Cable
DC917
Models Only
Spanish
Portuguese
Italian
Phillips Screwdriver
Standard Screwdriver
Drill and 1/4 in. (6 mm) Drill Bit
4 C Alkaline Batteries
Advertisement
Table of Contents

Related Manuals for Honeywell DC915 Series


Summary of Contents for Honeywell DC915 Series
- Page 1 Installation and Operation Guide Portable, Wired & Wireless Doorbell DC915/7XX DW915XX English Spanish German Portuguese French Italian Dutch Preparation For installation, you will need Content will vary according to your kit Doorbell Wall Mounting Bracket for DC91X Models Only Doorbell Wall Mounting Bracket for Phillips Screwdriver DW915 Models Only...
-
Page 2: Installation
Overview Just follow these simple steps: 1. Install batteries. 2. Set up the doorbell and your preferences. 3. Install the doorbell and the push button. Safety Before proceeding with the installation, please note the following safety warnings: • Always follow the manufacturer’s advice when using power tools and wear suitable protective equipment (e.g. - Page 3 Wiring Diagrams (DW9XX Models Only) • Potential-free connection of a wired doorbell button • A second wired doorbell button (terminals B1 & B2) can be connected • DCP917, DW915 battery/batteries must be inserted • Wireless expansion of a wired doorbell/intercom system •...
-
Page 4: Install Batteries
Install the Push Button 1. Mount the push button bracket in the desired location. Use the screws. –OR– Use the adhesive backing. If using the adhesive backing, –OR– clean the surface first. 2. Snap the push button onto the mounting bracket. Note: If you need to remove the push button, use a small screwdriver to release the tab. - Page 5 Change the Tune Press the Music button to change the doorbell tune. Every time you press the Music button, the tune will change. Stop pressing the Music button when you hear the tune you want. If you have multiple push buttons paired with the chime, you can select the melody for the last push button that was triggered.
-
Page 6: Adjust The Volume
Change the Halo Light Colour Press the push button. Every time you press the Sunlight button, the halo light will change Within 12 seconds, press the colour. Stop pressing the Sunlight Sunlight button. button when you see the colour you want: Light Blue Green White... - Page 7 Accessories You can connect up to 6 accessories to your doorbell, including other push buttons, window or door opening sensors, and motion sensors. If you try to connect more accessories than the max number, the doorbell will sound two beeps. Connect a Motion Sensor 1.
- Page 8 Connect a Push Button Follow these steps to change the ring and halo light colour for an existing doorbell, too. 1. Press and hold the Setting button on the doorbell for three seconds. The halo light will circle. 2. Press the push button. 3.
-
Page 9: Maintenance
Secret Knock For each push button, you can set up a Secret Knock that has a different ring and halo light colour. The Secret Knock is triggered by pressing the push button quickly 3 times. 1. Press the push button 3 times quickly. 2. -
Page 10: Specifications
*Under these scenarios the push button is considered the “transmitter”. Other examples of transmitters are the wireless motion (PIR) sensor or wireless door window sensor. www.resideo.com https://livewell.honeywellhome.com ©2019 Resideo Technologies, Inc. All rights reserved. The Honeywell Home trademark is used under license from Honeywell International Inc. 32343181-001 Rev.A...