
Related Manuals for Nasco Life/form LF03699U


Summary of Contents for Nasco Life/form LF03699U
- Page 1 HEALTHCARE “Airway Larry” Airway Management Trainer LF03699U INSTRUCTION MANUAL WARNING: Products may contain dry natural rubber. 5-Year Warranty...
-
Page 3: List Of Components
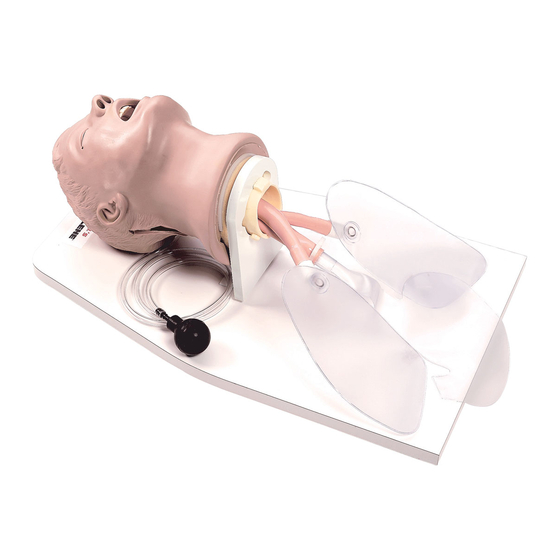
Nasco’s “Airway Larry” allows you to practice oral, digital, and nasal intubation. E.T., E.O.A., P.T.L.®, L.M.A., E.G.T.A., Combitube®, and King System insertion can all be practiced as well. Suction techniques and proper cuff inflation can also be performed and evaluated. - Page 4 GENERAL INSTRUCTIONS FOR USE A. Intubating the Airway Management Trainer Nasco recommends the use of a 7.5-8 mm endotracheal tube for oral intubation and 7.5 mm or smaller for nasal intubation. This simulator allows for the Sellick’s Maneuver of applying cricoid pres- sure during intubation procedures.
- Page 5 4. Lift the head ring attachment on the stand and pull gently to remove the head. Figure 5 C. Attaching the “Airway Larry” Airway Management Trainer Head to a Torso Nasco’s “Airway Larry” Airway Management Trainer has the ability to be attached to Adult CPARLENE ®...
- Page 6 Figure 6 3. Disconnect the corrugated upper airway from the clear tube extending from the head of the manikin. 4. Remove the existing head by rotating 180°, aligning the keyways,and pulling it free from the torso. 5. Install the “Airway Larry” Airway Management Trainer Head using the same method as removing the head, but in reverse.
- Page 7 Figure 9 Figure 10 10. Insert the short section of the upper airway through the hole in the upper compression plate and reattach the lung bag. (See Figure 9.) 11. The lung bag will lay flat on top of the upper compression plate. (See Figure 10.) 12.
- Page 8 Figure 12 5. Remove the upper compression plate and compression springs. 6. Remove the corrugated bronchus tubes from the airway extending from the existing head and set aside for future use. 7. Loosen the pinch clamp on the esophagus and pull the stomach tube free from the esophagus extending from the existing head and set aside for future use.
-
Page 9: Care And Maintenance
Stubborn stains may be removed with Nasco Cleaner (LF09919U). Simply apply the Nasco Cleaner to the soiled area and wipe clean with a soft cloth. Note: Avoid using cleaner around the mouth and nostrils if students will be applying direct mouth-to- mouth resuscitation techniques, as the cleaner may be toxic if ingested. - Page 10 Do not place simulator in contact with any printed paper or plastic. The ink will transfer and cause an indelible stain. Similar inks, such as ballpoint pen, will also cause an indelible stain. • Do not use Nasco Cleaner (LF09919U) around the nose or mouth of the simulator. The cleaner may be toxic if ingested. •...
-
Page 11: Supplies And Replacement Parts
LF03735U Mounting Kit for “Airway Larry” Airway Management Head LF03681U Hard Carry Case for Airway Trainers with Stand Life/form ® LF09919U Nasco Cleaner Actual product may vary slightly from photo. Nasco reserves the right to change product color, materials, supplies, or function as needed. - Page 12 Other Available Simulators LF03000U Series LF03770U Chest Tube CPARLENE ® LF03601U Adult Airway Management LF03953U Manikin, Complete CRiSis™ Trainer with Stand LF03955U Deluxe Manikin CRiSis™ LF03602U Adult Airway Management LF03956U Deluxe “Plus” Manikin CRiSis™ Manikin LF03965U Adult Auscultation CRiSis™ LF03609U Child Airway Management Manikin Trainer with Stand LF03966U Adult...