
Related Manuals for Makita XWT12


Summary of Contents for Makita XWT12
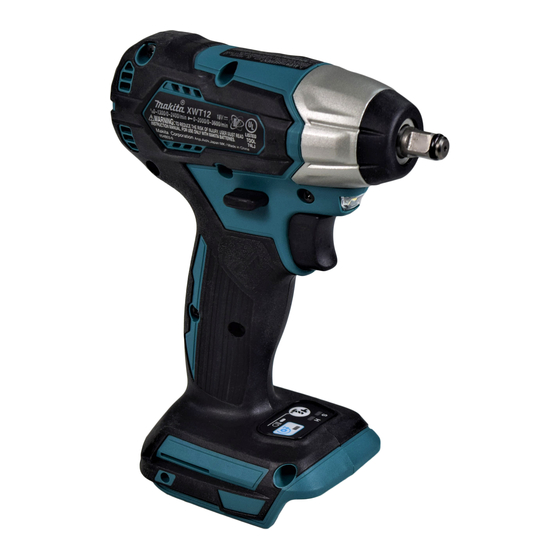
- Page 1 INSTRUCTION MANUAL MANUAL DE INSTRUCCIONES Cordless Impact Wrench Llave de Impacto Inalámbrica XWT12 IMPORTANT: Read Before Using. IMPORTANTE: Lea antes de usar.
-
Page 2: Specifications
ENGLISH (Original instructions) SPECIFICATIONS Model: XWT12 Fastening capacities Standard bolt M8 - M16 (5/16″ - 5/8″) High tensile bolt M6 - M12 (1/4″ - 1/2″) Square drive 9.5 mm (3/8″) No load speed (RPM) Hard impact mode 0 - 2,400 /min... - Page 3 Personal Safety Maintain power tools and accessories. Check for misalignment or binding of moving parts, break- Stay alert, watch what you are doing and use age of parts and any other condition that may common sense when operating a power tool. affect the power tool’s operation.
- Page 4 It will also void the Makita warranty for the Makita tool and charger. number of blow Tips for maintaining maximum...
-
Page 5: Functional Description
Tool / battery protection system FUNCTIONAL DESCRIPTION The tool is equipped with a tool/battery protection sys- tem. This system automatically cuts off power to the motor to extend tool and battery life. The tool will auto- CAUTION: matically stop during operation if the tool or battery is Always be sure that the tool is placed under one of the following conditions: switched off and the battery cartridge is removed... - Page 6 This tool is equipped with an electric brake. If the tool consistently fails to quickly stop after the switch trigger Indicator lamps Remaining is released, have the tool serviced at a Makita service capacity center. Lighted Blinking...
- Page 7 Reversing switch action ► 1. Reversing switch lever CAUTION: Always check the direction of rotation before operation. CAUTION: Use the reversing switch only after the tool comes to a complete stop. Changing the direction of rotation before the tool stops may dam- age the tool.
- Page 8 Changing the impact force You can change the impact force in three steps: hard, soft, and Reverse rotation auto stop mode. This allows a tightening suitable to the work. Every time the button is pressed, the number of blows changes in three steps. ►...
-
Page 9: Operation
ASSEMBLY OPERATION CAUTION: CAUTION: Always be sure that the tool is Always insert the battery cartridge switched off and the battery cartridge is removed all the way until it locks in place. If you can see the before carrying out any work on the tool. red indicator on the upper side of the button, it is not locked completely. -
Page 10: Maintenance
(90) To maintain product SAFETY and RELIABILITY, repairs, any other maintenance or adjustment should (70) (1/2") M10(3/8") be performed by Makita Authorized or Factory Service Centers, always using Makita replacement parts. (60) M8(5/16") (40) (3/8") OPTIONAL (30) (5/16") -
Page 11: Especificaciones
ESPAÑOL (Instrucciones originales) ESPECIFICACIONES Modelo: XWT12 Capacidades de apriete Perno estándar 8 mm - 16 mm (5/16″ - 5/8″) Perno de alta resistencia 6 mm - 12 mm (1/4″ - 1/2″) Adaptador cuadrado 9,5 mm (3/8″) Velocidad sin carga (RPM) - Page 12 No exponga las herramientas eléctricas a la Si dispone de dispositivos para la conexión de lluvia ni a condiciones húmedas. La entrada de equipos de extracción y recolección de polvo, agua en una herramienta eléctrica aumentará el asegúrese de conectarlos y utilizarlos debida- riesgo de que se produzca una descarga eléctrica.
- Page 13 Mantenga los mangos y superficies de asi- Advertencias de seguridad para la miento secos, limpios y libres de aceite o llave de impacto inalámbrica grasa. Los mangos y superficies de asimiento resbalosos no permiten una manipulación segura Sujete la herramienta eléctrica por las super- ni el control de la herramienta en situaciones ficies de agarre aisladas al realizar una ope- inesperadas.
- Page 14 Asimismo, esto inva- posibles quemaduras e incluso explosión. lidará la garantía de Makita para la herramienta y el En caso de que ingresen electrolitos en sus cargador Makita. ojos, enjuáguelos bien con agua limpia y con- sulte de inmediato a un médico.
-
Page 15: Descripción Del Funcionamiento
Sistema de protección para la DESCRIPCIÓN DEL herramienta/batería FUNCIONAMIENTO La herramienta está equipada con un sistema de pro- tección de la herramienta/batería. Este sistema corta PRECAUCIÓN: Asegúrese siempre de que la en forma automática el suministro de energía al motor herramienta esté... - Page 16 La herramienta está equipada con un freno eléctrico. Si 25% a 50% la herramienta falla constantemente en detenerse tras soltar el gatillo interruptor, lleve la herramienta a mante- 0% a 25% nimiento a un centro de servicio Makita. Iluminación de la luz delantera Cargar la batería. La batería PRECAUCIÓN:...
- Page 17 PRECAUCIÓN: Confirme siempre la direc- ción de rotación antes de la operación. PRECAUCIÓN: Utilice el conmutador de inversión solamente después de que la herra- mienta haya parado completamente. Si cambia la dirección de rotación antes de que la herramienta haya parado podría dañarla. PRECAUCIÓN: Cuando no esté...
- Page 18 Cambio de la fuerza de impacto La fuerza de impacto puede cambiarse en tres pasos: alta, baja y modo de parada automática con rotación invertida. Esto permite un apriete adecuado para el trabajo. Cada vez que el botón es oprimido, el número de per- cusiones cambia a tres niveles.
-
Page 19: Operación
ENSAMBLADO OPERACIÓN PRECAUCIÓN: PRECAUCIÓN: Asegúrese siempre de que la Siempre inserte completa- herramienta esté apagada y el cartucho de batería mente el cartucho de batería hasta que quede haya sido extraído antes de realizar cualquier asegurado en su lugar. Si puede ver el indicador trabajo en la misma. -
Page 20: Mantenimiento
40 N•m tenimiento o ajuste deberán ser realizadas en centros (30 ft•lbs) 8 mm de servicio autorizados o de fábrica Makita, empleando (5/16") 20 N•m siempre repuestos Makita. (10 ft•lbs) ACCESORIOS OPCIONALES 1. - Page 24 Para reducir la exposición a estos productos químicos: trabaje en un área bien ventilada y póngase el equipo de seguridad indicado, tal como las máscaras contra polvo que están especialmente diseñadas para filtrar partículas microscópicas. Makita Corporation 3-11-8, Sumiyoshi-cho, Anjo, Aichi 446-8502 Japan 885621-944...