
Summary of Contents for Neat NOVO
- Page 1 NOVO - Technical Handbook Handbook for Technical Adminstrators NE41 15013-02 v1.0...
- Page 2 © Copyright 2017 NEAT Electronics All rights reserved. Document number: NE41 15013-02 v1.0 Draft date: 2017-09-07 Contact: NEAT Electronics AB Varuvägen 2 SE-246 42 Löddeköpinge Sweden Phone: +46 46 70 70 65 Fax: +46 46 70 70 87 www.neat-group.com/se/en infosweden@neat-group.com...
-
Page 3: Table Of Contents
Buttons 2.2.1 Alarm button (B1) 2.2.2 Reset button (B2) 2.2.3 Extra button (B3) LEDs ConneNOVO PSTN/GSMtors on NOVO IP/GSM and 11 2.4.1 IP connector (C1) 2.4.2 AC connector (C2) External GSM antenna (EA) Connectors on NOVO PSTN/GSM and PSTN 2.6.1 TELE connector (C1) 2.6.2... - Page 4 5.10.1 Example 1 - a simple alarm sequence 5.10.2 Example 2 - SCAIP over IP/GSM 5.10.3 Example 3 - NEAT Talk/CPC to an analogue alarm receiver 5.10.4 Example 4 - Using Home Phone protocol NOVO Technical Handbook NE41 15013-02 v1.0...
- Page 5 Add a transmitter 6.3.2 Radio/GSM coverage mode 6.3.3 Remove transmitter 6.3.4 Set external GSM antenna to On/Off 6.3.5 Change Home/Away/Passive On/off Programing NOVO PSTN units with LPP commands NOVO Programmer Installation Menues 7.2.1 File menu 7.2.2 Communication menu 7.2.3 Option menu 7.2.4...
- Page 6 Document revision history Revision Date Version Revision details 2017-09-07 v1.0 draft NOVO Technical Handbook NE41 15013-02 v1.0...
-
Page 7: Introduction
Introduction Intended use The Care Phone NOVO is a unit designed for the purpose of providing security and a sense of comfort and safety for the user. The unit is primarily designed for people living in their own apartment or in nursing homes. -
Page 8: The Main Unit
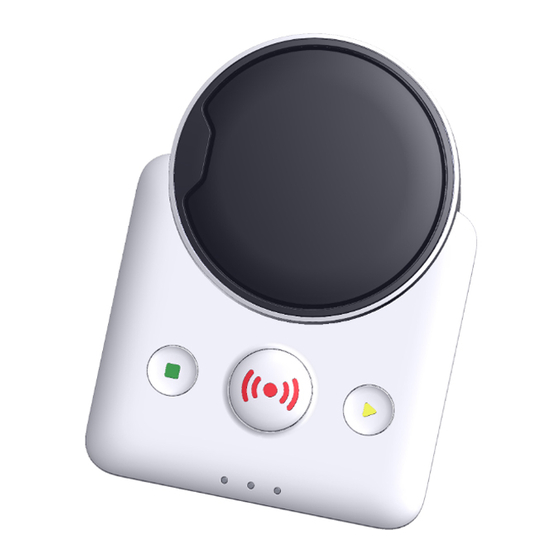
PSTN. Overview Care phone NOVO appears as in the picture below. The unit has been de- signed to make it as simple as possible to handle with maximum safety. The size of the plastic cover is: 117 x 161 x 65 mm. -
Page 9: Buttons
This button is also used in Control Mode and Service Mode. 2.2.2 Reset button (B2) Before making the alarm call NOVO is waiting a number of seconds enabling the user to reset the alarm. If the is pressed during this pe- Reset button (B2) riod, the alarm is interrupted. -
Page 10: Leds
LEDs The main unit has six (6) LEDs. Picture 2. NOVO unit LEDs Colour Position (seen as above) Green Leftmost LED in front L2 Red Middle LED in front Yellow Rightmost LED in front L4 Red Behind the Alarm button (B1) -
Page 11: Connenovo Pstn/Gsmtors On Novo Ip/Gsm And
Type RJ 45 (Ethernet) Micro-USB External antenna SMA Connector (female) Table 5. NOVO IP/GSM connectors denominations and physical characteristics 2.4.1 IP connector (C1) The IP connector (C1) is a RJ45 (Ethernet) female connector and used for IP traffic over cable. -
Page 12: Connectors On Novo Pstn/Gsm And Pstn
LINE RJ11 (4/6) Micro-USB External antenna SMA Connector (female) Table 6. NOVO PSTN/GSM connectors denominations and physical characteristics 2.6.1 TELE connector (C1) The TELE connector (C1) is a RJ11 female connector and used for PSTN traffic. 2.6.2 LINE connectorLINE (C2) The TELE connector (C1) is a RJ11 female connector and used for PSTN traffic. -
Page 13: External Antenna
External antenna Applies only to NOVO IP/GSM and NOVO PSTN/GSM. NOVO supports the use of an external antenna and the use of the internal or external antenna is determined by a configuration parameter in the unit’s software. The external antenna is intended to be used in case of poor GSM network signal quality. -
Page 14: On/Off Button (Ps1)
Please note that it isn’t enough to disconnect the AC plug to shut off the unit, since the unit then uses the backup accumulator as power source. NOVO Technical Handbook NE41 15013-02 v1.0... -
Page 15: Accumulator Lid
Under the lid is the accumulator compartment for the backup accumulators. If an accumulator must be replaced, please note that the accumulator must to be of correct type and delivered from NEAT. Always disconnect the AC adaptor and if connected the Ethernet cable before opening the accumulator lid. -
Page 16: Replacing The Accumulator
Depending on model the SIM-hatch is made of either rubber (soft) or plastic (hard). SIM cards should only be changed by the customer on NOVO products with the rubber hatch. To change SIM card on a NOVO product with the plastic hatch send the unit to service. -
Page 17: Mounting The Novo
7-8 mm. The screw head should be approximately 4 mm out of the wall for best fit. A drawing and measures is found in Appendix A NOVO IP/GSM Mounting holes. -
Page 18: Indications
When the unit is in accumulator operation, the LEDs flashes instead of being continuously lit. See the tables below for all indications. 3.1.1.1 LED indications for NOVO IP/GSM and NOVO PSTN/GSM L1 (Network) L2 (AC) -
Page 19: Alarm Button (L4) Led Indications
* May be changed to Off by configuration, see below. ** “No more call attempts” means that the NOVO has tried to call the alarm receiver, but all call attempts has failed. It has not been possible to transfer the alarm”. -
Page 20: Control Mode Led Indications
NOVO has the ability to play pre-recorded sounds, i.e. voice messages for improved interaction with the user. 3.2.1 After activating an alarm When the NOVO is calling, by default it plays a melody as a pre-call melody. This is configurable. 3.2.2 Disconnection signal Call disconnection is indicated by a tri-sound (di-du-da) in the loudspeaker. -
Page 21: Alarm Functions User Initiated Alarms
These are the alarms initiated by the user, e.g. by pressing the Alarm button ) on the NOVO or on the portable trigger SMILE. It can also be when an accessory like WALL, PIR or a SMOKE is activated. Depending on the alarm type received the alarms will be handled differently by NOVO. -
Page 22: Presence/Ready
If there hasn’t been any radio test alarm for a certain period, NOVO can be configured to send a alarm to the Radio out of range central indicating that there is some trouble with the transmitter. NOVO can also send a indication when the transmitter is working Radio within range again. -
Page 23: Automatic Test Alarm
Automatic test alarm To let the alarm receiver know that the care phone is working, NOVO can send test alarms to the alarm receiver at regular intervals. The default value is one test alarm each 24 hours. This interval can be changed and the function can also be turned off. -
Page 24: The Alarm Call
The alarm call Anything that creates some kind of action in the NOVO is called an alarm event. An alarm event can be any of: • pressing the Alarm button (B1) • a mains failure • radio interference These alarm events can be user initiated or initiated by internal functions such as monitoring functions, timers or external alarm events. -
Page 25: Alarm Events
Home Phone protocol, however, there is no requirement for any alarm code. Alarm type groups NOVO supports 16 alarm type groups, numbered from 1-16 and every alarm type must belong to one of these groups. NE41 15013-02 v1.0 NOVO Technical Handbook... -
Page 26: Alarm Sequences
Wait between call attempts If no-one answers the call, NOVO re-tries and between the call attempts there is a waiting period which can be set. For some alarm types it is possible to interrupt the call during this waiting period by pressing the . -
Page 27: Acknowledgement Of The Alarm Call
Indications during an alarm call NOVO has several ways to the progress and status of an alarm call. Below is a list of the default indications for a user initiated alarm call. -
Page 28: Protocols
Alarm button LED (L3) is in progress. Call answered When the alarm call is answered by the alarm central receiver NOVO initiates a data transmission sequence before the alarm central operator’s voice is heard. The data transmission is silent to the caller. -
Page 29: Conversation
Home Phone When the care phone is configured to call to a normal telephone, NOVO must use the protocol. To control the conversation in Home Phone Home Phone protocol, the alarm receiving party can press the buttons on their telephone according to below. -
Page 30: Examples
5.10.1 Example 1 - a simple alarm sequence The user presses the alarm button on the portable trigger, e.g. SMILE. This triggers an alarm event in NOVO and the logic finds that this is alarm event is associated to the alarm type . -
Page 31: Example 2 - Scaip Over Ip/Gsm
Step Call type Carrier type Call attempts Table 17. Example of steps in a sequence In this example NOVO attempts to call the alarm receiver over IP and GSM. Call Address/phone number Protocol Port Username Password Optional voice type number www.alarm.com... -
Page 32: Example 4 - Using Home Phone Protocol
+4646112165 and no other parameters are required. Call Address/phone Protocol Port Username Password Optional voice type number number +4646112157 N/A N/A Homephone Table 22. Example of call type parameters when using the Home Phone protocol NOVO Technical Handbook NE41 15013-02 v1.0... -
Page 33: Programming/Configuration Modes
NOVO PSTN Table 23. Version programming options NOVO is normally in Idle Mode, i.e. is not processing any user-ini tiated (e.g. user alarm) nor automatic alarm event/action (e.g. test alarm). Control Mode and Service Menu are ways of easily configuring the unit. The diagram below displayes the tree structure of the menues and its commands. -
Page 34: Control Mode (Cm)
. To indicate the current function available a corresponing voice button (B3) message is played in the speaker. After finishing configuration of a selected function NOVO automatically re- turns back to the Service Menu. Step to next function by pressing Extra button... -
Page 35: Add A Transmitter
Plug&Play. In total 48 radio peripherals can be added to NOVO. 8 as traditional position programed devices and 40 as Plug&Play peripherals. NOVO supports a large number of the alarm types for traditional position pro- gramming and in the default configuration the alarm types are positioned as listed in the table below. -
Page 36: Radio/Gsm Coverage Mode
Walk test mode When in Radio/GSM coverage, activate the connected transmitter, (e.g press- ing the Alarm button on SMILE) and NOVO responds with a “blipp” if the radio coverage is OK. On SMILE the LED blinks green to acknowledge radio coverage is OK. -
Page 37: Set External Gsm Antenna To On/Off
Exit to SM by pressing Reset Button (B2) The only way to remove a broken Plug&Play device from the NOVO configu- ration is to erase all transmitters or perform the action via the NEAT Manage- ment Portal or with a software programmer. When a full removal is performed, don’t forget to re-add the user peripherals in the installation. -
Page 38: Programing Novo Pstn Units With Lpp Commands
Programing NOVO PSTN units with LPP commands NOVO units with PSTN functionality can be programmed with the Local Pro- gramming Protocol (LPP). This protocol uses DTMF dialtones, i.e. the same dial tones that are used in a regular, analogue telephone and programming can de done over the PSTN line (e.g. -
Page 39: Novo Programmer
NOVO into NOVO Programmer and “Write to unit (CRTL+W)” writes the current configuration in NOVO Programmer into the connected NOVO. After the configuration file is written to NOVO the unit is disconnected from an re-connected to Windows. Depending on your Windows system settings the “Auto play”... -
Page 40: Help Menu
If the SIM card requires a PIN code, enter the four digits here otherwise leave empty. If the SIM cards is blocked by too many erroneous attempts it must be removed from NOVO and inserted into a regular mobile phone to unlock it with a PUK code. Own number If the configuration parameters require the subscription phone number enter it here. -
Page 41: Misc
Misc Real Time Clock (RTC) NOVO is equipped with a real time clock (RTC) which is running continously, even when power is turned off and/or running on accumulator. The RTC can be set by NTP servers (if connected to internet via GSM/GPRS). -
Page 42: Important
• Do not warm up the device or use it near fire. Cleaning • All parts in the NOVO kit can be cleaned with a mild soap solution and a damp cloth. Dry with a dry cloth. • Strong chemicals, grease and other harsh substances must not be used when cleaning or handling the parts in the NOVO kit. -
Page 43: Disposal
In the European Union, the bin label indicates that this prod- uct should not be disposed of with household waste. It should be deposited at an appropriate facility to enable recovery and recycling or returned to your distributor. NE41 15013-02 v1.0 NOVO Technical Handbook... -
Page 44: Appendix A Novo Ip/Gsm Mounting Holes
Appendix A NOVO IP/GSM Mounting holes 68 mm 161 mm 117 mm Picture 18. NOVO unit key hole measures NOVO Technical Handbook NE41 15013-02 v1.0... -
Page 45: Appendix B Alarm Types And Alarm Type Groups
Smoke detector Co Gas alarms Gas alarm Smoke detector alarm Temperature alarm Water alarm Technical alarms Accumulator alarm Accumulator fully charged Battery alarm Daily report / Event Heartbeat Mains failure alarm Mains OK indication NE41 15013-02 v1.0 NOVO Technical Handbook... - Page 46 User alarms Away indication Bogus call Epilepsy alarm Fall alarm (man down) Home indication Inactivity Passive alarm Pull cord alarm User alarm from button User alarm from trigger User alarm from trigger, battery low NOVO Technical Handbook NE41 15013-02 v1.0...
- Page 47 Measures, W x H x D 34 x 42 x 15 mm Weight (incl. backup 14 g accumulator) Radio frequency 869.2125 MHz (Social alarms, transmission) 869.2375 MHz (Acknowledge) IP Code IP67 Temperature range +5 - +55 °C NE41 15013-02 v1.0 NOVO Technical Handbook...
-
Page 48: Appendix C Recommended Ac Adaptors And Accumulators
Appendix C Recommended AC adaptors and accumulators Recommended AC adaptors for user markets NE31 07006-14 NE31 07006-16 NE31 07006-21 Recommended accumulators 400 mAh NE31 14002-02 2000 mAh NE31 14004-03 www.neat-group.com...