
Summary of Contents for Sanyo SAC-MST6
- Page 1 INSTRUCTION MANUAL Manual de Instrucciones COFFEE AND TEA MAKER WITH BUILT IN GRINDER SAC-MST6...
-
Page 2: Table Of Contents
Thank you for your purchase of a SANYO COFFEE AND TEA MAKER WITH BUILT IN GRINDER. Please read these instructions carefully before use and be sure to keep the manual in a safe place for ■ Important Safeguards ■ Names of Parts ■... -
Page 3: Important Safeguards
IMPORTANT SAFEGUARDS When using electrical appliances, follow basic safety precautions to reduce the risk of fire, electrical shock, and/or injury: 1. Read all instructions. 2. Do not touch hot surfaces. Use handles or knobs. 3. To protect against fire, electrical shock, and personal injury, do not immerse cord, plugs, or coffee-making unit in water or... -
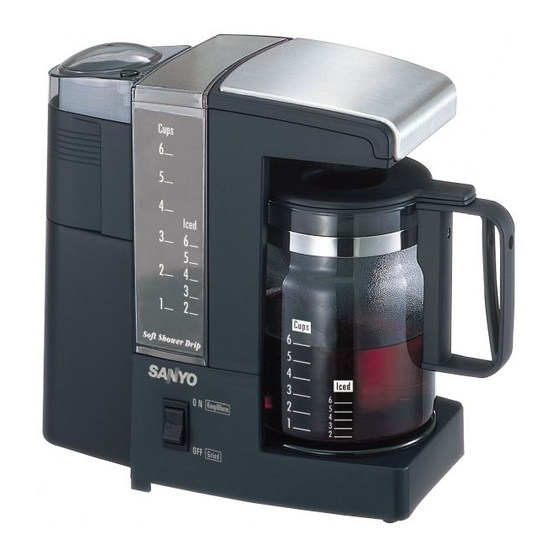
Page 4: Names Of Parts
Water Tank (Removable, see Page 5 for how to attach and remove) Grind Button Grinder Cover Grinder Case (Removable, see Page 5 for how to attach and remove). Cutter Blades Power Cord Power Supply Plug (For the use of 120V/15A and above outlet only.) On/Keep Warm Switch (Switch will light up when pressed and indicates... -
Page 5: Accessories
A replacement charcoal filter can be purchased at the store where your unit was purchased or visit www.sanyo.com best results, rinse the filter before each Cleaning Brush (1 each) Use to clean grinder case. -
Page 6: General Instructions
GENERAL INSTRUCTIONS HOW TO REMOVE AND ATTACH CHARCOAL FILTER ✱ How to remove: Turn the filter against the direction of arrow, clockwise. HOW TO REMOVE AND ATTACH WATER TANK ✱ How to remove: Support the main unit with one hand and grasp the indented part of the tank and lift it out vertically. -
Page 7: Operating Instructions/How To Make Coffee
HOW TO MAKE COFFEE Add coffee beans to grinder case. ➀ Measure coffee beans with the measuring spoon that is provided as an accessory. (see chart) ➁ Close the grinder cover. ➁ The inside of grinder and grinder cover should be completely dry, or coffee grains will stick. - Page 8 Place paper filter in coffee basket and add coffee grounds. ➀ Place coffee basket in glass carafe. ➁ Place a paper filter in coffee basket and press lightly. ➂ Add coffee grounds from grinder case to paper filter and level the coffee grounds.
- Page 9 Number of Cups 6 Cups 5 Cups 4 Cups 3 Cups 2 Cups 1 Cup Note: Do not add water during brewing. ● Brewing time varies depending on water and room temperature, voltage, etc. ● One-cup water yields approximately 4 oz. for a coffee cup. The amount varies ●...
-
Page 10: Operating Instructions/How To Make Tea
If you are using the unit for the first time, or after a prolonged period of storage, follow the instructions on Page 4, "Before Use" Add tea leaves to tea basket. ➀ Place tea basket on top of glass carafe. ➁... - Page 11 Number of Cups 6 Cups 5 Cups 4 Cups 3 Cups 2 Cups 1 Cup Note: Do not add water during brewing. ● Brewing time varies depending on water and room temperature, voltage, etc. ● One-cup water yields approximately 4 oz. for a tea cup. The amount varies depending ●...
-
Page 12: Care And Maintenance
CARE AND MAINTENANCE GENERAL CLEANING INSTRUCTIONS Always unplug and let the entire unit cool off prior to cleaning. ● Use a mild dishwashing soap and soft sponge or cloth. ● Do not use scouring powder or scrubbing brush. ● Do not put any parts in dishwasher. Doing so may cause the parts to deform. ●... -
Page 13: Troubleshooting
TROUBLESHOOTING Check before requesting service Symptom Coffee/Tea is not brewing Grinding does not start Coffee/Tea overflows Black fiber floats in coffee/tea Oil floats in coffee/tea Brewing is very slow If above troubleshooting did not solve problems, please stop using and contact a qualified service person. -
Page 14: Warranty
THIS WARRANTY APPLIES ONLY TO THE ORIGINAL RETAIL USER AND DOES NOT APPLY TO PRODUCTS USED FOR ANY INDUSTRIAL, PROFESSIONAL OR COMMERCIAL PURPOSE. THE ORIGINAL DATED BILL OF SALE OR SALES SLIP MUST BE SUBMITTED TO THE AUTHORIZED SANYO SERVICE CENTER AT THE TIME WARRANTY SERVICE IS REQUESTED. - Page 15 21605 Plummer Street Chatsworth, CA 91311 www.sanyo.com 0603 Printed in China...