Table of Contents
Advertisement
Quick Links
Advertisement
Table of Contents

Summary of Contents for Accutome AccuPach VI
- Page 1 AccuPach VI Tabletop Pachymeter AccuPach VI User’s Guide 24-6204 Rev-G...
- Page 2 (2) this device must accept any interference received, including interference that may cause undesired operation. CAUTION: Changes or modifications not expressly approved by Accutome, Inc., could void the FCC compliance and negate your authority to operate the product.
-
Page 3: Table Of Contents
Features Measurements Components Optional Components About This Manual Chapter 2: Safety Safety Information Safety Issues to Consider When Using the AccuPach VI Indications for Use Disposal Requirements Disposal of the Product within the EU Disinfection and Cleaning Safety Precautions Warnings... - Page 4 Accutome AccuPach VI User’s Guide Chapter 4: Maintenance General Maintenance Chapter 5: Specifications Overview Physical Specifications Environmental Specifications Measurement Accuracy Operating Modes Acoustic Output EMC Compliance Information Chapter 6: Warranty & Repairs Warranty Product Returns Service and Repair All Other Returns...
- Page 5 Figure 3.4 - Probe Connected Figure 3.5 - Component Connectors (back of instrument) Figure 3.6 - Measure Screen Displayed Figure 3.7 - AccuPach VI Test Block (top of instrument) Figure 3.8 - Measure Screen Starting New Patient Table 3.1 - IOP Correction Values Figure 3.9 - USB Flash Drive...
-
Page 6: Chapter 1: Introduction
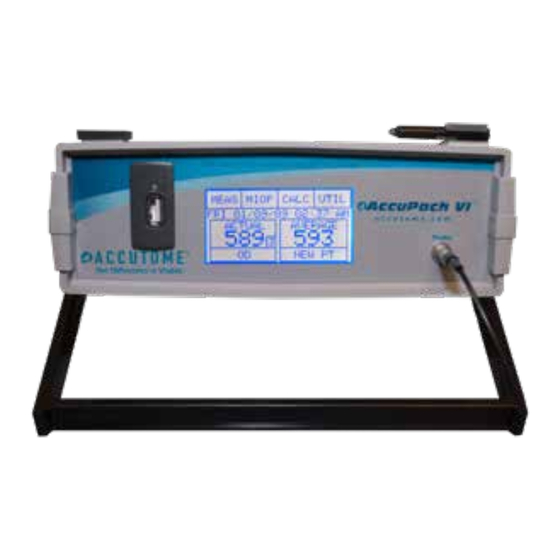
Chapter 1: Introduction Introduction AccuPach VI Overview The Accutome AccuPach VI pictured below has all the features that make it easy to obtain extreme accuracy and improved patient outcomes. Figure 1.1 - AccuPach VI Features The AccuPach VI is designed for easy access to all screens and functions. -
Page 7: Measurements
Chapter 6 - Warranty & Repairs Describes AccuPach VI warranty information and repair procedures. After reading this manual, you will be able to set up the AccuPach VI, take measurements, enter and calculate Corrected IOP, and print and save patient records. -
Page 8: Chapter 2: Safety
Safety Precautions There are several areas in the use of the above AccuPach VI that require special attention, as they may pose a safety threat. Disinfection and Cleaning Disinfection issues are confined to the Accutome probe that comes in contact with the patient’s eye. -
Page 9: Warnings
Accutome AccuPach VI User’s Guide Accessories such as the extension handle Symbol Definitions for or Goldman Tonometer Adapter that might come in contact with eye fluids should be the AccuPach VI cleaned with an FDA-cleared high-level disinfectant. Attention! Consult The probe must be cleaned between patients... -
Page 10: Disinfection Of The Probes With Alcohol
Avoid the use of damaged electrical equipment or frayed electrical cords. If repair or maintenance is to be performed on the AccuPach VI, the equipment must be turned off and the power cord disconnected. The device covers must not be removed except by qualified personnel. There are no user controls inside the unit. -
Page 11: Avoiding Equipment Damage
WARNING! THE ACCUPACH VI PRODUCT IS ONLY TO BE USED WITH A MEDICAL-GRADE POWER SUPPLY. WARNING! DO NOT POSITION THE ACCUPACH VI IN A WAY THAT WILL MAKE IT DIFFICULT TO OPERATE THE DICONNECTION DEVICE WHEN AN APPLIANCE COUPLER OR SEPARABLE PLUG IS USED AS ISOLATION MEANS. -
Page 12: Chapter 3: Getting Started
Getting Started Assembling the AccuPach VI The AccuPach VI is designed to be used in multiple medical settings and can be rested on a surface, such as a counter or desk. The AccuPach VI requires little assembly. All components, standard and optional, can be quickly and easily connected. -
Page 13: Placing The Accupach Vi
The USB Flash Drive is used to store patient data, which can be transferred to a computer for storage, or printed. Placing the AccuPach VI The AccuPach VI is designed to be placed on a surface, such as a counter or a desk. Connecting the Components All of the connectors for the AccuPach VI components, except for the probe and USB Flash Drive, are located on the back of the instrument. -
Page 14: Connecting The Power
3. Connect the power cable to the power mains. Figure 3.5 - Component Connectors (back of instrument) How to Set Preferences There are several features of the AccuPach VI that you can set to your own preferences: • Speed of sound •... - Page 15 4. Select Done when finished to return to the Util screen. Setting the LCD Presentation The AccuPach VI allows you to adjust the LCD display and brightness with the Screen function. To set the LCD presentation: Set the LCD presentation by selecting Screen. This will allow you to change the screen presentation from Normal (factory default) to Reverse (inverse video) by selecting the appropriate box.
-
Page 16: Basic Operation
Test Block (top of screen. instrument) Note: If you cannot detect a waveform, call the Accutome Service Group at (610) 889-0200. WARNING! DO NOT USE THE TEST BLOCK AND THEN TAKE A PATIENT MEASUREMENT. DISINFECT THE PROBE TIP AFTER USING THE TEST BLOCK AND BEFORE TAKING A PATIENT MEASUREMENT. -
Page 17: How To Start A New Patient
Selecting this box again returns it to the other eye. 3. Apply the probe to the patient’s eye. 4. If the AccuPach VI is not in the Auto Read mode, press the footswitch to take the measurement. The AccuPach VI will automatically proceed to the next empty measurement if it is available. -
Page 18: How To Save A Record
Disk” will be displayed. The USB flash drive can be plugged into the port at any time to activate the Save Ready function. (800) 979-2020 US & CA • (610) 889-0200 International • +44 (0) 1753-857177 Keeler Ltd. • www.accutome.com... -
Page 19: How To Print A Record
Note: If Done is selected prior to Save, the record will not be saved. The record can still be saved by simply running through the process again. 7. Remove USB flash drive from AccuPach VI unit to save or print record to/ from a computer. -
Page 20: Chapter 4: Maintenance
Maintenance General Maintenance Maintenance that should be performed on the AccuPach VI consists of activities such as keeping surfaces free of dust and dirt and storing in a dry and cool place so as to not adversely effect electronic parts. -
Page 21: Overview
Specifications Overview This section provides the physical and operational specifications of the AccuPach Physical Specifications The table below lists the physical specifications of the AccuPach VI instrument and associated peripherals. Table 5.1 - AccuPach VI Physical Specifications Main Unit Dimensions 25.4 cm X 25.4 cm X 6.35 cm (10”... -
Page 22: Environmental Specifications
USB Flash Drive (Any USB Flash Drive can be used) Safety Meets EN 60601-1 Series electrical standards for medical equipment Environmental Specifications The table below lists the AccuPach VI system operating and storage values for temperature and humidity. Table 5.2 - Environmental Specifications Temperature Operating +10°—40°C (50°—104°F) -
Page 23: Operating Modes
Accutome AccuPach VI User’s Guide Operating Modes The following table summarizes the mode/application possibilities for each system/transducer combination. Table 5.4 - Operating Mode(s) Clinical Combined Other** A B M PWD CWD CD Application (Specify) (Specify) Ophthalmic Fetal Imaging & Other* Cardiac, Adult &... -
Page 24: Emc Compliance Information
Table 5.6 - Guidance and Manufacturer’s Declaration - Electromagnetic Emissions The AccuPach VI is intended for use in the electromagnetic environment specified below. The customer or the user of the AccuPach VI should assure that it is used in such an environment. - Page 25 Table 5.8 - Guidance and Manufacturer’s Declaration - Electromagnetic Immunity The AccuPach VI is intended for use in the electromagnetic environment specified below. The customer or the user of the AccuPach VI should assure that it is used in such an environment.
-
Page 26: Chapter 6: Warranty & Repairs
Any product that is proven to be defective will be repaired or replaced, at our discretion, free of charge, up to one year from the date of purchase by the initial user of the equipment from Accutome, Inc., or any of its authorized distributors. -
Page 27: Nonreturnable Merchandise
• Merchandise held longer than 30 days Replacement Parts The table below lists items that are available from Accutome, Inc., or from your local sales representative. Please be sure to use the Accutome part number for the item when placing an order. - Page 28 US and Canada (800) 979-2020 International (610) 889-0200 Keeler Ltd. +44 (0) 1753-857177 Info@accutome.com www.accutome.com...