Table of Contents
Advertisement
Instruction Manual
ENG
DIGITAL HOME
THEATER SYSTEM
HT-X250
HT-TX250
If you have any questions or comments relating to Samsung products,
EJECT
please contact the SAMSUNG customer care center.
Samsung Electronics America, Inc.
1-800-SAMSUNG (7267864)
www.samsung.com
AH68-01943K
COMPACT
AH68-
01660E
DIGITAL VIDEO
REV: 01
Advertisement
Table of Contents

Related Manuals for Samsung HT-TX250


Summary of Contents for Samsung HT-TX250
-
Page 1: Theater System
Instruction Manual DIGITAL HOME THEATER SYSTEM HT-X250 HT-TX250 If you have any questions or comments relating to Samsung products, EJECT please contact the SAMSUNG customer care center. Samsung Electronics America, Inc. 1-800-SAMSUNG (7267864) www.samsung.com AH68-01943K COMPACT AH68- 01660E DIGITAL VIDEO... -
Page 2: Safety Warnings
Safety Warnings This symbol indicates “dangerous voltage” CAUTION inside the product that presents a risk of RISK OF ELECTRIC SHOCK. electric shock or personal injury. DO NOT OPEN TO REDUCE THE RISK OF ELECTRIC SHOCK, DO NOT REMOVE REAR COVER (or BACK). This symbol indicates important instructions NO USER SERVICEABLE PARTS INSIDE. -
Page 3: Table Of Contents
Anynet+(HDMI-CEC) Function Anynet+ is a function that can be used to operate the main unit using a Samsung TV remote control, by connecting the Home Theater to a SAMSUNG TV using an HDMI Cable. (This is only available with SAMSUNG TVs that support Anynet+.) -
Page 4: Notes On Discs
Notes on Discs DVD (Digital Versatile Disc) offers fantastic audio and video, thanks to Dolby Digital surround sound and MPEG-2 video compression technology. Now you can enjoy these realistic effects in the home, as if you were in a movie theater or concert hall. DVD players and the discs are coded by region. -
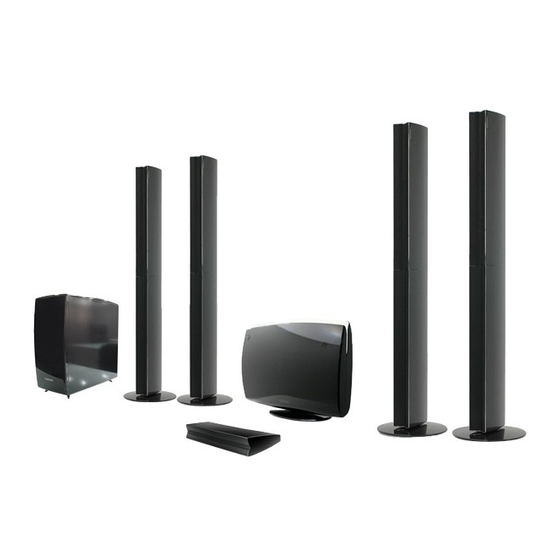
Page 5: Description
Description Front Panel Rear Panel 1. 5.1 Channel Speaker Output Connectors 2. Component Video Output Jacks Connect a TV with Component video inputs to these jacks. 3. Video Output Jack Connect your TV's Video Input jack (VIDEO IN) to the VIDEO OUT Jack on this unit. 4. - Page 6 Description (Con’t) Remote Control Insert Remote Batteries 1. DVD RECEIVER button 2. TV button 3. TV/VIDEO button 4. POWER button 5. Number (0~9) buttons 6. REMAIN button 7. STEP button 8. Tuning Preset/CD Skip buttons 9. VOLUME button 10. MENU button 11.
-
Page 7: Connecting The Speakers
Connecting the Speakers Before moving or installing the product, be sure to turn off the power and disconnect the power cord. HT-X250 Front Speaker (R) Center Speaker Rear Speaker (R) Position of the DVD Player Selecting the Listening Position • Place it on a stand or cabinet shelf, or under the TV stand. -
Page 8: Speaker Installation
SPEAKER Connecting the Optional Wireless Receiving Amplifier To connect the rear speakers wirelessly, you have to purchase the wireless receiving module and TX card from your Samsung retailer. When you have Purchased the Wireless Receiving Module (SWA-3000) HT-X250 Rear Speaker (L) - Page 9 Connecting the Optional Wireless Receiving Amplifier Connect the Front, Center and Subwoofer speakers to the DVD Player, referring to pages 12~14. With the DVD Player turned off, insert the TX card into the TX Card Connection(WIRELESS) on the back of the main unit. Hold the TX card so that the slanted side faces downward and insert the card into the port.
-
Page 10: Installing The Main Unit
Installing the Main Unit Method 1 : Installing the Stand so that the DVD Player Lays Flat. Preparation Disconnect the AC power cord from the AC outlet before installing the main unit. Connect the cables before installation. Turn the stand counter-clockwise and pull it apart. The DVD Player and stand are separated. -
Page 11: Connecting The Video Out To Your Tv
Using Anynet+(HDMI-CEC) Anynet+ is a function that enables you to control other Samsung Devices with your Samsung TV's remote control, Anynet + can be used by connecting this Home Theater to a SAMSUNG TV using an HDMI Cable. This is only available with SAMSUNG TVs that support Anynet+. -
Page 12: Connecting Audio From External Components
Connecting Audio from External Components AUX1 : Side Panel AUX2 : Rear Panel Audio Cable Audio Cable (not supplied) (not supplied) If the external analog compo- nent has only one Audio Out, connect either left or right. AUX1 : Connecting an External Analog Component Analog signal components such as an MP3 Player. -
Page 13: Connecting The Fm Antenna
Connecting the FM Antenna FM Antenna (supplied) Connect the FM antenna supplied to the FM 75Ω COAXIAL Jack. Slowly move the antenna wire around until you find a location where reception is good, then fasten it to a wall or other rigid surface. •... -
Page 14: Before Using Your Home Theater
Before Using Your Home Theater To Operate your Samsung TV and the Home Theater with the HT-X250/HT-TX250's Remote Control The DVD Home Theater's remote can be used to control Samsung TVs. Plug the main unit's power cord into the AC power supply. -
Page 15: Mp3/Wma-Cd Playback
MP3/WMA-CD Playback Data CDs (CD-R, CD-RW) encoded in MP3/WMA format can be played. Load the MP3 disc. The MP3/WMA menu screen will appear and playback will start. The appearance of the menu depends on the MP3/WMA disc. WMA-DRM files cannot be played. In Stop mode, use the Cursor and then press the ENTER button. -
Page 16: Divx Playback
DivX Playback DivX The functions on this page apply to DivX disc playback. Skip Forward/Back During playback, press the Goes to the next file whenever you press the Goes to the previous file whenever you press the Fast Playback To play back the disc at a faster speed, press the Each time you press either button, the playback speed will change as follows: Normal. -
Page 17: Using The Playback Function
Using the Playback Function Displaying Disc Information You can view disc playback information on the TV screen. Press the INFO button. Each time the button is pressed, the display changes as follows: Display disappears JPEG DivX Display disappears • Depending on the disc, the disc information display may appear different. •... -
Page 18: Skipping Scenes/Songs
Using the Playback Function Skipping Scenes/Songs Press the button. Each time the button is pressed during playback, the previous or next chapter, track or directory (file) will be played. You cannot skip chapters consecutively. TITLE 01/05 CHAPTER 002/045 When watching a VCD with a track longer than 15 minutes, each time playback will skip back or forward 5 minutes. -
Page 19: A-B Repeat Playback
Using the Playback Function A-B Repeat Playback You can repeatedly play back a designated section of a DVD. Press the INFO button twice. For a VCD, press the INFO button once. Press the Cursor button to move to the REPEAT PLAYBACK ( Press the Cursor button to select <A->... -
Page 20: Ez View Function
Using the Playback Function EZ VIEW Function Press the EZ VIEW button. Each time the button is pressed, the zoom function will switch between On and Off. When a movie is played in Widescreen format, black bars at the top and bottom of the TV screen can be removed by pressing the EZ VIEW button. -
Page 21: Moving Directly To A Scene/Song
Using the Playback Function Moving Directly to a Scene/Song Press the INFO button. Press the Cursor button or numeric buttons to select the desired title/track ( ) and then press the ENTER button. Press the Cursor button to move to the Chapter ( Press the Cursor button or numeric buttons to select the desired chapter and then press the ENTER button. -
Page 22: Playing Media Files Using The Usb Host Feature
Playing Media Files using the USB Host Feature You can enjoy media files such as pictures, movies and music saved in an MP3 player, USB memory or digital camera in high quality video with 5.1 channel home theater sound by connecting the storage device to the USB port of the home theater. Connect the USB device to the USB port on the side of the unit. -
Page 23: Settings
Settings Setting the Language OSD(On-Screen Display) language is set to English by default. In Stop mode, press the MENU button. Press the Cursor button to move to <Setup> and then press the ENTER button. Select <LANGUAGE> and then press the ENTER button. Press the Cursor button to select <OSD LANGUAGE>... -
Page 24: Setting Parental Controls (Rating Level)
This selects one of the 3 wallpaper screens Press the EXIT button to exit the setup screen. • ORIGINAL : Select this to set the Samsung Logo image as your wallpaper. • USER : Select this to set the desired image as your wallpaper. -
Page 25: Dvd Playback Mode
Settings (Con’t) DVD Playback Mode Some DVD-Audio discs contain DVD-Video as well as DVD-Audio. To play back the DVD-Video portion of the DVD-Audio disc, set the unit to DVD-Video mode. Press the EJECT button and then press the MENU button. Press the Cursor button to move to <Setup>... -
Page 26: Setting The Test Tone
Settings (Con’t) Setting the Test Tone Use the Test Tone feature to check the speaker connections. In Stop mode, press the MENU button. Press the Cursor button to move to <Audio> and then press the ENTER button. Press the Cursor button to move to <TEST TONE>... -
Page 27: Setting The Drc (Dynamic Range Compression)
Settings (Con’t) Setting the DRC (Dynamic Range Compression) This feature balances the range between the loudest and quietest sounds. You can use this function to enjoy Dolby Digital sound when watching movies at low volume at night. In Stop mode, press the MENU button. Press the Cursor button to move to <Audio>... -
Page 28: Sound Field (Dsp)/Eq Function
Settings (Con’t) Sound Field (DSP)/EQ Function DSP(Digital Signal Processor) : DSP modes have been designed to simulate different acoustic environments. EQ : You can select ROCK, POP, or CLASSIC to optimize the sound for the genre of music you are playing Press the DSP/EQ button. -
Page 29: Dolby Pro Logic Ii Effect
Settings (Con’t) Dolby Pro Logic II Effect This function works only in Dolby Pro Logic MUSIC mode. Press the PL II MODE button to select <MUSIC> mode. Press the PL II EFFECT button to select <P> (PANORAMA), then press the Cursor buttons to select the desired effect setting. -
Page 30: Presetting Stations
Listening to Radio (Con’t) Presetting Stations Example : Presetting FM 89.10 in the memory Press the TUNER button to select the FM band. Press the button to select <89.10>. Press the TUNER MEMORY button. <01> flashes in the display. Press the button to select preset number. -
Page 31: Operating A Tv With The Remote Control
TV. • If you do not set the remote control with the code for your brand of TV, the remote control will work on a Samsung TV by default. TV Brand Code List... -
Page 32: Troubleshooting
Refer to the chart below when this unit does not function properly. If the problem you are experiencing is not listed below or if the instruction below does not help, turn off the unit, disconnect the power cord, and contact the nearest authorized dealer or Samsung Electronics Service Center. Symptom •... -
Page 33: Cautions On Handling And Storing Discs
Cautions on Handling and Storing Discs Small scratches on the disc may reduce sound and picture quality or cause skipping. Be especially careful not to scratch discs when handling them. Handling discs Do not touch the playback side of the disc. Hold the disc by the edges so that fingerprints will not get on the surface. -
Page 34: Usb Host Feature Supported Products
Optio-S50 Pentax Digital Camera Optio 33LF Pentax Digital Camera YP-T5 VB Optio MX Pentax Digital Camera YP-53 Digimax-420 Samsung Digital Camera Digimax-400 Samsung Digital Camera Sora PDR-T30 Toshiba Digital Camera USB External HDD Coolpix 5900 Nikon Digital Camera Coolpix S1... -
Page 35: Specifications
365 x 83 x 173 mm Front/Rear 5.4Kg Weights Center 1.4Kg Contact SAMSUNG WORLD WIDE If you have any questions or comments relating to Samsung products, please contact the SAMSUNG customer care centre. 5.1ch speaker system Subwoofer speaker 3Ω (DCR 3.4Ω) 40Hz~200Hz 86dB/W/M...