Advertisement
NEC Storage M110/M310/M310F Disk Array Unit
Please read this document first.
This document describes the operating procedure based on the "NEC Storage
M110/M310/M310F Disk Array Unit User's Guide".
For details, please see the pages indicated by
Guide".
・ Before using this unit, please read the "Safety Precautions" attached to the unit.
・ If the setup operation for this unit is performed by a maintenance service company,
check with maintenance personnel regarding the scope of work to be performed.
Setup Guide
in the "Disk Array Unit User's
856-857715-101-D
4 / 2016
Ver.4
Advertisement
Table of Contents

Related Manuals for NEC Storage M110


Summary of Contents for NEC Storage M110
- Page 1 NEC Storage M110/M310/M310F Disk Array Unit Setup Guide Please read this document first. This document describes the operating procedure based on the “NEC Storage M110/M310/M310F Disk Array Unit User’s Guide”. For details, please see the pages indicated by in the “Disk Array Unit User’s Guide”.
- Page 2 7-2 Specifying the IP address ◆ Perform the following setup operations with respect to 7-3 Installing NEC Storage Manager Agent Utility the application server to which this unit is to be connected: 7-4 Starting iSM client - Acquiring a host adapter WWPN...
-
Page 3: Checking The Package
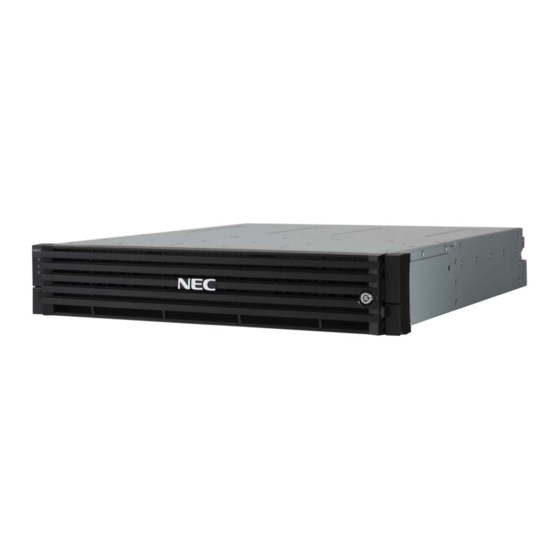
Notice ◆Notes on handling cables: Be sure to handle cables carefully. Careless handling might cause the characteristics to degrade or mechanical damage (cable disconnection). • Handle cable connectors carefully so that they are not dropped on the floor and damaged. •... - Page 4 3 Part Name – Checking Appearance and Features Check the mount positions for the components and LED. Disk Array Unit 1-2-1 Disk Array Controller [Front view] (2)SERVICE LED (1) ID LED (3)POWER LED (4)Disk drive/Dummy carrier [2.5-inch disk drive-mounting model] (2)SERVICE LED (1) ID LED (3)POWER LED...
- Page 5 [Rear view] Dual controllers and AC power mounting model The DC power supply is same as the Disk Enclosure’s. See the “Rear view” of the DC power mounting model Disk Enclosure on the next page. (1) Controller (CONT1) (1) Controller (CONT0) (2) Power supply (PS1) (2) Power supply (PS0) [With FC 2port or iSCSI Optical 2port controllers]...
- Page 6 [Optional] Disk Enclosure 1-2-2 Disk Enclosure (optional) [Front view] Same as the Disk Array Unit. See the “Front view” of the Disk Array Unit. [Rear view] (1) Adapter (ADP0) (1)Adapter (ADP1) (1) Adapter (ADP0) (1)Adapter (ADP1) (2) Power supply (PS1) (2) Power supply (PS0) (2) Power supply (PS1) (2) Power supply (PS0)
-
Page 7: Installation
4 Installation Perform the installation safely by reading the following safety precautions. Assembling the controller Install optional components if they are not already mounted in the controller. If they are all mounted, go to 4-2. In the case you install an optional controller to a single controller model, be sure to install it AFTER finishing all configuration of the Disk Array Unit as a single controller model. -
Page 8: Installing Disk Drives
Installing Disk Drives Install the disk drive if it is not already mounted on the Disk Array Unit or the disk enclosure. 3-2-4 Installing Disk Drives ・ Disk drives are electronic devices. When handling a disk drive, take anti-static measures, such as wearing a wrist strap. ・... - Page 9 5 Connection – connecting the cables ■ Connect the cables by checking the locations of cables (see figure below) . 3-3 Connecting Disk Array Units Disk Array Unit Note: Connect the power cable to the outlet after the connection of other cables is completed. [Dual controllers and AC power mounting model with a pair of FC 4port HPE] Connect the same way for Disk Array Units with other types of controller.
- Page 10 [Optional] Disk enclosure Note: Connect the power cable to the outlet after the connection of other cables is completed. 8-3-4 Disk Enclosures To Disk Array Unit or disk enclosure closer to Disk Array Unit [AC power mounting model] Disk port (DP0-IN) ※A port next to DP0-IN is not used DP-OUT DP0-IN...
- Page 11 ■ Connecting DE19 DE09 M110 3.5-inch disk the SAS cables drive mounting model Note: For wiring, DE18 DE08 Disk enclosure 9 units max see the User’s Guide. DE17 DE07 DE16 DE06 DE15 DE05 M310 2.5/3.5, M310F 2.5 inch disk drive mounting model DE14 DE04 Disk enclosure 19 units max...
-
Page 12: Turning The Power On
6 Turning the Power On Follow the steps below to power on the Disk Array Unit. Make sure to power on the application servers after the Disk Array Unit is successfully started. Step 0 Preparation ・ Check the disk array controller and the disk enclosures are connected correctly. ・... -
Page 13: Installing And Setting Up The Software
Install the software required to prepare and set up the NEC Storage Manager client. Preparation Prepare the client machine on which NEC Storage Manager client will be used. See the following section: 4-1 Configuring NEC Storage Manager 4-2 Configuring Internet Explorer and Java for NEC Storage Manager Specifying the IP address Install the network setup tool and then specify the IP address for the disk array. - Page 14 8 Initializing the Disk Array Unit Initialize the disk array. The initialization method differs depending on the model. Collecting host information for FC connection or iSCSI Opt connection ・ To automatically collect host information on an FC model, go to 8-2. ・...
- Page 15 SAS model Initialize and configure the disk array from the iSM client. See the following section: 7-3 Initialization the SAS Connection Verifying the connection Verify the connection to the disk array from the application server to which the logical disk has been assigned. See below. FC connection 5-4 Checking Connection from Application Servers iSCSI connection...
-
Page 16: Setup Complete
* For a description on how to install/uninstall a controller, a disk drive, or a disk enclosure, see the following section: 8-3 Installation and Removal NEC Storage M110/M310/M310F Disk Array Unit Setup Guide © NEC Corporation 2014 NEC Corp. 5-7-1, Shiba, Minato-ku, Toyo TEL(03) 3454-1111(main)