Table of Contents
Advertisement
Quick Links
Digital Cordless Telephone
SP-R6100
User's Manual
Your battery is guaranteed for six months. When you purchase the unit, you should
fully charge the battery before initial operation.
This equipment is not designed for making
emergency telephone calls when the power
fails. Alternative arrangements should be made
Printed in Korea
Code No. : GG68-00191A
for access to emergency services.
Basic. 03/00. Rev.1.3
Advertisement
Table of Contents

Related Manuals for Samsung SP-R6100


Summary of Contents for Samsung SP-R6100
-
Page 1: Digital Cordless Telephone
Digital Cordless Telephone SP-R6100 User’s Manual Your battery is guaranteed for six months. When you purchase the unit, you should fully charge the battery before initial operation. This equipment is not designed for making emergency telephone calls when the power fails. -
Page 2: Safety Precautions
To recover the full storage capacity of the battery, recharge the battery for a minimum of 10 hours and use until it is fully discharged. This process needs to be repeated several times. 04. This unit requires a SAMSUNG-approved battery. Do not use other batteries. Important Notices... - Page 3 05. Clean the charge points with a dry cloth from time to time. 06. Ringer Equivalence Number (REN)-1.0. The REN is a customer guide indicating the approximate maximum number of items of apparatus that should be connected simultaneously to the line. The sum of REN’s of the individual items should not exceed a total value of 4.
-
Page 4: Table Of Contents
Table of Contents Getting Started Checking Parts ... 8 Control Locations ... 9 Connecting Lines ... 11 Installing Handset Battery ... 12 Charging the Handset ...14 Turning the Handset On/Off ... 15 LCD Window Icon Descriptions... 16 Choosing Dial Mode(Menu 5-1)... 16 Using Headset... -
Page 5: Getting Started
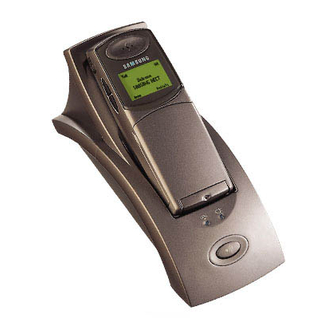
Getting Started Checking Parts Once you have unpacked your phone, check to make sure that you have all the parts shown below. If any piece is missing or broken, please call your dealer. Base Adapter Batteries Getting Started Control Locations Handset Handset Line Cord... -
Page 6: Connecting Lines
Base Blinks when a call comes in and lights steadily when a call is in progress. Paging key Allows you to page the handset. Lights steadily while the base Also used to register a new handset is connected to the power supply. with the base. -
Page 7: Installing Handset Battery
• The battery needs to be replaced if it does not recover its full storage capacity after re c h a rging. • When replacing battery, only use SAMSUNG-approved b a t t e ry. For details, see ‘Specifications’ on page 65 or ask your nearest service center. -
Page 8: Charging The Handset
1. To turn on the handset when the display is off, press key. The display shows the handset and base number, and the greeting message SAMSUNG as shown below. (To change the greeting, see page 42) The phone is now ready for use. -
Page 9: Lcd Window Icon Descriptions
LCD Window Icon Descriptions H S ( 1 ) B S ( 1 ) S A M S U N G Signal Strength icon Line icon Choosing Dial Mode In order to provide compatibility with most telephone systems, your phone can be set to either pulse-dialling (same as rotary), or tone dialling (DTMF). -
Page 10: General Functions
General Functions Making a Call 1. Open the flip cover, and press key. You hear a dial tone. N o t e : If you turn the Active Flip f e a t u re on, you do not need to press the k e y. -
Page 11: Camp On Busy
Camp On Busy (Available only when you have more than one handset) This feature allows your handset to wait for connection to the telephone line currently engaged by another handset. Your handset rings when the telephone line becomes free. 1. You hear a short busy tone if you open the flip cover or press key while another handset engages the telephone line. -
Page 12: Caller Id Display
Caller ID Display Caller ID displays the caller’s name and number, as well as the date and time that the call was received. This feature is available on your phone if the caller’s network transmits the necessary information. You can use this feature only when the caller’s service network transmits the caller’s information. -
Page 13: Battery Level Indicator
To Erase All Numbers In Redial Memory 1. Press the Redials soft key in the Standby mode. 2. Press the All Erase soft key. The display prompts you to confirm the setting. 3. Press the Yes soft key. You hear a beep and the phone returns to the Standby mode after clearing the redial memory. -
Page 14: Adjusting Key Volume
Adjusting Key Volume In the Standby mode with the flip cover open, press key on the side of the phone . You can adjust the volume from level 0 to level 5, and it is preset to level 1. The key volume is displayed as bars in the LCD window. -
Page 15: Using The Menus
Using the Menus A two-level menu structure is available to set the various options available on your phone. You can set the menu options in two different ways, via the soft keys or by using the index system. Using the Soft Keys The two soft keys are used in the following ways. -
Page 16: Menu Map
Menu Map The following illustration shows the menu structure available and indicates the: • Number assigned to each option • Brief description and the page on which you can find details of each feature. 1. Phone Book 1-1 Find Name (Search a number by name. -
Page 17: Phonebook
PhoneBook The Phonebook allows you to store frequently used phone numbers and their associated names in your personal directory so that you can easily make a call without having to remember or enter the phone number. You can store up to 70 numbers. -
Page 18: Dialing A Number In Phonebook
3. Select the other letters in the same way. The cursor moves to the right when you press a different key. N o t e: When entering the same letter twice (or a d i ff e rent letter on the same key), just wait for a few seconds for the cursor to move automatically, and then select the next letter. -
Page 19: Searching For Numbers In Memory (Menu 1-1, 2)
Searching for Numbers in Memory If you do not remember which telephone numbers have been stored in the various memory addresses, you can scan through the memory until you find the one you are looking for. By Name 1. Press the Menu soft key. Phonebook appears. 2. -
Page 20: Erasing All Numbers (Menu 1-4)
Erasing All Numbers 1. Press the Menu soft key. Phonebook appears. 2. Press the Select soft key to access Phonebook menu. The phonebook options are displayed. 3. Press the soft key until All Erase is selected, then press the Select soft key. You are asked if you are sure you want to erase all numbers stored in your phonebook memory. -
Page 21: Received Calls (Caller Id)
Received Calls When you receive a call, the caller’s phone number is shown on your phone’s display, if it is available from the network on which the call was made. The last 20 numbers received are stored in your phone and you can view the list and dial the numbers. -
Page 22: Greeting Message
Greeting Message This option allows you to enter a greeting message that will be displayed when your phone is in the Standby mode. You can change the greeting message according to your own pref- erence. Greeting Message 1. In the Standby mode, press the Menu soft key. 2. -
Page 23: Adjusting Ring Volume (Menu 4-2)
Adjusting Ring Volume 1. In the Standby mode, press the Menu soft key. 2. Press the soft key repeatedly until Ring appears, then press the Select soft key. 3. Press the soft key repeatedly until Ring Volume appears, then press the Select soft key. The current Ring Volume setting appears. -
Page 24: Unique Ring Tones For Selected Calls (Menu 4-4)
Unique Ring Tones for selected calls This new feature allows you to distinguish between different callers by assigning unique ring tones to specific numbers stored in your handset When a call is received from a speci- fied number, you will hear a unique ring sound that can only be heard when that specific number calls. -
Page 25: Ring Delay Time (Menu 4-5)
Ring Delay Time If you activate the ring delay time, your handset will not ring for a specified delay time while other handsets are ringing. If you wish, you can answer the call within the delay time on your handset. 1. -
Page 26: Base Number Display (Menu 5-3)
Base Number Display This feature allows the phone to display the base number currently in use while in the Standby mode. The feature is preset to ON at factory. 1. In the Standby mode, press the Menu soft key. 2. Press the soft key repeatedly until Settings appears, then press the Select soft key. -
Page 27: System
System Up to six handsets can be registered and operated from your base unit. You can register and remove a handset through the System menu. You can also reset the handset to its default configuration. Call Barring It is possible to set the phone to restrict numbers that can be dialled. -
Page 28: Registering A New Handset (Menu 6-2)
Registering a New Handset The handset supplied with the base unit is already registered as handset 1. Each additional handset you purchase must be registered to the base unit. 1. Press and hold the Paging key on the base for more than 3 seconds. -
Page 29: Intercom Between Handsets
Intercom Between Handsets (Available only when you have more than one handset) If you have multiple handsets registered with the base, two handsets can talk to each other on an internal intercom call, while a third handset can be on an external call. 1. -
Page 30: Call Transfer Between Handsets
Call Transfer Between Handsets (Available only when you have more than one handset) You can transfer a call from one handset to another. 1. During a telephone conversation, press caller will be put on hold and will hear music. INTERCOM - displays and the cursor blinks. 2. -
Page 31: Changing Pin (Personal Identification Number) (Menu 6-4)
• Ring Delay: OFF • Base Number: ON • PIN code: 0000 • No number barred • Greeting Message: SAMSUNG • Key Volume : Level 1 • Unique Ring Tone: OFF Note: The Dial type will not change even after resetting the 1. -
Page 32: Base
Base The SP-R6100 handset may be used with up to four base units. To use the handset with more than one base unit, you must register the handset to each base unit. Refer to ‘Registering a New Handset’ on page 54. -
Page 33: Specifications
Tr o u b l e s h o o t i n g Symptom Check • Check that the power adapter is properly connected. • Check that the telephone line cord is properly connected. No operation • Check that the handset is fully charged. - Page 34 3. The liability of Samsung (UK) Ltd is limited to the cost of repair/replacement of the unit under warranty. 4. This warranty does not affect the purchasers statutory rights.