Advertisement
Quick Links
Download this manual
See also:
Reference Manual
Installation
NETGEAR ProSAFE VPN Firewall
FVS318G v2
Package Contents
• NETGEAR ProSAFE VPN Firewall FVS318G v2
• Ethernet cable
• Power adapter
• Mounting screws
Connect the VPN Firewall
If you use cable modem service, you must set up the VPN firewall using
the same computer that you used when you first set up your Internet
connection. If you use DSL service, you might need your DSL service login
name and password.
¾ To connect the VPN firewall:
1. Power off your computer.
2. Power off your modem and unplug the power supply.
3. Locate the Ethernet cable connecting the computer and the modem.
4. Disconnect this Ethernet cable from the computer only.
5. Connect the Ethernet cable coming from the modem to the WAN port
on the VPN firewall.
6. Connect the Ethernet cable that came with your VPN firewall into a LAN
port on the front of the firewall.
7. Connect the other end of the Ethernet cable coming from the VPN
firewall LAN port to the LAN port on your computer.
Your VPN firewall is connected and you are now ready to restart your
network.
WARNING:
Failure to restart your network in the correct sequence might
prevent you from connecting to the Internet.
8. Connect your modem's power supply to your modem and power it on.
Wait two minutes for the modem to boot.
9. Connect the VPN firewall's power supply.
Wait one minute for the firewall to boot.
10. Turn on your computer.
Note:
For DSL customers, if ISP-provided software logs you in to the Internet, do
not run that software. You might need to go to the browser Tools menu, Internet
Options, Connections tab, and disable autodialing.
Verify Your Connection
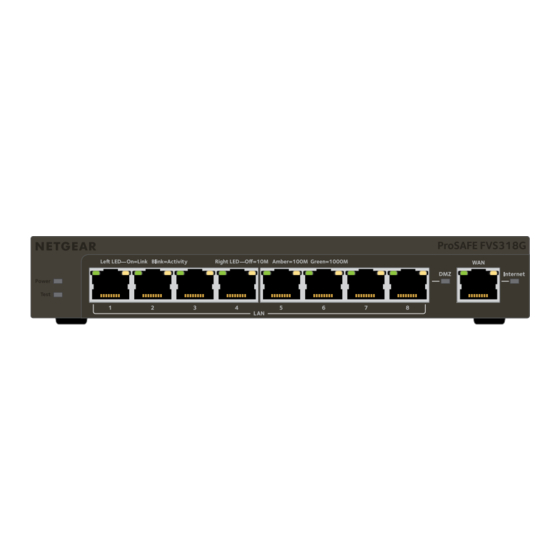
Check the VPN firewall LEDs to verify that the VPN firewall is connected.
• Power. The Power LED lights solid green. If it does not light solid green,
check that the power adapter is connected to an AC outlet.
• Test. The Test LED lights when the firewall is first turned on and then goes
off. If after two minutes it is still lit, see the Troubleshooting Tips in this
guide.
• WAN. The WAN port LED lights. If it does not, make sure that the Ethernet
cable is attached to the VPN firewall WAN port and the modem. Also, make
sure that the modem is powered on.
• LAN. There are two LEDs for each LAN port. The green LED on the upper
left indicates network activity. The right LED indicates communication
speed. It is green for 1000 Mbps, amber for 100 Mbps, and off for 10
Mbps. If the LAN port LED is not lit, check that the Ethernet cable from the
computer to the firewall is attached at both ends, and that the computer is
on.
Configure the VPN Firewall for Internet
Access
Use your browser to access and configure the FVS318G.
¾ To configure your firewall:
1. Open a browser and enter https://192.168.1.1 into the address bar.
The login screen displays.
Advertisement

Related Manuals for NETGEAR FVS318G v2


Summary of Contents for NETGEAR FVS318G v2
-
Page 1: Package Contents
Installation Connect the VPN Firewall Verify Your Connection If you use cable modem service, you must set up the VPN firewall using the same computer that you used when you first set up your Internet connection. If you use DSL service, you might need your DSL service login name and password. NETGEAR ProSAFE VPN Firewall Check the VPN firewall LEDs to verify that the VPN firewall is connected. ¾ To connect the VPN firewall: FVS318G v2 • Power. The Power LED lights solid green. If it does not light solid green, 1. Power off your computer. check that the power adapter is connected to an AC outlet. 2. Power off your modem and unplug the power supply. • Test. The Test LED lights when the firewall is first turned on and then goes 3. Locate the Ethernet cable connecting the computer and the modem. off. If after two minutes it is still lit, see the Troubleshooting Tips in this 4. Disconnect this Ethernet cable from the computer only. guide. -
Page 2: Troubleshooting Tips
NETGEAR, the NETGEAR logo, and Connect with Innovation are trademarks and/or registered August 2014 trademarks of NETGEAR, Inc. and/or its subsidiaries in the United States and/or other countries. 350 East Plumeria Drive Information is subject to change without notice. © NETGEAR, Inc. All rights reserved.