NEC SL2100 Quick Install Manual
Isdn pri trunks
Hide thumbs
Also See for SL2100:
- Features and specifications manual (978 pages) ,
- Programming manual (678 pages) ,
- Hardware manual (218 pages)
Table of Contents
Advertisement
Advertisement
Table of Contents

Related Manuals for NEC SL2100


Summary of Contents for NEC SL2100
- Page 1 The SL2100 Quick Install Guide: ISDN PRI Trunks www.nec-enterprise.com...
- Page 2 NEC SL2100 Communication System This guide explains the installation, configuration and operation of the SL2100 Telephone System including the exchange line and telephone connections. Further information is available on BusinessNet. Please keep all information supplied for future reference. Regulatory Notice.
-
Page 3: Table Of Contents
Service Codes ..............................39 Extension – Programmable Function Keys ......................40 Extension - Toll Restriction ..........................42 What to do if you make errors within the SL2100 Configuration ..............43 10- Security................................44 Quick Install Guide – SL2100 with ISDN PRI Trunks rev 1.1... -
Page 4: What Is The Sl2100
Each trunk line is presented at a Function Key with busy lamp indication. The system can be easily modified using SL2100 PCPro which has Quick Installation wizards for the majority of system settings. Outside lines (ISDN PRI Trunks) included in this guide You can install one PRI trunk interface daughter card within the SL2100 main unit. -
Page 5: Parts Available For The Sl2100
NEC SL2100 Communication System Parts available for the SL2100 Not all parts are included within this guide, please refer to the other SL2100 Quick Install Guides or the SL2100 Hardware Manual for a full description and installation instructions of all parts available. -
Page 6: System Overview
NEC SL2100 Communication System System Overview SL2100 chassis showing the CPU card and an extension interface card with 1PRIDB daughter card installed. 1 x ISDN PRI circuit SL2100 CPU card Extension Interface card The slots are labelled S0~S4 on the front of the chassis. -
Page 7: Installation Procedure
It is not possible to have power fail operation with ISDN PRI trunks. If power fail operation is required by the customer then it is recommended that additional analogue trunks are installed. Quick Install Guide – SL2100 with ISDN PRI Trunks rev 1.1... -
Page 8: 1- Unpack The Sl2100 System
SL2100 system telephone – 300 metres Normal telephone (SLT) – 1125 metres If you need to extend the exchange line cables: ISDN30 lines must usually be extended by the Network Provider Quick Install Guide – SL2100 with ISDN PRI Trunks rev 1.1... -
Page 9: 2- Install The Isdn Pri Trunk Card
Install the ISDN PRI Card 2- Install the ISDN PRI Trunk Card The SL2100 chassis does not have any trunk ports pre-installed, you install the trunk card of your choice. ! Ensure the SL2100 is powered off before removing/installing any card. -
Page 10: Removing The Plastic Knockouts
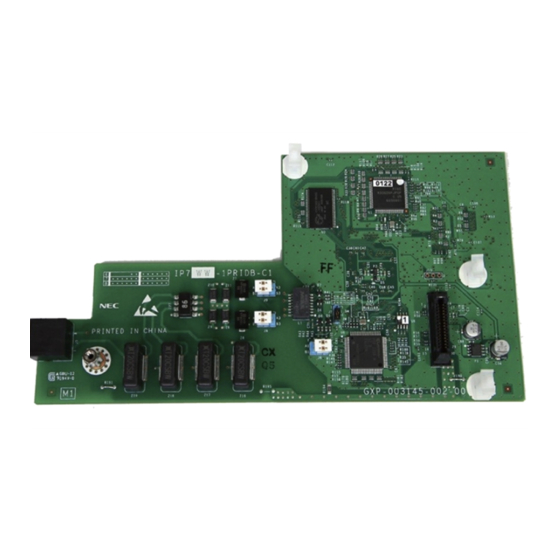
Cut the three connection points for each left/right knockout depending in the trunk daughter card being installed Remove any sharp edges with a utility knife Ensure the flush side of the cutter is towards the front panel of the card Quick Install Guide – SL2100 with ISDN PRI Trunks rev 1.1... - Page 11 The 1PRIDB card is supplied with three Nylon pillars already installed and a securing screw and metal spacer. Align the 1PRIDB board Nylon spacers and connector with the SL2100 interface card and push in firmly. Secure the 1PRIDB with the screw through to the metal spacer.
- Page 12 Install the ISDN PRI Card Insert the interface card with 1PRIDB daughter card mounted into the SL2100 universal slot, ensure the card slides into the guide rails and tighten the two screws to secure the card. The type of trunk daughter card installed can be identified by the RJ45 sockets visible on the front of the interface card.
-
Page 13: 3- Install The Cpu Card
Install the ISDN PRI Card 3- Install the CPU Card The SL2100 chassis does not have any CPU card pre-installed, you install the card of your choice. There are two CPU card available: IP7EU-CPU-C1 SL2100 Main Processor Board • VoIPDB Daughter Board Connector : 1 •... - Page 14 Install the ISDN PRI Card Insert the CPU card mounted into the SL2100 CPU slot S0, ensure the card slides into the guide rails and tighten the two screws to secure the card. Quick Install Guide – SL2100 with ISDN PRI Trunks rev 1.1...
-
Page 15: 4A- Wall Mount The Sl2100 System
SL2100 Hardware Manual for instructions. Fit three screws to the wall in the holes shown. Leave 2.5~3.5 mm stand off. Hook the SL2100 chassis onto the three screw heads. Quick Install Guide – SL2100 with ISDN PRI Trunks rev 1.1... - Page 16 Important. The system must have a permanent Earth Ground connection to a verified Earth point using a minimum of 14AWG/2.5mm cable. The Earth connection must have no other purpose than connecting to the SL2100 unit. Quick Install Guide – SL2100 with ISDN PRI Trunks rev 1.1...
-
Page 17: 4B- Rack Mount The Sl2100 System
Fit the rack mount shelf + chassis into the 19 inch rack and secure the shelf with the four screws supplied Quick Install Guide – SL2100 with ISDN PRI Trunks rev 1.1... -
Page 18: 5- Connect The Telephones
These guides also include details of connecting the following items: Doorphone units DSS consoles 6- Connect the External Music on Hold Device Refer to the Quick Install Guide for MOH and External Audio. Quick Install Guide – SL2100 with ISDN PRI Trunks rev 1.1... -
Page 19: 7- Connect The Exchange Lines
Connect the Exchange Lines 7- Connect the Exchange Lines The SL2100 chassis does not have any trunk ports pre-installed, you install the trunk card of your choice. ISDN PRI circuit Trunk port allocation Circuit 1 Trunk ports 1-30 The SL2100 1PRIDB card has an RJ45 connector. -
Page 20: 8- Connect The Power & System Start Up
System Start Up – First Time ! The first time you start up the SL2100 it is important to clear the system memory. This will ensure that the system is set to the default/factory configuration. 1. Push and hold the LOAD Button located on the front of the CPU card. -
Page 21: 9- Configure The Sl2100
You must have SL2100 PCPro installed to your laptop/PC, this can be downloaded from BusinessNet, refer to the Quick Install Guide – SL2100 PCpro. The SL2100 can also be configured via an SL2100 System phone or via a WebPro interface, these are not included within this guide. -
Page 22: Change Your Pc Ip Address
Change your PC IP Address You will need to reconfigure your PC to have an IP address in the same subnet as the SL2100 during system commissioning. You will be able to change the IP address of the SL2100 during this process. -
Page 23: Sl2100 Pcpro
User Name: tech Password: 12345678 On first install you may need to setup the default sliding panes if you wish to use these. Select View tab and click Default Quick Install Guide – SL2100 with ISDN PRI Trunks rev 1.1... -
Page 24: Pcpro Initial Setup Wizard
Remove unused trunks System time and date The Wizard downloads the SL2100 system configuration to detect the hardware installed, and then tailor the process to the system, so that you only have to setup the parts actually installed. Start the Wizard The Initial Setup Wizard can be started from either the Properties sliding pane or the Easy Edit navigation menu once you have connected to the SL2100 system. - Page 25 Select the Extension Number Range Leave at country default Press F1 to get help 10->29 with the Initial Setup Wizard 100->129 201->312 Factory default 200->311 Quick Install Guide – SL2100 with ISDN PRI Trunks rev 1.1...
- Page 26 Trunk access code = 9 Select the Programmable Function Key Assignmant for all system phones Select from 1 to 12 lines (these are trunks connected to the SL2100) Delete all keys (you can setup your own key assignment later with PCPro) ...
- Page 27 Configure the SL2100 Detected Trunk Type Will show the trunk cards installed within the SL2100 system, in this example only ISDN PRI trunks are installed. Click the ‘Primary Rate (ISDN30)’ button to continue. Select the Trunk Routing Type. If you are not sure then select 1~30 to DID.
- Page 28 Configure the SL2100 Tell the SL2100 system how many DID numbers you have. If you are not sure then select 200. Click the Add Range button to create one or more incoming DDI ranges. Note – You can use the Add Range button as many times as you wish to build your bespoke DDI routing.
- Page 29 Built-in Answer Machine is setup within VRS Auto Attendant You can repeat these steps as many times as required to setup all of your DDI’s When done, click to step on to the next wizard screen. Quick Install Guide – SL2100 with ISDN PRI Trunks rev 1.1...
-
Page 30: Set Time & Date And Upload To The Sl2100
Ensure Select All is ticked and Click Start to begin uploading the changes to the SL2100 system, the progress bar will show when this is complete (should take less than 30 seconds). Click Close when finished. Repeat Wizard or Finish If you’ve uploaded your changes then click Disconnect... -
Page 31: Make Additional Changes With Pcpro
Note – Not all options are available within the Properties pane when you are offline (not connected to the SL2100), configuration within this guide is done online so you should always: 1. Connect to the SL2100 2. Download the system configuration (always download before you make any changes) 3. -
Page 32: Pri Trunk Type
Adjust the quantity of DDI receive digits Click button to view selected details within the Easy Edit screens The trunk type was set to DDI by the Initial Setup wizard. Quick Install Guide – SL2100 with ISDN PRI Trunks rev 1.1... -
Page 33: Ddi Routing
Tip – Setup your Automatic Night Mode schedule (if required) before you configure the Incoming Call Routing. Tip – Create your Incoming Ring Groups first (within the Incoming Ring Group pane) before assigning the Group number as the target for a DDI. Quick Install Guide – SL2100 with ISDN PRI Trunks rev 1.1... -
Page 34: Incoming Ring Groups
Click any IRG to view the details within the Properties pane Click button to open Easy Edit screen for IRG’s Change the view within the pane by right clicking and selecting View Quick Install Guide – SL2100 with ISDN PRI Trunks rev 1.1... -
Page 35: Vrs Auto Attendant
VRS Auto Attendant The SL2100 has a 4-channel auto attendant built-in that can be used to answer incoming trunk calls and either play a customer recorded greeting (eg to announce that the office is closed in Night Mode), give the caller a list of dialling options to route the call within the SL2100 system or take a message within the built-in Answer Machine. -
Page 36: Trunk - Outgoing Trunk Access
False = Outgoing calls disabled The Priority can be used to select the order the trunks are seized when a user dials the Trunk Access code. Quick Install Guide – SL2100 with ISDN PRI Trunks rev 1.1... -
Page 37: Automatic Night Mode Schedule
Automatic Night Mode Schedule Night modes are used to adjust the incoming ring assignment of the SL2100. Mode 1 (Day) and Mode 2 (Night) are used within the Initial Setup Wizard, additional modes can be added via this screen. The example below has Mode 3 used for lunch period. -
Page 38: Speed Dials
Configure the SL2100 Speed Dials You can copy a list of speed dial names and numbers into the PCPro screen and then upload to the SL2100. Prepare a spreadsheet in the following format: Number Name 01234567890 A customer 01234567891 B customer... -
Page 39: Service Codes
You can Right click within the Service Codes screen and export the data to the clipboard. Service codes can’t be duplicated and must be within the defined number range you selected within the Initial Setup wizard Quick Install Guide – SL2100 with ISDN PRI Trunks rev 1.1... -
Page 40: Extension - Programmable Function Keys
1. Within the Properties pane – allows selection of keys 1~12 and requires knowledge of the key types 2. Within the Easy Edit screen – allows selection of all keys and is simpler to use Click the Function Keys button to open the Easy Edit screen Quick Install Guide – SL2100 with ISDN PRI Trunks rev 1.1... - Page 41 You can copy the key assignment of the current phone to others by clicking the Apply to multiple button. Programmable Function keys are setup within the Initial Setup wizard for Line keys or no function, you can add further functions here. Quick Install Guide – SL2100 with ISDN PRI Trunks rev 1.1...
-
Page 42: Extension - Toll Restriction
Green highlight means it’s permitted (applied as an exemption to the restriction tables) Note – You must ensure that all phones can dial Emergency numbers for all available lines in all modes Quick Install Guide – SL2100 with ISDN PRI Trunks rev 1.1... -
Page 43: What To Do If You Make Errors Within The Sl2100 Configuration
Tip - Press F1 to get help within PCro. If you can’t locate your errors within PCPro then you may need to default the SL2100 back to factory defaults and run the Initial Setup wizard again (this will only take a few minutes). -
Page 44: 10- Security
DIM Access (if enabled for maintenance) To edit the passwords using PCPro: Search for password within the System Data and Easy Edit areas: 90-02=PCPro‘s password Select Advanced level Quick Install Guide – SL2100 with ISDN PRI Trunks rev 1.1...