Table of Contents
Advertisement
SHARP SERVICE MANUAL
PARTS IDENTIFICATION .............................................................................................................
SPECIFIC INFORMATION ...........................................................................................................
PART SPECIFICATION ................................................................................................................
IMPORTANT SAFEGUARDS .......................................................................................................
PRECAUTIONS ............................................................................................................................
CAUTIONS FOR USE ..................................................................................................................
WIRING DIAGRAM AND CIRCUIT DIAGRAM .............................................................................
EXPLANATION OF CIRCUIT .......................................................................................................
REPLACING METHOD FOR MAIN PARTS .................................................................................
COOKING/WARMING TEST METHOD ........................................................................................
TEST MODE SPECIFICATION .....................................................................................................
BEFORE CALLING FOR SERVICE .............................................................................................
SERVICING ..................................................................................................................................
POST-REPAIR INSPECTION .......................................................................................................
TROUBLESHOOTING GUIDE .....................................................................................................
SERVICE PARTS LIST .................................................................................................................
ELECTRONIC JAR RICE
COOKER/WARMER
MODEL
In the interests of user-safety (Required by safety
regulations in some countries) the set should be restore
to its original condition and only parts identical to those
specified should be used.
TABLE OF CONTENTS
SHARP CORPORATION
KS-COM18
Page
2
3
4
5
5
5 - 7
8 - 10
11
12 - 16
17 - 18
19
20
21
21
22 - 24
25 - 27
Advertisement
Table of Contents

Related Manuals for Sharp KS-COM18


Summary of Contents for Sharp KS-COM18
-
Page 1: Table Of Contents
SHARP SERVICE MANUAL ELECTRONIC JAR RICE COOKER/WARMER MODEL KS-COM18 In the interests of user-safety (Required by safety regulations in some countries) the set should be restore to its original condition and only parts identical to those specified should be used. -
Page 2: Parts Identification
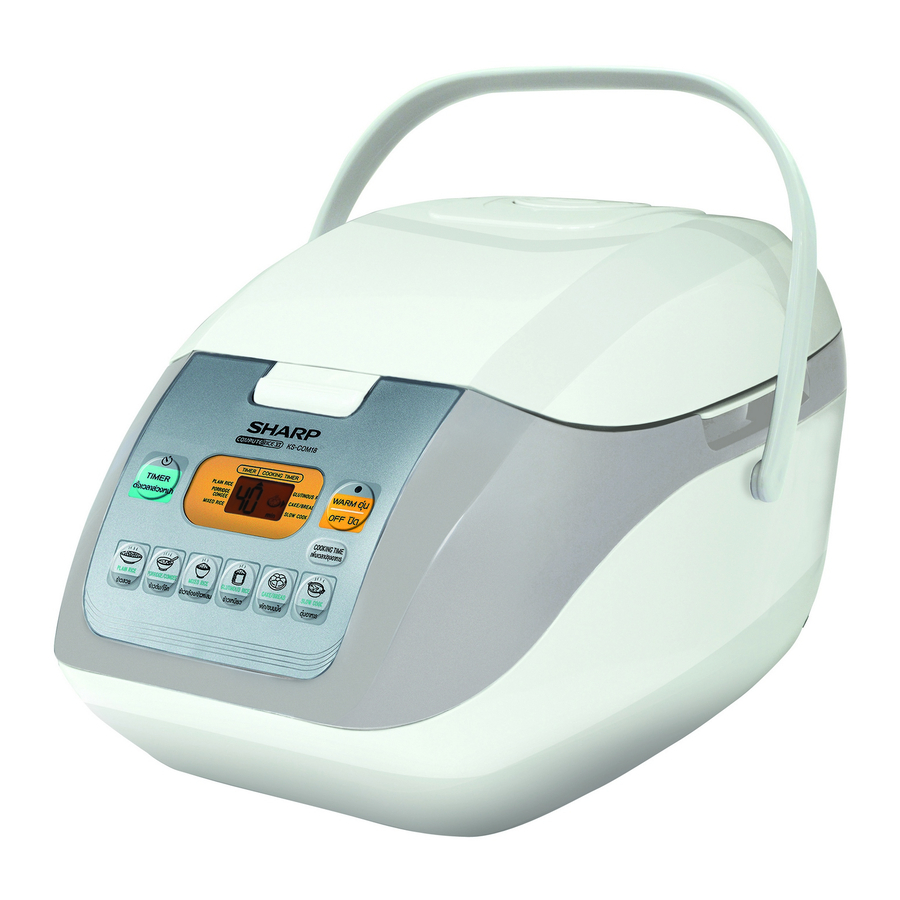
PARTS IDENTIFICATION OPERATION BOARD Display Warm lamp indicator Timer button Warm/Off button Cooking Time button Plain rice button Slow cook button Porridge/Congee button Cake/Bread button Glutinous rice button Mixed rice button Lid cap Power cord Key sheet Inner lid Steam vent hole Steamer rack Inner pot Inner pot handle... -
Page 3: Specific Information
SPECIFIC INFORMATION KS-COM18 Model A.C. Line Voltage (V/Hz) 220 / 50 A.C. only Rice cooking (W) Power consumption Warming maximum (W) Warming (average) (W) Present time to finish Type Timer 1 to 24 hours Setting range 0.36 - 1.8 Capacity (... -
Page 4: Part Specification
PART SPECIFICATION Name of part Part specification Part No. Cord length 1.03 m. Cord reel ass’y 22N405ASY 220V 830W (rating wattage) Heater plate ass’y 22N402 22N403ASY Thermistor plate ass’y Thermistor type (with connector) Temperature fuse (169 C 10A) Side heater ass’y Power 77W 22J3031ASY Ω... -
Page 5: Important Safeguards
5. Do not operate the appliance with a damaged cord or plug or after the appliance malfunctions or has been damaged in any manner. 6. Use of accessory attachments no recommended by SHARP may cause injuries. 7. Do not use outdoors. - Page 6 3. How to use it (1) Before cooking Do not use the inner pot for washing rice. Wash rice quickly and thoroughly. Insufficient washing will cause scorching and odor. Use clean, clear water. Do not use any other inner pot except the provided one. Insert the plug into wall outlet firmly and when disconnecting, hold the plug and pull it out without touching the power cord.
- Page 7 (3) Warming Because to keep the lid closed even at meals. Use for 12 hours or less for best results. Avoid using for a small amount of rice. Use for keeping warm rice warm, the setting is not intended to be used for refrigerated or room temperature rice.
-
Page 8: Wiring Diagram And Circuit Diagram
WIRING DIAGRAM CIRCUIT DIAGRAM... -
Page 9: Schematic Diagram
SCHEMATIC DIAGRAM Faston tab terminal Faston receptacle terminal Connector (Housing side) Connector (Post side) -
Page 11: Explanation Of Circuit
Warming heater drive circuit User interface circuit Model change VREF Power supply and detector circuit MODEL CHANGE Temp. detector circuit MODEL NAME Thermistor plate ass’y KS-COM18 OPEN Room temperature thermistor Thermistor Thermistor resistance temperature ( (kΩ) TH Plate -5.0 205.6 45.74... -
Page 12: Replacing Method For Main Parts
REPLACING METHOD FOR MAIN PARTS REMOVE OF BODY 1. Upside down the rice cooker and remove 4 screws fixing the body. 2. Remove body from the panel ring. 3. Remove cord reel from the body. 4. Remove the nut holding lead wire earth with body. 5. - Page 13 REMOVE OF LID ASS’Y 1. Remove the lid cap from the unit. 2. Remove the body in accordance with “REMOVE OF BODY”. 3. Remove the screw holding the hinge cover. 4. Disconnect lead wire (Lid heater) from PCB ass’y and remove the screw holding lead wire earth from outer pot.
- Page 14 CAUTION When assembling, be sure not to catch the lead wires for the inner lid heater. As shown in Fig. 4, the lead wires of the lid heater are to be passed under the rib of the lid cover and passed above the hinge pin. After assembly, make sure not to have deformation of inner lid packing.
- Page 15 REMOVE OF THERMISTOR PLATE ASS’Y 1. Remove the body in accordance with “REMOVE OF BODY”. 2. Disconnect all lead wire of the thermistor plate ass’y from PCB ASS’Y. 3. Unbend the lead wire band bounding all the lead wire. 4. Remove the heater plate ass’y in accordance with “REMOVE OF HEATER PLATE ASS’Y”. 5.
- Page 16 REMOVE OF LATCH BUTTON 1. Insert flat type screwdriver into the gap between a latch button and panel ring. 2. Pry the latch button from the panel ring. 3. Now the latch button and the latch spring are free. Latch button Panel ring Flat type screwdriver Fig.
-
Page 17: Cooking/Warming Test Method
COOKING/WARMING TEST METHOD When rice cannot be cooked well (resulting in marked scorching or under cooking), a temperature test may be done in the following way. 1. Simple test method (Simulated rice cooking) (1) Test conditions 1. Power voltage 220V. 2. - Page 18 2. Actual rice cooking test method (1) Test conditions 1. Power supply voltage ..220V. 2. 2-cup of “PLAIN RICE” cooking. 3. Ambient temperature 20 - 30 4. Standard water level according to water level scale. (2) Judging criteria 1. Each indicator shall be switched over as follows. Display show select menu “PLAIN RICE”.
-
Page 19: Test Mode Specification
TEST MODE SPECIFICATION [ To enter TEST MODE] A plug is inserted with key “Timer” & “Warm/OFF” Pushed at the same time. -
Page 21: Servicing
SERVICING Remember the following points. 1. Precautions for handling electronic parts (1) Stock/transportation PCB ass’y must be wrapped with aluminium foil or put in electroconductive bag at the condition of full discharge. (2) Taking out/fitting Do not place anything loaded by electrostaticity nearby. 2. -
Page 22: Troubleshooting Guide
TROUBLESHOOTING GUIDE 1. Body circuit side Remedy Problem Cause of problem and location of malfunction When WHT and BLU on PCB ass’y are not Rice cooker does not operate. supplied with 220V a.c. check the following. (Keys are inoperable.) Plug the power cord into Power cord is not plugged in the a.c. - Page 23 Remedy Problem Cause of problem and location of malfunction Replace the thermistor Faulty thermistor ass’y. ass’y. Faulty operation of thermistor ass’y. Repair the assembly (Thermistor movement not smooth) or replace the thermistor ass’y. Replace the PCB ass’y Faulty PCB ass’y. 4-3 Cooked rice has burned parts.
- Page 24 Problem Cause of problem and location of malfunction Remedy 6-3 Warm function operates, but Repair the lid or close Lid is not closed tightly. rice becomes watery. the lid tightly. (Warming temperature too Lid cap is not installed securely. Do not keep rice warm low) for an extended period Rice becomes sticky.
-
Page 25: Service Parts List
SERVICE PARTS LIST PARTS CODE REF. NO DESCRIPTION Q’TY PRICE (FEC) PRINTING & PACKAGING MATERIAL 22N102 INSTRUCTION BOOK 22N101 CARTON BOX 22N104 KEY SHEET 22N103 NAME PLATE 22N108 LID CAUTION LABEL 22N106B UPPER PAD - B 22N106F UPPER PAD - F 22N107B BOTTOM PAD - B 22N107F... - Page 26 PARTS CODE REF. NO DESCRIPTION Q’TY PRICE (FEC) ELECTRIC PARTS 22N405ASY CORD REEL ASS’Y 22N403ASY THERMISTOR PLATE ASS’Y 22N402 HEATER PLATE ASS’Y 22N401SET PCB SET W07A105XC LEAD WIRE BAND 22N404 สาย EARTH WIRE ASS’Y { Ground} for Holder Plate+Outer Pot+Cord Reel E03A300GG สาย...
- Page 27 2-13 2-14 2-15 2-10 2-11 2-16 2-12 2-17 2-19 2-18 2-20 1-12 1-13 2-21 2-23 2-22 2-9-1 KS-COM18...