Table of Contents
Advertisement
Advertisement
Table of Contents

Related Manuals for Hanna edge blu


Summary of Contents for Hanna edge blu
- Page 1 ® .800.561.8187 information@itm.com www. .com...
-
Page 2: Table Of Contents
Included..........................Safety Measures........................Description.......................... Diagram..........................Product Diagram......................Probe Diagram......................Guide to Indicators Probe....................Keypad Function....................... Guide to Indicators Instrument.................... Setup/Installation........................ Setting Up edge ..................... ® blu Probe Connections......................General Setup........................pH Configurations......................Basic Mode........................Logging Function......................Viewing Logged Data......................PC & Storage Interface....................... Operational Guide........................ -
Page 3: Included
Remove the instrument from the packing material and examine it carefully to make sure that no damage has occurred during shipping. If there is any damage, please contact your local Hanna Instruments Office. Packaging for edge (HI2202) includes: ® blu... -
Page 4: Description
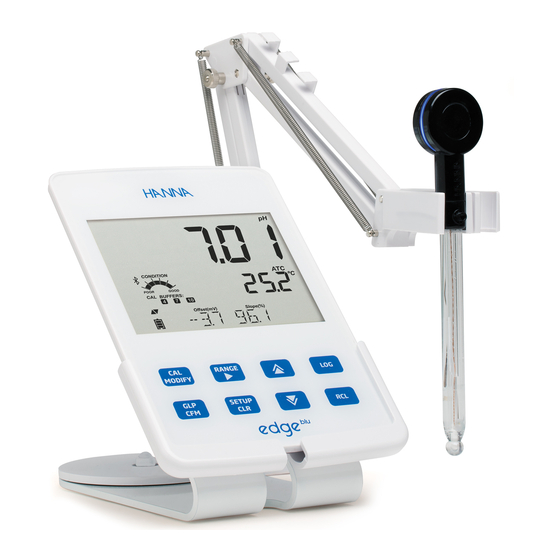
Hanna ® blu Instruments HALO™ Bluetooth digital sensor. Each HALO™ probe has a unique serial number. Once connected to the meter, the probe is ready to measure pH along with temperature. - Page 5 Liquid Crystal Display (LCD) Capacitive Touch Keypad Top mounted ON/OFF button Micro USB device connection for power or PC interface Standard USB host connection for data transfer to a USB thumb‑drive .800.561.8187 information@itm.com www. .com...
-
Page 6: Probe Diagram
PROBE DIAGRAM HI11102 HALO™ pH Probe with Bluetooth Smart Technology ® • Glass body, double junction, gel filled pH probe • Auto sensor recognition • Store calibration specific data from the last calibration • Integrated temperature measurement • Bluetooth connectivity processor •... -
Page 7: Keypad Function
KEYPAD FUNCTION 1.CAL/MODIFY ‑ Used to enter and exit calibration mode. In SETUP, used to initiate changes of a configuration setting. 2.GLP/CFM ‑ Used to display GLP calibration information. In SETUP, used to confirm change made. In calibration, used to accept calibration points. 3. -
Page 8: Guide To Indicators Instrument
GUIDE TO INDICATORS INSTRUMENT 1. Mode tags 10. Third LCD line, message area 2. Confirm tag 11. Labels 3. USB connection status 12. Second LCD line, temperature measurement 4. Bluetooth Logo 13. Temperature units 5. pH electrode diagnostics 14. Temp. Compensation status 6. -
Page 9: Setup/Installation
SETTING UP edge ® blu The main operating modes of edge are setup, calibration, measurement, data logging, and data ® blu export. Follow this general outline of steps to get you started. The following topics are expanded upon in the sections that follow in this manual. Familiarize yourself with the design features of this unique meter. - Page 10 Slide edge into the cradle. Put the probe into the electrode holder. ® blu Connect the power adapter cable to the rear socket of the bench cradle. Connect the other end to the power adapter and plug into line power. Verify the battery icon indicates charging. Wall Cradle Setup Choose suitable wall location.
- Page 11 Connect the power adapter cable to the bottom socket of the wall cradle. Connect the other end to the power adapter and plug into line power. Slide edge into the wall cradle. Verify the battery icon indicates charging. ® blu Power Connection Alternatively to using the cradle for power, edge...
-
Page 12: Probe Connections
“BAD PROBE“ or “PROBE NOT CONFIGURED“. In these cases, please contact your local Hanna Instruments Office. Note: When the scanned probes are shown, they are ordered by the RSSI (signal strength) in descending order. -
Page 13: General Setup
GENERAL SETUP The following Setup options are displayed regardless of the sensor being used or without a sensor. These settings remain when switching to another probe. Options are tabulated in the table below with choices and default values. Options are accessed by pressing SETUP. Use keys to go through Setup functions press CAL/MODIFY key. - Page 14 Option Description Choices Default Basic Mode When “On”, it permits the user to enter a custom pH First Custom Buffer Off or value Not Available buffer value to use during electrode calibration. When “On”, it permits the Second Custom user to enter a custom pH Off or value Not Available Buffer...
- Page 15 Option Description Choices Default Basic mode Select degree Celsius or Temperature Unit Fahrenheit scale for displayed ºC or ºF ºC Available and logged temperatures. Permits modification of the LCD Contrast display contrast for various 0 to 7 Available lighting conditions. Permit formatting the flash Flash Format* On or Off...
-
Page 16: Ph Configurations
pH CONFIGURATIONS Once a HALO™ probe is connected to a meter, all Probe specific parameters will be visible in the SETUP menu edge’s pH meter operation is configured by using the SETUP/CLR key with a pH probe connected to the meter. The parameter‑specific options will be seen inserted into the menu. If Basic mode is “On”, the pH parameter list will not be displayed. - Page 17 Logging type is configured in SETUP. Types of Logging Interval logging: A continuous log recorded using a user‑selected timed period. (This is not available in Basic mode). Manual log on demand: Readings are logged each time LOG key is pressed. All of the records are stored in a single Manual lot for the measurement type.
- Page 18 Manual Logging Select Manual in the SETUP menu. To initiate a Manual log, press the LOG key, or the probe button while the instrument is in measurement mode. The “PLEASE WAIT” screen will be displayed briefly followed by a screen indicating the measurement has been saved and then a screen indicating the log record number.
-
Page 19: Viewing Logged Data
VIEWING LOGGED DATA All log records stored on edge may be viewed on the meter by pressing the RCL key. ® blu The display indicates the percentage of log memory used. Press GLP/CFM key to display the logs. Choices are: Manual log on demand lot, Manual log on stability lot, Individual Interval logging lots. - Page 20 “CLEAR DONE” is displayed for a few seconds after the selected Interval lot is deleted. Delete Log Records Delete Records (Manual and Stability log on demand) To delete individual records (Manual and Stability logs only), enter Manual (Stability) log by pressing GLP/CFM key when Manual (Stability) is displayed.
-
Page 21: Pc & Storage Interface
Press the RCL key. “CFM” will be blinking. While the pH is displayed and “CFM“ blinks and message states “LOG RECALL”, press SETUP/CLR key. “CLEAR ALL” and pH will be displayed with “CFM” tag blinking. Press GLP/CFM key. “PLEASE WAIT” and the percent cleared will be displayed until completed. Note: If SETUP/CLR key is pressed in error, press SETUP/CLR key again to exit without deleting. - Page 22 The export percentage should go to 100%. Remove USB flash drive. If the selected file or a file with the same name, is already saved on the flash drive, edge will ask for confirmation of overwriting the ® blu existing file. The message “OVERWRITE” and “CFM” tag will blink. Press GLP/CFM key for overwriting the existing file or CAL/MODIFY key to exit without exporting.
- Page 23 Logged data on the edge can be transferred from the meter to a PC by following these simple ® blu directions. Suitable operating systems include Windows (XP minimum), OS X or Linux. Connect edge to the PC using the supplied micro USB cable. ®...
-
Page 24: Operational Guide
BASIC VS. STANDARD pH MODE The “Standard” pH operation includes up to a 5‑point buffer calibration, use of custom buffers, choice of displaying 0.001 pH resolution, use of the full diagnostic features of Calibration Check™ (that includes buffers used, probe condition and messages indicating a contaminated buffer or pH sensor requiring maintenance during calibration). -
Page 25: Connecting The Halo™Probe
CONNECTING THE HALO™PROBE Power the edge meter by pressing the ON/OFF button on the top of the meter. The Bluetooth logo ® blu and “SCANNING” will appear in the message area. Immediately press the operation button on your HALO™ probe. The blue halo on the probe will start blinking every half second indicating it is in discoverable mode. - Page 26 The custom buffers allow the user to calibrate in a buffer solution different from a standard one. Two custom buffers can be set in SETUP menu. See page 28 for more information about using custom buffers. The instrument will automatically skip custom buffers which are in a ±0.2 pH window of an already calibrated buffer.
- Page 27 If current buffer has no previous data stored and the calibration is not full (five buffers), the current buffer is added to the existing calibration. If the existing calibration is full, the instrument asks which buffer to replace. Press the keys to select another buffer to be replaced.
- Page 28 Offset: The new buffer calibration point can create a constant offset to all existing pH calibration data (existing calibration must have a minimum of two pH buffers). Recalibrating a pH sensor or adding to an existing calibration is simple and follows the PROCEDURE outlined on page 26.
- Page 29 For a continuous display of the electrode’s condition, daily calibration is necessary. This information can also be viewed in the GLP data. Calibration in Basic Mode Procedure Basic mode operation permits up to three‑point buffer calibration. For accurate measurements, at least a two‑point calibration is recommended. However, a single point calibration can also be used.
- Page 30 The calibrated value is then displayed on the first LCD line and the third expected buffer value on the third LCD line. After the second calibration point is confirmed, rinse and submerse the pH electrode approximately 3 cm (1¼”) into the last buffer solution and stir gently. If necessary, press the keys to select a different buffer value.
-
Page 31: Calibration Messages
pH Buffer Temperature Dependence Calibration buffers are affected by temperature. During calibration with standard pH buffers (not Custom), the instrument will display the pH buffer value at 25 ºC, however, it will use the value for that buffer at the temperature of calibration. Immediately after exiting calibration, the buffer will read its value at the temperature of measurement. - Page 32 Wrong Old Points Inconsistency “WRONG OLD POINTS INCONSISTENCY” is displayed if the new calibration differs significantly from the last value of that probe in that buffer. In this case it may be best to clear the previous calibration and attempt a new calibration with fresh buffers.
-
Page 33: Ph Glp Information
During calibration, the instrument will automatically calibrate to the pH value corresponding to the measured temperature but display it to the value at 25 ºC. Immediately after calibration, the buffer should read the value of the buffer at the temperature of measurement. Note: Temperature limits will be reduced to actual sensor specifications. - Page 34 Pressing the keys, the last calibration date (yyyy.mm.dd) together with the current reading is displayed. Note: If a custom buffer was used in calibration, the “C1” and “C2” tags will be displayed. If only the one buffer is used in calibration, the tag will be “C1” and the value will be displayed. If disabled, “EXPIRATION WARNING DISABLED”...
-
Page 35: Ph Measurement
pH MEASUREMENT When a HALO™ probe is connected, the instrument will recognize it and a cap removal message will be displayed. Press any key to skip the message. The instrument will enter measurement mode. Make sure the electrode has been calibrated before taking measurements. Rinse the pH sensor with water and a sample if possible. - Page 36 The code and the name of the currently connected probe. If the name was not changed (with Hanna Instruments LAB iPad app) it consists of the last six digits of the SN. SCAN operation.
- Page 37 Error Messages During Measurement If the pH or temperature exceeds the limits of the sensor, the message “ELECTRODE OUT OF SPEC” will scroll on the third LCD line. The temperature will continue to be displayed. If temperature exceeds the meter specification of 120 ºC, then “120 ºC” will blink on the display.
-
Page 38: Maintenance
pH PROBE MAINTENANCE New Probe pH probes are shipped with a cap that protects the bulb and junction from damage. When using a new probe, remove the protective bulb cap and inspect for damage. Thoroughly rinse the probe with water to remove salt deposits that may have formed on the external surface of the probe during storage or shipping. - Page 39 A sensor or reference that is coated or fouled in any way may produce drifty sluggish measurements. To ensure the best pH measurement possible, preventative maintenance and storage practices are strongly advised. A clean, conditioned Hanna Instruments pH electrode will provide the best measurement possible. Always use fresh buffers with each calibration; dirty electrodes can contaminate buffer solutions.
-
Page 40: Ph Probe Battery Replacement
PH PROBE BATTERY REPLACEMENT 1. If required, disconnect probe from meter by pressing the indented button located on the top of the probe until indicator halo stops flashing. 2. Unscrew the battery compartment cover and set aside. The old battery is removed by inserting a straight edge (such as a screwdriver) into the recessed notch and prying it up. -
Page 41: Troubleshooting Guide
Broken pH electrode. Replace the probe. or gives faulty readings. At startup the meter The ON/OFF button is displays all LCD tags Contact your local Hanna Instruments Office. stucked. permanently. Instrument was not CAL tag with “FACT DUE” factory calibrated or lost Contact your local Hanna Instruments Office. -
Page 42: Specifications
edge SPECIFICATIONS ® blu pH, mV in pH Temperature ‑2.00 to 16.00 pH Range ‑2.000 to 16.000 pH* ‑20.0 to 120.0 ºC ; ‑4.0 to 248.0 °F** ±1000.0 mV in pH 0.01 pH Resolution 0.001 pH* 0.1 ºC; 0.1 ºF 0.1 mV ±0.01 pH Accuracy... -
Page 43: Hi11102 Specifications
HI11102 SPECIFICATIONS Specifications Reference Double, Ag/AgCl Junction Ceramic Electrolyte 0.00 to 12.00 pH Range ±420 mV ‑5.0 to 80.0 ºC (23.0 to 176.0 ºF) Bulb Shape Spherical Outer Diameter (glass) 12 mm (glass) Overall Length 183 mm Solution Temperature ‑5.0 to 80.0 ºC (23.0 to 176.0 ºF) Environment 0.0 to 50.0 ºC (32.0 to 122.0 ºF) electronic module is not waterproof Temperature Sensor... -
Page 44: Accessories
ELECTRODES/PROBES HI11102 Glass body, gel filled HALO pH probe with Bluetooth Smart technology ® HI11312 Glass body, refillable HALO pH probe with Bluetooth Smart technology ® HI12302 Plastic body, gel filled HALO pH probe with Bluetooth Smart technology ® FC2022 PVDF body, HALO pH probe with Bluetooth Smart technology... - Page 45 Protein Cleaning Solution, 500 mL HI7073L HI7074L Inorganic Cleaning Solution, 500 mL HI7077L Oil & Fat Cleaning Solution, 500 mL HI8061L General Cleaning Solution in FDA approved bottle, 500 mL HI8073L Protein Cleaning Solution in FDA approved bottle, 500 mL HI8077L Oil &...
- Page 46 Damage due to accidents, misuse, tampering or lack of prescribed maintenance is not covered. If service is required, contact your local Hanna Instruments Office. If under warranty, report the model number, date of purchase, serial number and the nature of the problem.