Advertisement
Available languages
Available languages
Quick Links
Garden Sprayer - Cat. No. GSP014
INSTRUCTION MANUAL
T
T
HANK
YOU
FOR
CHOOSING
HANK
YOU
FOR
CHOOSING
G
.B
G
.B
O
T
O
WWW
LACKAND
O
T
O
WWW
LACKAND
T
O
REGISTER
T
O
REGISTER
BEFORE RETURNING THIS PRODUCT
FOR ANY REASON PLEASE CALL
1-800-544-6986
BEFORE YOU CALL, HAVE THE CATALOG No. AND DATE CODE AVAILABLE. IN MOST CASES, A
BLACK & DECKER REPRESENTATIVE CAN RESOLVE THE PROBLEM OVER THE PHONE. IF YOU HAVE
A SUGGESTION OR COMMENT, GIVE US A CALL. YOUR FEEDBACK IS VITAL TO BLACK & DECKER.
SAVE THIS MANUAL FOR FUTURE REFERENCE.
VEA EL ESPAÑOL EN LA CONTRAPORTADA.
INSTRUCTIVO DE OPERACIÓN, CENTROS DE SERVICIO Y PÓLIZA
DE GARANTÍA. ADVERTENCIA: LÉASE ESTE INSTRUCTIVO ANTES
DE USAR EL PRODUCTO.
CAT. NO. GSP014
Copyright © 2007 Black & Decker
(JAN. '07)
WARNING: READ AND UNDERSTAND ALL WARNINGS AND OPERATING
INSTRUCTIONS BEFORE USING THIS EQUIPMENT. Failure to follow all instructions
listed below, may result in electric shock, fire, and/or serious personal injury or property
damage.
WARNING: Some spray created from products used with the Garden Sprayer contains
chemicals known to the State of California to cause cancer, birth defects or other
reproductive harm. Some examples of these chemicals are:
• compounds in fertilizers
• compounds in insecticides, herbicides and pesticides
• arsenic and chromium from chemically treated lumber
Follow directions on containers of all such products. To reduce your exposure to these
chemicals, wear approved safety equipment such as face masks that are specially
designed to filter out sprays, gloves, and other appropriate protective equipment.
WARNING: This product contains chemicals, including lead, known to the state of
California to cause cancer, and birth defects or other reproductive harm. Wash hands after
handling.
IMPORTANT SAFETY INSTRUCTIONS
INSTRUCTIONS PERTAINING TO A RISK OF FIRE, ELECTRIC SHOCK, OR INJURY TO
PERSONS.
WARNINGS:
• Before using any pesticide or other spray materials in this sprayer, READ THE LABEL
ON ITS ORIGINAL CONTAINER THOROUGHLY AND FOLLOW ITS DIRECTIONS.
Some spray materials are dangerous and should not be used in this sprayer as they can
damage the sprayer and cause SERIOUS BODILY INJURY OR PROPERTY DAMAGE.
• BEFORE ANY USE, be sure anyone using this sprayer reads and understands all
safety instructions and other information contained in this manual.
• SAVE THESE INSTRUCTIONS and review frequently prior to use and in instructing
others.
• KEEP CHILDREN AWAY - All visitors should be kept at a safe distance from area being
sprayed.
• USE SAFETY EQUIPMENT - Protect eyes, skin and lungs against drifting spray and
during mixing, filling and cleaning.
• ELECTRIC SHOCK HAZARD - Never spray toward electrical outlets.
• STORE SPRAYER IN A SECURE, well ventilated indoor space.
• DO NOT OPERATE gardening appliances in gaseous or explosive atmospheres.
Motors in these appliances normally spark, and the sparks might ignite fumes.
• DO NOT USE commercial grade chemicals or for commercial or industrial
purposes.Use only consumer grade water-based lawn and garden chemicals.
• RISK OF FIRE OR EXPLOSION - Do not spray flammable liquids such as
gasoline. Look for this symbol reference on the container
• SPRAY AREA must be well ventilated.
• DO NOT USE caustic (alkali) self heating or corrosive (acid) liquids in this sprayer as
these can corrode metal parts or weaken hose and seals.
• DO NOT use hot or boiling liquids in sprayer as this may weaken tank and hose.
• DO NOT smoke while spraying, or spray where spark or flame is present.
• RISK OF INJECTION do not discharge directly against skin.
• DO thoroughly inspect both inside and outside of sprayer before each use.
• TOOL SERVICE MUST BE PERFORMED ONLY BY QUALIFIED REPAIR PERSONNEL
AT AN AUTHORIZED REPAIR FACILITY. Service or maintenance performed by
unqualified personnel could result in a risk of injury.
• WHEN SERVICING A TOOL, USE ONLY IDENTICAL REPLACEMENT PARTS.
FOLLOW INSTRUCTIONS IN THE MAINTENANCE SECTION OF THIS MANUAL. Use
of unauthorized parts or failure to follow Maintenance Instructions may create a risk of
electric shock or injury.
• TO REDUCE THE RISK OF INJURY, close supervision is necessary when an appliance
is used near children.
• ONLY USE ATTACHMENTS recommended or sold by the manufacturer.
• TO REDUCE THE RISK OF ELECTRIC SHOCK, do not put appliance in water or other
liquid. Do not place or store appliance where it can fall or be pulled into a tub or sink.
• USE only the charger supplied by the manufacturer to recharge.
• DO NOT mix liquids in storage tank. Follow instructions under "Cleaning Up"
before switching to another liquid.
SAVE THESE INSTRUCTIONS
B
&
D
B
&
D
LACK
ECKER
LACK
ECKER
D
.
/N
O
D
.
/N
O
ECKER
COM
EW
WNER
ECKER
COM
EW
WNER
.
.
YOUR
NEW
PRODUCT
YOUR
NEW
PRODUCT
FORM NO. 1005451-00
Printed in China
.
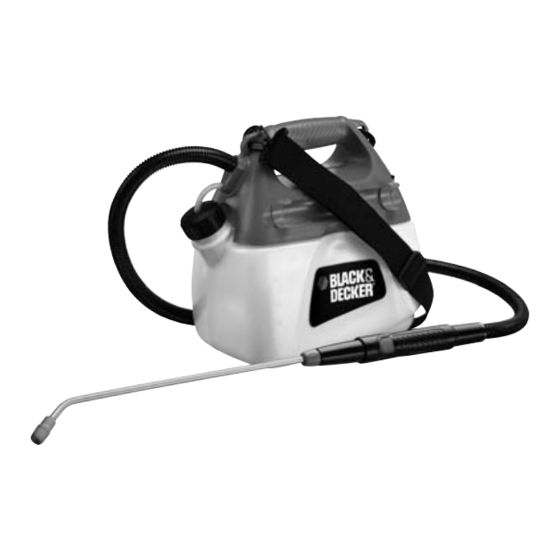
Functional Description
A. Charging socket
B. On/ Off switch
C. Spray wand
D. Tank
E. Cap
F. Wand clip
G. Carrying strap
H. Power head
Charger (not shown)
Extra tank cap (not shown)
Charging
Before attempting to charge the sprayer,
thoroughly read ALL of the safety
instructions. To charge, follow the steps
below.
1. Pull the socket cover out and over and
plug the output cord of the charger into
the socket in the back of the sprayer
housing as shown in figure 1.
2. Plug the charger into any standard
120 VAC, 60 Hz electrical outlet.
3. Allow the sprayer power head to remain on charge for 14-18 hours.
4. After the power head has been completely charged, remove the charger cord and
replace the socket cover.
!
!
Important Charging Notes
1. After normal usage, your sprayer should be fully charged in 14-18 hours or less. Your
sprayer was sent from the factory in an uncharged condition. Before attempting to use
it, it must be charged for at least 14-18 hours.
2. DO NOT charge the batteries in an air temperature below +40°F (4.4°C) or above
+105°F (40.5°C). This is important and will prevent serious damage to the batteries.
3. While charging, the charger may hum and become warm to touch. This is a normal
condition and does not indicate a problem.
4. If the batteries do not charge properly – (1) Check current at receptacle by plugging in
a lamp or other appliance. (2) Check to see if the receptacle is connected to a light
switch which turns power off when you turn out the lights.
(3) Move charger and sprayer to a surrounding air temperature of +40°F (4.4°C) to
+105°F (40.5°C). (4) If the receptacle and temperature are OK, and you do not get
proper charging, take or send the sprayer and charger to your local Black & Decker
service center. See "Tools Electric"' in yellow pages.
5. The sprayer should be recharged when it fails to produce sufficient power on the jobs
which previously were done easily. DO NOT CONTINUE to use the sprayer with its
battery in a depleted condition.
6. To prolong battery life, avoid leaving the sprayer on charge for more than 2 days.
Although overcharging is not a safety concern, it can significantly reduce overall
battery life.
7. Sprayer will not operate if charger is plugged into unit.
8. Unplug charger from the power supply before disconnecting the charger from the
sprayer. Under certain conditions, with the charger plugged in to the power supply, the
exposed charging plug can be shorted by foreign material and may create a fire
hazard. Foreign materials of a conductive nature, such as but not limited to, steel wool,
aluminum foil, or any build up of metallic particles should be kept away from the
charging plug. Unplug charger before attempting to clean.
ASSEMBLY
CARRYING STRAP
Remove the strap from the styrofoam
packaging filler and attach it to the openings
on both ends of the sprayer handle.
SPRAY WAND
Attach the wand by inserting it into the wand
handle and threading the orange plastic cap
onto the end of the wand handle, as shown
in figure 2. Your new Garden Sprayer is now
completely assembled and ready to use.
OPERATING INSTRUCTIONS
Warning: Use safety equipment. Protect
eyes, skin and lungs while mixing, filling,
spraying and cleaning.
Spray only in a well-ventilated area. See
Safety Warnings and Instructions at
beginning of Instruction Manual. This
product is intended for household use only.
TO FILL TANK:
• Unscrew black cap and remove suction tube
from tank. Fill with appropriate liquid. Liquid
to be sprayed must be as thin as water -
thicker liquids will not spray properly.
Recommended Chemicals: Insecticides,
Fungicides, Weed Killers, Fertilizers,
Chemicals Not Recommended: All
Flammable Liquids, Chemicals for Acoustic
Tile Soaking, Carpet Loosening, Wallpaper
Loosening, White Washing Fences, Stucco
Spraying, Window Washing, Deck Sealing,
Deck Staining, Painting, etc.
Warning: Always follow chemical
manufacturer's instructions printed on
their product labeling for use, cleaning
and storage.
TO REMOVE POWER HEAD:
• Unscrew black cap and remove clear tube
from tank. Unclasp the latch located below
the charging socket, raise the back of the
power head, move it forward and lift up to
remove as shown in figure 3.
• To reattach the power head, align the slots in
the power head with the tabs on top of the
tank and push rearward to engage.
Reconnect clasp.
SPRAYING
The cone type nozzle provided is for most
lawn and garden applications including
misting. Adjust the spray pattern from light
misting to stream by turning the nozzle tip as
shown in figure 4.
• To start the sprayer, push switch on the top
of the spray wand as shown in figure 5. To
stop sprayer, release the switch.
• Plan your spray application, taking note of
wind direction. Always spray downwind,
away from people or animals.
CLEANING UP
WARNING: Chemicals can be harmful to your health and to the environment if used,
stored or disposed of improperly. Disposal of contaminated rinse should be according to
your local ordinances and bylaws.
• If there is liquid left after spraying which you plan to use later, remove power head from tank
and securely screw cap on tank. See Storage section for instructions on how to store.
B
H
A
F
E
G
D
C
1
2
Wand
Wand Handle
3
4
5
Advertisement

Related Manuals for Black & Decker GSP014


Summary of Contents for Black & Decker GSP014
-
Page 1: Important Safety Instructions
A. Charging socket B. On/ Off switch C. Spray wand D. Tank E. Cap F. Wand clip Garden Sprayer - Cat. No. GSP014 G. Carrying strap H. Power head Charger (not shown) INSTRUCTION MANUAL Extra tank cap (not shown) Charging... -
Page 2: Troubleshooting Guide
• DO NOT use aggressive or abrasive cleaning agents - they may damage the sprayer. Pulvérisateur de jardin – STORAGE N° de cat. GSP014 When storing your Garden Sprayer for more than a day, you should: • Completely drain hose, clean and dry all parts of Sprayer. -
Page 3: Guide De Dépannage
DÉPOSE DE LA TÊTE DE LA POMPE : • POUR LA RÉPARATION D’UN OUTIL, UTILISER UNIQUEMENT DES PIÈCES DE • Dévisser le bouchon noir et retirer le tube RECHANGE IDENTIQUES. SUIVRE LES DIRECTIVES FIGURANT À LA SECTION transparent du réservoir. Déverrouiller le ENTRETIEN DE CE MANUEL. -
Page 4: Instrucciones Importantes Sobre Seguridad
Pulverizador para jardín STEP STEP ÉTAPE Catálogo N° GSP014 STEP STEP ÉTAPE MANUAL DE INSTRUCCIONES ÉTAPE STEP STEP STEP STEP ÉTAPE Sceau RBRC Le sceau RBRC de la Rechargeable Battery Recycling Corporation apposé sur la pile au nickel-cadmium (ou le bloc-pile) indique que les coûts de recyclage de ce dernier à... - Page 5 • PARA EL SERVICIO DE UNA HERRAMIENTA, SÓLO UTILICE PIEZAS DE Para RETIRAR EL CABEZAL DE IMPULSIÓN: REPUESTOS IDÉNTICAS. SIGA LAS INSTRUCCIONES EN LA SECCIÓN DE MAN- • Desenrosque la tapa negra y retire el tubo transparente del tanque. Quite el seguro TENIMIENTO DE ESTE MANUAL.
- Page 6 Para reparación y servicio de sus herramientas eléctricas, favor de dirigirse al Centro de Servicio más cercano: CULIACAN, SIN MONTERREY, N.L. TORREON, COAH Av. Nicolás Bravo #1063 Sur Av. Francisco I. Madero Blvd. Independencia, 96 Pte. (667) 7 12 42 11 No.831 (871) 716 5265 Col.