Philips SA3CNT08 User Manual
Gogear
Hide thumbs
Also See for SA3CNT08:
- User manual (70 pages) ,
- Quick start manual (11 pages) ,
- Quick start manual (11 pages)
Table of Contents
Advertisement
Quick Links
Download this manual
See also:
User Manual
Advertisement
Table of Contents

Related Manuals for Philips SA3CNT08


Summary of Contents for Philips SA3CNT08
-
Page 1: User Manual
Always there to help you Register your product and get support at www.philips.com/welcome SA3CNT08 Question? Question? Contact Contact SA3CNT16 Philips Philips SA3CNT32 User manual... -
Page 3: Table Of Contents
Contents Listen to music through stereo Bluetooth headphones 6 Applications 1 Important safety information Install applications General maintenance HiMarket Other sources 2 Your new device Manage applications What's in the box Files loaded on the device 7 Music Overview Browse the music library Controls Play music Home screen... - Page 4 Accessibility Play recordings Date & time Share recordings Automatic setting Manual setting 15 Alarm clock Information Philips 16 Calculator Registration Upgrade 17 Use the device in corporate networks Install secure credentials Set up your Microsoft Exchange account 38 Add VPN...
-
Page 5: Important Safety Information
1 Important safety Battery life may be shortened in low temperature conditions. information Replacement parts/accessories: Visit www.philips.com/support to order replacement parts/accessories. Hearing Safety General maintenance The translation of this document is for reference only. A pleine puissance, l’écoute prolongée du In the event of any inconsistency between the baladeur peut endommager l’oreille de... - Page 6 Be responsible! Respect copyrights. the device are retrieved and used ONLY if the user returns the device to the Philips service center and ONLY to simplify error detection and prevention. The data stored shall be made This product is partly based on Open Philips respects the intellectual property of Source software.
- Page 7 Neither the name of the Xiph. org Foundation nor the names of its contributors may be used to endorse or promote products derived from this permission. This software is provided by the copyright holders and contributors "as is" and any express or implied warranties, including, but not limited to, the implied warranties of merchantability and In no event shall the foundation or contributors...
-
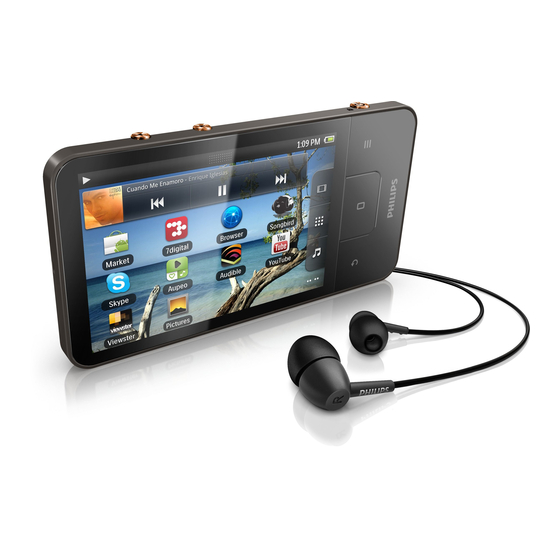
Page 8: Your New Device
Note Press: return to the Home screen. Press and hold: display applications that The images serve as reference only. Philips reserves the you have launched recently. right to change color/design without notice. Show options menu... -
Page 9: Home Screen
i Speaker Tudou: Online video service QIYI: Online video service Home screen weibo: Social networking service Sina: News portal From the Home screen, tap the icons to access applications. Sina Music: Online music service Applications: List all applications in alphabetical order. Videos/ pictures: Play videos/ pictures from HiMarket: Download different applications, games, and others. -
Page 10: Get Started
3 Get started Select USB connection modes Switch on the device and connect it to a PC. A pop-up screen is displayed for you to select a connection mode: Charge power Connect has a built-in battery that can be charged through the USB port of a computer. By using the USB cable, connect the device to a PC. -
Page 11: Basics
4 Basics Use the status bar and Find applications At the top of the screen, event icons are displayed. Drag down the bar to learn about the details. application: Swipe left/ right to select a page; Alternatively, tap to open the list of applications that are sorted in alphabetical order. -
Page 12: Use The Power Control Widget
Calendar reminder on Use the music widget Alarm clock set and switched on On the Home screen, use the music widget to do the following: Go to the music library of ; or Use the power control Control the music play in widget Widgets allow you to access functions quickly on the Home screen. -
Page 13: Lock/ Unlock The Screen
Customize the Home screen To access functions quickly from the Home screen, you can add and rearrange items. Add items Add widgets, shortcuts, wallpapers, or other items Lock/ unlock the screen Swipe left/ right to select a page. If necessary, press to return to the By locking the screen, you can lock all the Home screen. -
Page 14: Rearrange Items
Relocate items Tap your options. » The shortcut, widget, wallpaper, or Tap and hold an item to unlock. other item is added to the selected Drag the item to a space on the page. page. Release the item. Add application icons »... -
Page 15: Text Entry
Text entry With the onscreen keyboard, you can enter text in multiple languages. Select options for text entry Select input methods Press and hold the text box until the pop-screen is displayed. » You can select the following input methods: Android keyboard: for multiple languages other than Chinese QQ input: for Chinese input through... -
Page 16: Use Qq Pinyin To Enter Text
On the keyboard, tap On the onscreen keyboard, tap select Android keyboard settings. switch between Chinese Pinyin and English input; to enter or exit the entry mode for numbers/ symbols. On the numeric/symbol keyboard, tap to switch between numbers/symbols and more symbol choices. To switch between upper and lower cases, to switch between : Letters you enter are in upper... -
Page 17: Edit Text
To switch between letters and numbers/ symbols, On the numeric/symbol keyboard, tap to switch between numbers/symbols and more symbol choices. To switch between upper and lower cases, repeatedly to switch between , and . To move to the next line, : The next letter you enter is in »... - Page 18 Tap and hold the selected text until the pop-screen is displayed. » In the pop-up screen, options are displayed: Copy, Cut. Tap Copy or Cut. » The selected text is copied or cut. Paste the text Put the cursor in a position. Tap and hold the position until the pop- screen is displayed.
-
Page 19: Connections
5 Connections Connect to the Internet Connect Connect to a wireless router (Access Point). You can connect Connect to the network that is built around the router. On the power control widget, tap select your Wi-Fi settings. » You see a list of Wi-Fi networks in range, and previously connected networks (if the networks are remembered). -
Page 20: Connect To Bluetooth
Connect with Bluetooth devices You can connect Connect with Bluetooth devices in the following ways: Connect another Bluetooth device; Get connected by another Bluetooth device. Before the connection, consult the user manual of the Bluetooth device to get its Bluetooth pairing passcode. Or, try 0000 or 1234. -
Page 21: Bluetooth
From the Home screen, tap > Connect through Bluetooth. Wireless & networks > Bluetooth » When Connect is connected to the settings; Bluetooth device, is displayed on If necessary, tap to switch on the screen. Bluetooth; » If the function is enabled, the tick On the Connect box is selected. -
Page 22: Applications
6 Applications To transfer the application to the internal memory, use the USB cable to connect the device to your PC. Start installation With applications, you can access functions, The downloaded applications start services, and different audio/ video contents on installation automatically;... -
Page 23: Music
7 Music Play music Go to to play music from the music library Tap a song to start play. on the device. To play the entire artist, album, or playlist, Tap and hold the artist, album, or playlist. Browse the music library On the pop-up screen, select Play. -
Page 24: Select Sound Options
Select sound options and select Sound On the play screen, press effects. [FullSound] Restore the sonic details that music compression loses (such as MP3, WMA). [Sound Personalization] Drag the navigation button on the screen to select sound settings. Playlists You can create a playlist for songs that you want to play together. -
Page 25: Remove A Song From The Playlist
Remove a song from the playlist In a playlist, select or play a song. Tap and hold the song until the pop-up screen is displayed. Tap Remove from playlist. » The selected song is removed from the playlist. Delete a playlist Select a playlist. -
Page 26: Gallery
8 Gallery To list pictures or videos as thumbnails or in stacks by date, Drag the button 2. To go to the main menu of Gallery, Go to to play: Tap the button 3. videos/ pictures that you store on the device. -
Page 27: Crop Pictures
On the play screen, tap the onscreen button Menu and select More. Tap Crop. » A cropping frame is displayed. Within the cropping frame, select an area that you want to keep: Swipe left/ right to select the area; To enlarge/ reduce the area in proportion, drag a corner of the frame;... -
Page 28: Fm Radio
9 FM radio Note Always plug in the supplied headphones when tuning into radio stations. The headphones double as antenna. For better reception, move the headphone cable in different directions. Tune in to radio stations When you move to a new place (such as a new city or country), restart auto tune for better reception. -
Page 30: Browser
10 Browser With , you can browse Web pages. From the Home screen, tap Tap the text box to start text entry. » The onscreen keyboard is displayed. Enter a web address. On the onscreen keyboard, tap Go. To open a new web page, On the screen of web page, press select New window. -
Page 31: Email
11 Email On the screen of account list, tap and hold an account. » A pop-up screen is displayed. Tap Account settings. On Connect, you can receive and send email as you do on a computer. Do the following: Set up your email accounts on the Check your email messages player. -
Page 32: Check Messages By Account
» Starred messages from all the accounts are displayed. To add star to a message, On the screen of mail list, tap the star next to the message. » For a starred message, the star is selected. Alternatively, On the screen of mail list, tap the tick boxes next to the messages. -
Page 33: Organize Email Messages
» The screen is displayed for you to compose a message. To select options, press To reply to current message, On the screen of mail list, tap to read the selected message. » The content of the message is displayed. Tap the option on the screen. -
Page 34: Folder View
12 Folder view Alternatively, tap a paired device to start sending. » When Connect is connected to the Bluetooth device, With displayed on the screen. internal memory of the device. From the Home screen, tap Connect. memory. and select Delete. »... -
Page 35: Calendar
13 Calendar On the device, you can sync the calendar with: the calendar of your Microsoft Exchange account (see 'Use the device in corporate networks' on page 38). -
Page 36: Recordings
14 Recordings From the Home screen, go to to make and play sound recordings. Voice recordings From the Home screen, go to » In the recordings library, existing recordings are displayed. to switch to the recording screen. Make sure that the microphone is close to the sound source to be recorded. -
Page 37: Share Recordings
Share recordings You can share recordings through the Internet or Bluetooth. to switch to the recordings library. » In the recordings library, existing recordings are displayed. , and select Share. Press Tap to select options. Follow the onscreen instructions to send... -
Page 38: Alarm Clock
15 Alarm clock On the player, you can set alarms. Set an alarm Make sure that you have set the clock time (see 'Date 46). From the Home screen, tap . Tap To set an alarm clock, To add an alarm, tap Add alarm. To change an alarm, tap the preset alarm time. -
Page 39: Calculator
16 Calculator From the Home screen, tap to use the calculator. Enter numbers and mathematic operators: Use the onscreen keyboard for entry; Swipe left to use more mathematic functions. Tap = to start calculation. To clear entries, Tap to put the cursor behind the entry where you start to clear. -
Page 40: Use The Device In Corporate Networks
17 Use the device , select Location & security > Use secure credentials. in corporate » On the device, you allow the applications to use the secure networks credentials. Set up your Microsoft You can use Connect in corporate networks. Exchange account Install the secure credentials or security networks. - Page 41 Ask your network administrator for the From the Home screen, go to > Wireless & networks > VPN settings > Add VPN. Install the secure credentials as needed (see 'Install secure credentials' on page 38). To connect to the VPN, Make sure that you have connected Connect to the Internet.
-
Page 42: Settings
18 Settings Note If you have disabled SSID broadcasting or hidden the enter the SSID or public name for the network. From the Home screen, go to to select your settings. is unavailable or disabled on the router, manually enter Swipe up or down to scroll through the IP address of Connect (see 'Advanced settings' on lists of options. -
Page 43: Advanced Settings
IP address Assign an IP address and subnet Advanced settings mask for Connect on the Enter the IP address manually network. Make sure that you don't , press and select enter an IP address that is already Advanced > Use static IP. assigned to a computer/device on If necessary, tap Use static IP to switch the network. -
Page 44: Tethering
» If the function is enabled, the tick box is selected. To connect to Connect on a Bluetooth device, consult Connect the device to the PC through the the user manual of the Bluetooth device. USB cable. » On the PC, a pop-up screen is Scan for devices displayed for installation. -
Page 45: Display
Maps, or other relevant services Display and applications. In Display, select your display settings: Brightness Drag the slider to change the *The location information is based on the IP address display brightness. that is assigned to the device in the Wi-Fi network. Switch on/ off the screen screen rotation between the landscape... -
Page 46: Credential Storage
Before you uninstall such an application, disable For the applications from sources the rights of device administrator. other than , tap Unknown sources In Select device administrator, tap an to allow installation on the Connect. application. » The rights of device administrator are Manage applications disabled. -
Page 47: Privacy
» A pop-up screen is displayed. Sync data automatically as scheduled. Edit or delete the word or phrase. Manage Select accounts for auto sync accounts or sync in the background. Or, Android keyboard sync the accounts manually. In Android keyboard, select your options for the text entry through the onscreen keyboard. -
Page 48: Accessibility
Automatic setting Connect the device to the Internet. Over the Internet, you can sync the date and , tap Install voice time on Connect from Philips online services data. (see 'Philips' on page 47). » Search for and download the voice To switch on the automatic clock setting, data. -
Page 49: Philips
Internet. Tap [Upgrade]. » The device starts to check for the Philips » Downloading and installation of the On Connect, you can access Philips online services over the Internet, such as registration, Note Registration update is complete. -
Page 50: Firmware Update
19 Check for firmware update If the Connect is connected to Wi-Fi, you can Drag down the top status bar to check Connect on the device. device On Connect, through Philips online services over the Internet (see 'Upgrade' on page 47). -
Page 51: Technical Data
Platform 20 presets Android™ 2.3 Storage media Connectivity Built-in memory capacity²: Headphone: 3.5 mm SA3CNT08 8GB NAND Flash USB: 2.0 High speed SA3CNT16 16GB NAND Flash Wireless LAN: Wi-Fi 802.11 b/g/n Preloaded applications Bluetooth HiMarket™, QQ, QQ Music, QQ reader, QQ live, Tecent Weibo, QQ browser, TuDou.com™, QIYI Video™, weibo.com™,... -
Page 52: Pc System Requirements
PC system requirements Windows®XP (SP3 or above), Vista/7 (32- bit, 64-bit) Pentium III 800 MHz processor or higher 512 MB RAM 500 MB hard disk space Internet connection Windows® Internet Explorer 6.0 or later USB port... - Page 54 Specifications are subject to change without notice © 2012 Koninklijke Philips Electronics N.V. All rights reserved. SA3CNT_93_UM_V1.0 wk1228.5...