Zodiac Pool Systems Nature2 Fusion soft Installation And Operation Manual
Hide thumbs
Also See for Nature2 Fusion soft:
- Installation and operation manual (20 pages) ,
- Installation instructions (2 pages)
Table of Contents
Advertisement
Installation and Operating Data
Installation and
Operation Manual
THIS SYSTEM INCLUDES A START-UP CARTRIDGE
REQUIRES A NATURE
2
(not included, see page 26 for more information)
FOR YOUR SAFETY - This product must be installed and serviced by a contractor who is licensed and qualified in pool
equipment by the jurisdiction in which the product will be installed where such state or local requirements exist. In the
event no such state or local requirement exists, the maintainer must be a professional with sufficient experience in pool
equipment installation and maintenance so that all of the instructions in this manual can be followed exactly. Before
installing this product, read and follow all warning notices and instructions that accompany this product. Failure to follow
warning notices and instructions may result in property damage, personal injury, or death. Improper installation and/or
operation will void the warranty.
Improper installation and/or operation can create unwanted electrical hazard which can cause serious injury, property
damage, or death.
MINERAL CARTRIDGE AFTER START-UP PERIOD
Compatible with
WARNING
Advertisement
Table of Contents

Related Manuals for Zodiac Pool Systems Nature2 Fusion soft


Summary of Contents for Zodiac Pool Systems Nature2 Fusion soft
- Page 1 Installation and Operating Data Installation and Operation Manual THIS SYSTEM INCLUDES A START-UP CARTRIDGE REQUIRES A NATURE MINERAL CARTRIDGE AFTER START-UP PERIOD (not included, see page 26 for more information) Compatible with WARNING FOR YOUR SAFETY - This product must be installed and serviced by a contractor who is licensed and qualified in pool equipment by the jurisdiction in which the product will be installed where such state or local requirements exist.
- Page 2 Page 2 Nature Fusion Soft Installation and Operation Manual 2®...
-
Page 3: Table Of Contents
Page 3 Nature Fusion Soft Installation and Operation Manual 2® Table of Contents Section 1. Important Safety Instructions .... 5 Section 5. Operating Instructions ....... 32 User Interface Controls ........32 Section 2. System Description ......7 Reading the Display ...........33 Operation ............35 Product Description ..........7 Startup ...............36... - Page 4 Page 4 Nature Fusion Soft Installation and Operation Manual 2® Figures Tables Figure 1. Nature Fusion Soft Components ..7 Table 1. Approximate Pounds and Kilograms of Salt Needed to Obtain 3.0 gpl Figure 2. Anchor Bracket Installation ....11 (3,000 ppm) ..........
-
Page 5: Important Safety Instructions
Page 5 Nature Fusion Soft Installation and Operation Manual 2® Section 1. Important Safety Instructions READ AND FOLLOW ALL INSTRUCTIONS All electrical work must be performed by a licensed electrician and conform to all national, state, and local codes. When installing this equipment, basic safety precautions should always be followed, including the following: WARNING EQUIPMENT UNDER PRESSURE: Always turn pump off prior to installing or changing any Nature vessel or... - Page 6 It is important to note that certain materials used in and around swimming pools and spas may not be compatible with chemicals commonly used to purify pool and spa water (e.g. acids, chlorine, salt, stabilizers, etc.). As such, Zodiac Pool Systems, Inc. does not warrant or guarantee that the chlorinated water generated by the Nature Fusion will not damage or destroy certain types of plants, decking, coping and other materials in and around your pool and/or spa.
-
Page 7: System Description
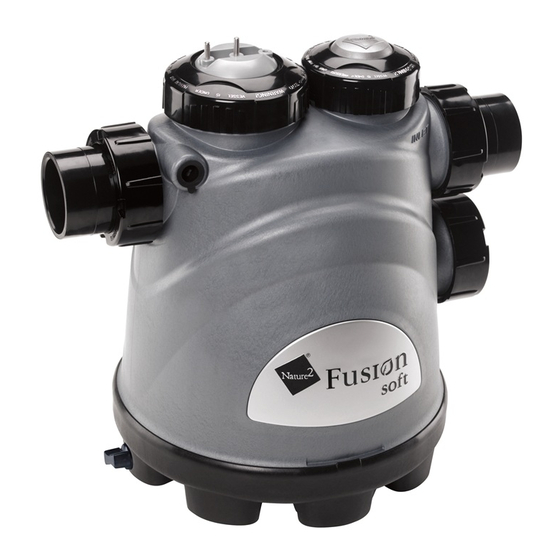
Page 7 Nature Fusion Soft Installation and Operation Manual 2® Section 2. System Description Nature Cartridge Electrolytic Cell Inlet Port Outlet Port Flow/Temperature/ Salinity Sensor Vessel Drain Plug Vessel Anchors Figure 1. Nature Fusion Soft Components Product Description The Nature Fusion Soft is an all-in-one, sanitizing system that includes mineral sanitization and saltwater chlorination technologies in one housing, that can be interfaced with a centralized pool control system. -
Page 8: Product Specifi Cations
Page 8 Nature Fusion Soft Installation and Operation Manual 2® AquaLink RS PureLink Power Center (For centralized pool control system, sold separately) ® • The PureLink system is an all-in-one saltwater chlorinator control system power center for use with AquaLink RS PDA, All Button, Pool Link, or OneTouch controllers. -
Page 9: Electrical Specifi Cations
Page 9 Nature Fusion Soft Installation and Operation Manual 2® Electrical Specifi cations Circuit Protection If only the Nature Fusion Soft is connected to the circuit breaker, use a 5 AMP fuse. If more devices are connected to the circuit breaker use a 20 AMP fuse at the electrical panel. Nature Fusion Soft 700 Connected to FUSIONM Nature... -
Page 10: Installation Instructions
Page 10 Nature Fusion Soft Installation and Operation Manual 2® Section 3. Installation Instructions WARNING FOR YOUR SAFETY: This product must be installed and serviced by a professional pool/spa service technician as described on the front cover of this manual. The procedures in this manual must be followed exactly. Failure to follow warning notices and instructions may result in property damage, serious injury, or death. -
Page 11: Anchoring The Vessel To The Equipment Pad
Page 11 Nature Fusion Soft Installation and Operation Manual 2® • The vessel must be installed downstream from the heater or heater damage will occur. • If the vessel is installed below the pool water level, it must be installed with a check valve. The check valve will isolate the vessel and prevent pool draining during installation, cell change or cartridge change. -
Page 12: Installation Of The Vessel
Page 12 Nature Fusion Soft Installation and Operation Manual 2® Installation of the Vessel Make sure the pool pump is turned off. Remove the temporary cap on the cartridge side of the vessel, and install the Nature start-up cartridge included in the box. -
Page 13: Bypass Installation
Page 13 Nature Fusion Soft Installation and Operation Manual 2® FUSIONM Optional ChemLink or other ORP Control APUREM PureLink Existing AquaPure ® Heater Power Pac Flow/Temperature/ Salinity Sensor Pump Nature Fusion Soft Filter Flow Flow Pool Intake Spa Intake Flow/Temperature/ Salinity Sensor Spa Return Pool Return... -
Page 14: Figure 5. Example Of Bypass Installation
Page 14 Nature Fusion Soft Installation and Operation Manual 2® FUSIONM Optional ChemLink or APUREM other ORP Control Control Valve Installation Options PureLink Install between the inlet and discharge side of Install on the inlet Existing AquaPure ® bypass plumbing side of the vessel Power Pac Heater... -
Page 15: Split-Return Installation
Page 15 Nature Fusion Soft Installation and Operation Manual 2® Split-Return Installation If the vessel is used with a water feature line system, it must be installed in a split-return confi guration or vessel damage may occur. Make sure the pool pump is turned off. Remove the temporary cap on the cartridge side of the vessel, and install the Nature start-up cartridge included in the box. -
Page 16: Installing The Fusionm Or Aqualink
Page 16 Nature Fusion Soft Installation and Operation Manual 2® Start the pump and allow water to pass through the newly plumbed system. Check for any leaks. Make sure the fl ow rate to the Nature Fusion Soft does not drop below 30 gpm (114 lmp). Installing the FUSIONM or AquaLink RS PureLink ®... -
Page 17: Grounding And Bonding
Page 17 Nature Fusion Soft Installation and Operation Manual 2® Level the control/power center and tighten all screws, ensuring that the control/power center is securely fastened to the mounting surface. In order to use on 120 VAC, the internal Check source voltage. (All units are factory wired for 240 VAC). factory wiring of the power center must be changed. -
Page 18: Installation Of The Chlorine Generator Device
Page 18 Nature Fusion Soft Installation and Operation Manual 2® 3.10 Installation of the Chlorine Generator Device User Interface on an AquaLink RS or ® PDA Bezel On the chlorine generator user interface board, connect one end of the ribbon cable to the 16-pin J1 connector as shown in Figure 9. -
Page 19: Connecting The Nature Fusion Soft Vessel And Flow/Temperature/Salinity Sensor
Page 19 Nature Fusion Soft Installation and Operation Manual 2® 3.11 Connecting the Nature Fusion Soft Vessel and Flow/Temperature/Salinity Sensor WARNING ATTENTION INSTALLER: If the fl ow/temp/salinity sensor is not installed properly, it may allow the vessel to operate without water fl ow. This would cause a buildup of fl ammable gases resulting in FIRE or EXPLOSION. •... -
Page 20: Figure 11. Wiring Diagram For The Power Pack
Page 20 Nature Fusion Soft Installation and Operation Manual 2® Tighten strain relief fi tting screws for the fl ow/temp/salinity sensor and the DC cord. Do not pull fl ow/temp/salinity sensor cable or DC cord too tight. Allow some slack cable inside of power pack enclosure. CAUTION Do not over-tighten the strain relief fi... -
Page 21: Figure 12. 240 Vac Wiring Diagram For The
Page 21 Nature Fusion Soft Installation and Operation Manual 2® Flow, Salinity, Temp Sensors CHLORINE GENERATOR Factory wired to Multiplex Board USER INTERFACE To AquaLink® RS PRIMARY CHLORINE GENERATOR TRANSFORMER CHLORINE GENERATOR POWER INTERFACE SECONDARY J10 J8 HEAT SINK L - BRACKET (Middle primary wires not used) BLACK BLK/YEL... -
Page 22: Figure 13. 120 Vac Wiring Diagram For The
Page 22 Nature Fusion Soft Installation and Operation Manual 2® Flow, Salinity, Temp Sensors CHLORINE GENERATOR Factory wired to Multiplex Board USER INTERFACE To AquaLink® RS PRIMARY CHLORINE GENERATOR TRANSFORMER CHLORINE GENERATOR POWER INTERFACE SECONDARY J10 J8 HEAT SINK L - BRACKET BLK/WHT BLK/RED BLK/YEL... -
Page 23: Connection To The Aqualink Rs Control System
Page 23 Nature Fusion Soft Installation and Operation Manual 2® 3.12 Connection to the AquaLink RS Control System ® The Jandy ® AquaLink RS is a multi-function pool controller that can fully control the function of the Nature Fusion Soft chlorine generator. The chlorine generator user interface will display “JA” when any of its buttons are pressed while the AquaLink RS is in control. -
Page 24: Connection Of Purelink Chlorine
Page 24 Nature Fusion Soft Installation and Operation Manual 2® 3.12.2 Connection of PureLink Chlorine Generator Electronics to a Jandy AquaLink ® ® The chlorine generator electronics in the PureLink power center and the AquaLink RS controller require a four (4) wire connection to communicate. -
Page 25: 3.13 Operation Of External Control/Orp Control Board
Page 25 Nature Fusion Soft Installation and Operation Manual 2® 3.13 Operation of External Control/ORP Control Board An external device such as an ORP (Oxidation Reduction Potential) controller supplying 24 Volts AC can be used to control the output of the chlorinator. The chlorinator control board can be set up in the fi eld to operate in two (2) different modes. -
Page 26: Pool Water Preparation
Page 26 Nature Fusion Soft Installation and Operation Manual 2® Section 4. Pool Water Preparation Determining Pool Size (Gallons of Water in Your Pool) • Rectangular Pools Average length (feet) x average width (feet) x average depth (feet) x 7.5 = gallon capacity. •... -
Page 27: Chemistry You Need To Know
Page 27 Nature Fusion Soft Installation and Operation Manual 2® Chemistry You Need to Know • Chlorine Stabilizer (cyanuric acid) is needed to maintain proper levels of chlorine. Most unstable chlorine is destroyed by the UV radiation from the sun within two (2) hours. Chlorine stabilizer should be maintained between 10 - 50 ppm. -
Page 28: Optimum Pool Water Conditions
Page 28 Nature Fusion Soft Installation and Operation Manual 2® Optimum Pool Water Conditions In accordance with Association of Pool and Spa Professionals (APSP) standards, we recommend the following water balance conditions be maintained on an on-going basis to protect the pool fi nish and equipment and ensure the pleasing appearance of the water. -
Page 29: How To Add Salt To The Pool
It is important to note that certain materials used in and around swimming pools and spas may not be compatible with chemicals commonly used to purify pool and spa water (e.g. acids, chlorine, salt, stabilizers, etc.). As such, Zodiac Pool Systems, Inc. does not warrant or guarantee that the chlorinated water generated by the Nature Fusion Soft/PureLink™... - Page 30 Page 30 Nature Fusion Soft Installation and Operation Manual 2® Table 1. Approximate Pounds and Kilograms of Salt Needed to Obtain 3.0 gpl (3,000 ppm) Salt Pool Size US Gallons (Litres) Conc. Before 10,000 g 12,000 g 14,000 g 16,000 g 18,000 g 20,000 g 22,000 g...
-
Page 31: Table 2. Approximate Pounds And Kilograms Of Stabilizer Needed To Obtain 50 Ppm
Page 31 Nature Fusion Soft Installation and Operation Manual 2® Table 2. Approximate Pounds and Kilograms of Stabilizer Needed to Obtain 50 ppm Current Gallons and (Liters) of Pool/Spa Water Cyanuric 10,000 gal 15,000 gal 20,000 gal 25,000 gal 30,000 gal 35,000 gal 40,000 gal 45,000 gal... -
Page 32: Operating Instructions
Page 32 Nature Fusion Soft Installation and Operation Manual 2® Section 5. Operating Instructions NOTE The user interface is located inside the control/power center. To access the control panel, open the door to the control/power center. See Figure 18. Figure 18. User Interface User Interface Controls Chlorine... -
Page 33: Reading The Display
Page 33 Nature Fusion Soft Installation and Operation Manual 2® Operating User Interface Controls when AquaLink RS Control System is Online ® Chlorine The user interface can be used to adjust the output production rate (%) when the saltwater Production Rate chlorinator system is controlled by the AquaLink RS only when the AquaLink RS is placed Adjustment with into service mode. - Page 34 Page 34 Nature Fusion Soft Installation and Operation Manual 2® SALINITY Salinity is displayed along with the gpl (grams per liter) indicator, when the SALINITY button (C) is depressed. If a reading of HH appears, the salinity is above 4.5 to 6.5 gpl (depending on pool temperature) and is too high to measure correctly (at normal temperatures).
-
Page 35: Operation
Page 35 Nature Fusion Soft Installation and Operation Manual 2® Operation CAUTION Before attempting to operatethe device, refer to Section 4, Pool Water Preparation. Also, do not adjust Chlorine production above 00% until it is certain that salt has been dissolved in pool. Operating without salt will damage the Electrolytic Cell. -
Page 36: Startup
Page 36 Nature Fusion Soft Installation and Operation Manual 2® Startup 5.4.1 Start-Up Cartridge Procedure Install the cartridge after the water has been balanced. With the circulation system OFF, remove the collar from the Nature side of the system. If this is a newly installed system, remove and store the temporary plug supplied with the unit. -
Page 37: Operating In Winter
Page 37 Nature Fusion Soft Installation and Operation Manual 2® Operating in Winter See Section 6.7, Winterizing. Recommendations • DO List • Read and keep your manual in a safe place. • Replace the start-up cartridge within 30 days and again every six (6) months. •... -
Page 38: User Maintenance Instructions
Page 38 Nature Fusion Soft Installation and Operation Manual 2® Section 6. User Maintenance Instructions The following information describes how to care for your sanitizing system. IMPORTANT Always test the chlorine levels of your pool before each use. Daily Filtration and Circulation. Follow the manufacturer’s directions for keeping the circulating pump in good working order and operate it at least six (6) hours a day. -
Page 39: Every Six (6) Months (Or Once Every Pool Season Whichever Is Shorter)
Page 39 Nature Fusion Soft Installation and Operation Manual 2® Every Six (6) Months (Or once every pool season whichever is shorter) 6.4.1 Nature Mineral Cartridge Replacement The Nature cartridge for the Nature Soft Fusion lasts six (6) months or one pool season (whichever is the shorter length of time). -
Page 40: Flow/Temp/Salinity Sensor Cleaning
Page 40 Nature Fusion Soft Installation and Operation Manual 2® Replace the yellow plug after drying and smearing lightly with silicone grease. Reset valves and switches. Turn pump and sanitizer on. 10. Confi rm chlorine output and settings on the user interface. Flow/Temp/Salinity Sensor Cleaning One (1) time per year or as needed. -
Page 41: Winterizing
Page 41 Nature Fusion Soft Installation and Operation Manual 2® Winterizing Very little chlorine is needed in cold water. Below 51°F (11°C), chlorine production is not permitted; operating the chlorinator in cold water might result in over-chlorinated pool water. If more chlorine is needed, activating the “Boost”... -
Page 42: Troubleshooting
Page 42 Nature Fusion Soft Installation and Operation Manual 2® Section 7. Troubleshooting NOTE Turn off power to unit prior to attempting service or repair. Problems and Corrective Action Problem Possible Cause Corrective Action Low or no chlorine. Low stabilizer (cyanuric acid) level in pool Add stabilizer to maintain 10 - 50 ppm. - Page 43 Page 43 Nature Fusion Soft Installation and Operation Manual 2® Problem Possible Cause Corrective Action “Cell On” indicator does not Chlorine Production set to 00%. Adjust CHLORINE PRODUCTION to come on. desired Percentage. If No Flow also…. Insuffi cient water fl ow. Cell is plugged with Remove obstruction and/or clean cell.
- Page 44 Page 44 Nature Fusion Soft Installation and Operation Manual 2® Problem Possible Cause Corrective Action “Service” indicator on. Low salt level in pool water. Test salinity. Add salt as described in Section 4.6. Cell requires cleaning. Refer to Maintenance Procedure for acid wash cleaning.
-
Page 45: Service Codes
Page 45 Nature Fusion Soft Installation and Operation Manual 2® Service Codes Code Number Possible Cause Corrective Action Low current in forward direction to cell. 1. Clean cell if necessary (see Section 6.5). 2. Check DC Cord. Low current in reverse direction to cell. 1. -
Page 46: Level 2 Service Codes
Page 46 Nature Fusion Soft Installation and Operation Manual 2® Level 2 Service Codes If you encounter a Level 2 Service Code, contact a qualifi ed service representative. Code Number Possible Cause Corrective Action Heated sensor element not heating. Contact a qualifi ed service representative. (Generates 172 code) Flow sensor temperature sensor failure. -
Page 47: Temperature Conversion
Page 47 Nature Fusion Soft Installation and Operation Manual 2® Section 8. Temperature Conversion To display Celsius or Fahrenheit on the digital display. Pool Temp. -Boost- 1. Press and hold button for 15 seconds Pool Temp. - Boost - (third beep). Salinity 2. -
Page 48: Nature 2 Fusion Soft And Purelink Exploded Views And Replacement Kits
Page 48 Nature Fusion Soft Installation and Operation Manual 2® Section 9. Nature Fusion Soft and PureLink Exploded Views and Replacement Kits Nature FUSIONM and PureLink Control/Power Pack Replacement Parts Dwg.# Kit # Description Qty. Dwg.# Kit # Description Qty. R0467400 User Interface Board R0447500 Wiring Harness, PureLink Back Screws... -
Page 49: Figure 20B. Aqualink ® Rs Purelink Tm Power Center, 6614Ap
Page 49 Nature Fusion Soft Installation and Operation Manual 2® 4, 6 2, 3 Figure 20b. AquaLink RS PureLink Power Center, 6614AP ® 4, 6 2, 3 Figure 20c. AquaLink RS PureLink Power Center, 6613AP... -
Page 50: Nature 2 Fusion Soft Replacement Parts
Page 50 Nature Fusion Soft Installation and Operation Manual 2® Nature Fusion Soft Replacement Parts Dwg. # Kit # Description Qty. R0452100 Universal Union/Tailpiece/Plug Includes: Nut, Union Universal 10, 11 O-Ring, #2-231 Tailpiece, 2” X 2 ½” Plug, Port (not shown) W28000 DuoClear ®... - Page 51 Page 51 Nature Fusion Soft Installation and Operation Manual 2® NOTES...
- Page 52 ZODIAC POOL SYSTEMS, INC. 6000 Condor Drive • Moorpark, CA • 93021 Tel: 800-822-7933 • Fax: 877-327-1403 © 2010 Zodiac Pool Systems, Inc. 1003...