
Related Manuals for Philips wearable digital camcorder


Summary of Contents for Philips wearable digital camcorder
-
Page 1: User Manual
| manuale per l'utente användar-handbok wearable digital camcorder | benutzerhandbuch | manual del usuario | manual do usuário... - Page 2 System requirements: Système requise: Systemanforderungen: Requisitos sistema: Systeemvereisten: Requisiti del sistema: Requisitos do sistema: System krav: · Windows 98SE / 2000 / ME / XP...
- Page 3 We hope you enjoy your wearable digital camcorder Please visit www.philips.com/support and enter your product name to view: · FAQ, Frequently Asked Questions · Latest user manuals · Latest computer software downloads · Firmware upgrade files The model and production numbers can be found next to the USB port.
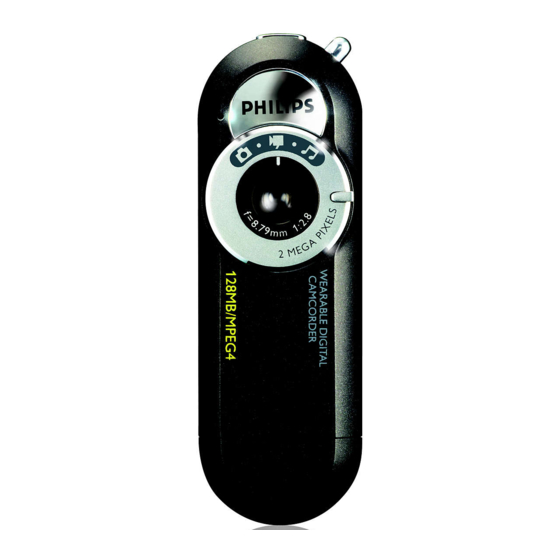
- Page 5 Knowing Your Camcorder Your camcorder is a multi-functional USB device that combines MPEG4 video capture with 2 Megapixel still picture capture. It plays back both video and pictures through its micro display viewfinder. It also plays MP3 audio files. Microphone: records sounds during video capturing...
- Page 6 When your camcorder is charged and the battery module is in use, your camcorder will first use up the power from the external battery. • You can organize and transfer your files while your camcorder is charging.
- Page 7 Powering on for capture modes Turn Mode dial clockwise to power ON and to access different media modes. Your camcorder will show your mode status by displaying these icons (in red) on the Viewfinder / Micro Still picture mode Video mode Powering on for playback modes Connect your remote control (see page 8 for more information).
-
Page 8: Taking Still Pictures
Look through the Viewfinder Keep the camcorder steady and press the picture conditions. For best results, check the status of all indicators on the camcorder when you take a picture. (See page 11 for more information) Press the Shutter fully down to take your pictures. -
Page 9: Capturing Video
Make sure the lens is not obstructed / covered when you capture Look through the Viewfinder Keep the camcorder steady and press the For best results, check the status of all indicators on the camcorder when you capture. (See page 11 for more information) Press the Shutter again to stop capturing. -
Page 11: Remote Control
Remote Control Your remote control allows you to playback all the media files from your camcorder. Headphones connector Volume up + : for increasing volume Volume down : for decreasing volume : next : previous Power 2; : Power on / off and Play / Pause... - Page 12 Visual Media Playback Connect your remote control (see page 8 for more information). Press and hold for 2 seconds to power on. Turn the Mode dial to your desired visual playback mode. (See page 5) Look through the Viewfinder / Micro Display Basic Operation Switch on / off Play media...
- Page 13 Indicators on your camcorder Your camcorder tells you various information by LEDs and beeps: User action Signal USB Connection Double beep Green LED blinks Green LED on Powering on Double beep Capturing Single beep (Battery level) Green LED on Green LED blinks...
- Page 14 Icons and messages on the Micro Display Your camcorder tells you various information via the micro display: Icons on the Micro Display (Capture mode) Battery level Picture capture mode Poor light conditions Saving media file Icons on the Micro Display (Playback mode)
- Page 15 Press [delete] to continue Warning message before deletion. Press [delete] to continue Selected file is deleted No audio track stored on camcorder No picture stored on camcorder No video stored on camcorder Internal formatting. Do not perform any operation. Available space on camcorder...
-
Page 16: Music Playback
Music playback Connect the remote control (see page 8 for more information). Press and hold for 2 seconds to power on. Turn the Mode dial Connect headphones and enjoy. Basic Operation Switch on / off Play music Pause music Change volume Go to next or previous track Delete track . -
Page 17: Usb Connection
Only format your camcorder with FAT16 and FAT32 file systems. IMPORTANT! KEEP A COPY OF YOUR ORIGINAL FILES! Please keep a copy of the original files transferred to your camcorder. Philips is not responsible for any loss of content if the product becomes damaged or not readable. - Page 18 Internal Formatting Your camcorder has an internal formatting system. This is to ensure that you can always use the capturing function on the go. The internal formatting is activated if you have previ- ously used a wrong format system during USB connection.
-
Page 19: Firmware Upgrades
Connect your camcorder to your computer. Copy the extracted firmware file into the root directory of your camcorder. After file transfer completes, disconnect camcorder safely from your computer by clicking avoid file error. WINDOWS 98SE users: there is no camcorder after file transfer completes. -
Page 20: Troubleshooting
If a fault occurs, first check the points listed. For further help and other troubleshooting tips, please also check out FAQ for your camcorder at www.philips.com/support. If you are unable to find a solution from these hints, consult your dealer or service center. -
Page 21: Safety And Maintenance
To avoid damage or malfunction: • Do not expose to excessive heat caused by heating equipment or direct sunlight. • Do not drop your camcorder or allow objects to fall on it. Strong shocks and vibrations may cause malfunction. • This product is not waterproof: do not allow your camcorder to be submersed in water. -
Page 22: Technical Data
USB 1.1 Casing material magnesium body, plastic USB cover PHILIPS reserves the right to make design and specification changes for product improvement without prior notice. Modifications not authorized by the manufacturer may void users authority to operate this device. All rights reserved. -
Page 23: Environmental Information
English Environmental information We have reduced the packaging to its minimum and made it easy to separate into mono materials: cardboard, PS, PE and PET. Your set consists of material which can be recycled if disassembled by a specialized company. Please observe the local regulations to dispose of packaging, exhausted batteries and old equipment. - Page 24 Notice for the USA Philips KEY019 Note: This equipment has been tested and found to comply with the limits for a Class B digital device, pursuant to part 15 of the FCC Rules.These limits are designed to provide reasonable protection against harmful interference in a residential installation.This...
- Page 25 This set complies with the radio interference requirements of the European Union. Cet appareil est conforme aux normes de la Communauté européenne en matière d’interférences radio. Dieses Gerät entspricht den Funkentstörungsvorschriften der Europäischen Gemeinschaft. Este reproductor cumple las normas para interferencias de radio establecidas por la Comunidad Europea. Dit apparaat voldoet aan de radio-ontstoringseisen van de Europese Unie.
- Page 26 © Koninklijke Philips Electronics N.V. 2004 All rights reserved. www.philips.com Printed in China...