Table of Contents
Advertisement
Quick Links
Advertisement
Table of Contents
Troubleshooting

Related Manuals for Acer CE-6430


Summary of Contents for Acer CE-6430
- Page 1 Acer CE-6430 Service Guide 100% Recycled Paper...
- Page 2 Copyright Copyright 2006 by Acer Incorporated. All rights reserved. No part of this publication may be reproduced, transmitted, transcribed, stored in a retrieval system, or translated into any language or computer language, in any form or by any means, electronic, mechanical, magnetic, optical, chemical, manual or otherwise, without the prior written permission of Acer Incorporated.
- Page 3 Conventions The following conventions are used in this manual Screen messages Denotes actual messages that appear on screen. Gives bits and pieces of additional information Note related to the current topic. Alerts you to any damage that might result from Warning doing or not doing specific actions.
- Page 4 DIFFERENT part number code to those given in the FRU list of this printed Service Guide. You MUST use the list provided by your regional Acer office to order FRU parts for repair and service of customer machines.
-
Page 5: Table Of Contents
Table of Contents Chapter 1: System Introduction Technical Specification ................1 Chapter 2: Firmware Update Upgrading Procedure ................3 Chapter 3: Machine Disassembly and Replacement General Information ................6 Disassembly Procedure ................7 Chapter 4: Troubleshooting Function Test ..................11 Operation Function Troubleshooting ............. -
Page 6: Chapter 1: System Introduction
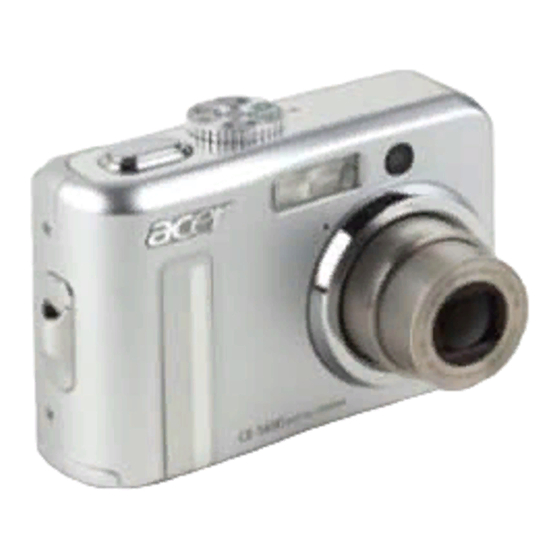
Chapter 1 System Introduction Technical Specification Item Description Image sensor 6.36 Mega pixels CCD sensor <Still image> 2816 x 2112, 2272 x 1704, 1600 x 1200, 640 x 480 Image resolution < Video clip> 320 x 240 LCD monitor 2.36" color TFT LCD Image quality Fine/Normal/Economy Approx. - Page 7 Item Description Exposure compensation -2.0 EV ~ +2.0 EV (in 1/3 EV Increments) Self timer 10 sec, 2 sec, 10+2 sec Auto, 64, 100, 200 Terminal DC input terminal, PC/AV terminal 2 x AA (Alkaline or Ni-MH rechargeable) batteries Power supply AC-DC Power Adapter (3V/2.5A) Dimension (W x H x D) Approx.
-
Page 8: Chapter 2: Firmware Update
Chapter 2 Firmware Upgrade Upgrading Procedure To update this camera firmware, you will need to have 1. The new firmware file. 2. One SD card. 3. One card reader. Please follow the steps below to perform the update process: 1. Prepare a formatted and empty SD card. 2. -
Page 9: Image
5. Press "Shutter" and then Power On the camera. Wait for update process. Image 3 6. Icon as Image 4 will show on LCD during the updating procedure. Image 4 7. “OK” will show on LCD, when update process is finished. Image 5 Reformat the SD card if you want to use it again. -
Page 10: Chapter 3: Machine Disassembly And Replacement
Chapter 3 Machine Disassembly and Replacement This section provides disassembly procedures for CE-6430 DSC. Before you begin any of these procedures, be sure to turn off the power, computer system, and other attached devices; then disconnect the power cable from the electronically outlet. -
Page 11: General Information
General Information Before You Begin Before proceeding with the disassembly procedure, make sure that you do the following: 1. Turn off the power to the system and all peripherals. 2. Unplug the AC adapter, all power and signal cables from the system. 3. -
Page 12: Disassembly Procedure
Disassembly Procedure Please follow the steps below to perform the disassemble procedure: 1. Remove all the screws at the camera housing. Tools needed: Screwdriver Image 1 2. Remove the back cover after plug off the FPC connection from MCU board. Tools needed: Tweezers Image 2 3. - Page 13 4. Remove two screws from back cover to remove LCD panel and Switch Board. Tools needed: Screw drivers, Tweezers Image 4 5. Remove screw in red circle to remove the IO board. Tools needed: Tweezers, Screwdriver Image 5 Chapter 3...
- Page 14 Remove the screws (marked in Red), FPC connection (marked in Purple), and joints (marked in Blue) to remove the MCU board. Remove MCU Board from the camera. Notice there are two joints at the backside of MCU board. Desolder the joints to remove MCU board. (Image 7) Tools needed: Tweezers, Soldering Iron, Screwdriver Image 6 Image 7...
-
Page 15: Chapter 4: Troubleshooting
Chapter 4 Troubleshooting This chapter provides technicians and people who have an electronic background a primary description about maintaining the product. Moreover, you can get the appropriate operation to solve some complicated problems of component repairing and professional problems. The troubleshooting section focuses on below items: Function test Operation Function Troubleshooting Chapter 4... -
Page 16: Function Test
Function Test TOOLS / EQUIPMENT SD card*2, TV, AC adapter, lens-wiping paper, speaker Static electricity preventing gloves, flowers, accessory, computer Operation Description Item Operation Description Remark Part 1 Insert the battery from the positive side, SD card and power on, check if the shutter opens wholly, enter into the capture mode, LCD displays the correct memory in accordance with the actual one. - Page 17 Item Operation Description Remark Press S1 to focus to vicinity (about 1.0m) and far (about 2.5m) in T mode, confirm if can focus ok, that is the focus frame displays green, that the focus frame displaying red is NG. Select SETUP mode, select LCD BRIGHTNESS and press OK button to enter into LCD brightness adjustment menu, press left-right button to adjust LCD brightness to confirm if LCD brightness is changing regularly.
- Page 18 Select the SETUP mode, choose the biggest sound of button pressing, and confirm the BEEP sound. Enter into FORMAT menu, conduct the Format action, reset the camera’s system and reset the number, confirm if the language and format are correct (set to be correct when they are wrong).
-
Page 19: Operation Function Troubleshooting
Operation Function Troubleshooting Item NG point NG Analyzing solution Charging Fail to charge 1. Check the F/W version, update F/W again; 2. Check if the signal of STROBE_CHG on MCU board has Triggering been output; system 3. Check if U1, T1, Q4 and big capacitor of FLASH/B are 4. - Page 20 Item NG point NG Analyzing solution Aperture not 1. Check if the lens unit, power U802 +5.0V and +3.3V moving are ok; 2. Check F/W version and update F/W again; 3. Confirm the output control signal of MCU board is normal 4.
- Page 21 Item NG point NG Analyzing solution Display and TFT-LCD white 1. Check the +15.0V and –8V of power suppliers, CCD Image image parts are normal, LCD power suppliers +12V and system 3.3VD are normal; 2. Check if the connection between LCD and MCU board is ok;...
- Page 22 Display and Noise when 1>. Check the F/W version, update F/W again; Image playback the 2>. Playback the record to confirm if it is ok, in order system record/ no sound to eliminate the speaker circuit’s issue; 3>. Check if the Microphone unit is ok and connects well;...
-
Page 23: Chapter 5: Fru (Field Replaceable Unit) List
FRU (Field Replaceable Unit) List This chapter gives you FRU (Field Replaceable Unit) listing in global configuration of CE-6430. Refer to this chapter whenever ordering for parts to repair or for RMA (Return Merchandise Authorization). Please note that WHEN ORDERING FRU PARTS, you should check the most up-to-date information available on your regional web or channel. -
Page 24: Fru List
FRU List Photo Part Name Front Cover ASY 9FD44-4200 9FD44-4400 (LCD, Rear Cover ASY SWITCH Board Included) LTPS-LCD 02092-0027-00 MCU PCB ASY 9W347-0100 Switch Board ASY 9W447-3100 IO Board ASY 9W447-6100 Battery Cover 9FD34-4600-99 Chapter 5... -
Page 25: Exploded Overview
Exploded Overview Chapter 5...